Showing posts with label opensource. Show all posts

Friday, August 31, 2018

How TO Install Docker On Ubuntu 18.04/16.04

How To Install Docker In Ubuntu Linux 14.04, 16.04 And 18.04


I'm going to show you how to install and run Docker in Ubuntu Linux

First update source-list

sudo apt update

Install required dependencies..

sudo apt install apt-transport-https ca-certificates curl software-properties-common

Then.. Add docker's official GPG key with following command..

curl -fsSL https://download.docker.com/linux/ubuntu/gpg | sudo apt-key add -

The above commands output will looks like..

shivaraj@shivaraj-Aspire-A315-21:~$ curl -fsSL https://download.docker.com/linux/ubuntu/gpg | sudo apt-key add - OK shivaraj@shivaraj-Aspire-A315-21:~$

Now add Docker Community Edition's repository to list..

sudo add-apt-repository "deb [arch=amd64] https://download.docker.com/linux/ubuntu $(lsb_release -cs) stable"
shivaraj@shivaraj-Aspire-A315-21:~$ sudo add-apt-repository "deb [arch=amd64] https://download.docker.com/linux/ubuntu $(lsb_release -cs) stable" Ign:1 http://dl.google.com/linux/chrome/deb stable InRelease Hit:2 http://packages.microsoft.com/repos/vscode stable InRelease Ign:3 https://repo.mongodb.org/apt/ubuntu bionic/mongodb-org/4.0 InRelease Get:4 https://download.docker.com/linux/ubuntu bionic InRelease [64.4 kB] Hit:5 http://dl.google.com/linux/chrome/deb stable Release Hit:6 http://in.archive.ubuntu.com/ubuntu bionic InRelease Hit:7 https://deb.opera.com/opera-stable stable InRelease Get:8 http://security.ubuntu.com/ubuntu bionic-security InRelease [83.2 kB] Get:9 http://in.archive.ubuntu.com/ubuntu bionic-updates InRelease [88.7 kB] Hit:10 http://archive.canonical.com/ubuntu bionic InRelease Hit:11 http://linux.teamviewer.com/deb stable InRelease Hit:12 http://linux.teamviewer.com/deb preview InRelease Hit:13 https://repo.mongodb.org/apt/ubuntu bionic/mongodb-org/4.0 Release Hit:15 https://repo.skype.com/deb stable InRelease Get:16 http://in.archive.ubuntu.com/ubuntu bionic-backports InRelease [74.6 kB] Get:17 https://download.docker.com/linux/ubuntu bionic/stable amd64 Packages [1,708 B] Hit:18 https://download.sublimetext.com apt/stable/ InRelease Fetched 313 kB in 2s (128 kB/s) Reading package lists... Done shivaraj@shivaraj-Aspire-A315-21:~$

Now update the package index once again..

sudo apt update

Now Install the docker..

sudo apt install docker-ce
shivaraj@shivaraj-Aspire-A315-21:~$ sudo apt install docker-ce Reading package lists... Done Building dependency tree Reading state information... Done The following additional packages will be installed: aufs-tools cgroupfs-mount pigz The following NEW packages will be installed: aufs-tools cgroupfs-mount docker-ce pigz 0 upgraded, 4 newly installed, 0 to remove and 0 not upgraded. Need to get 40.4 MB of archives. After this operation, 198 MB of additional disk space will be used. Do you want to continue? [Y/n] y Get:1 https://download.docker.com/linux/ubuntu bionic/stable amd64 docker-ce amd64 18.06.1~ce~3-0~ubuntu [40.2 MB] Get:2 http://in.archive.ubuntu.com/ubuntu bionic/universe amd64 pigz amd64 2.4-1 [57.4 kB] Get:3 http://in.archive.ubuntu.com/ubuntu bionic/universe amd64 aufs-tools amd64 1:4.9+20170918-1ubuntu1 [104 kB] Get:4 http://in.archive.ubuntu.com/ubuntu bionic/universe amd64 cgroupfs-mount all 1.4 [6,320 B] Fetched 40.4 MB in 12s (3,510 kB/s) Selecting previously unselected package pigz. (Reading database ... 273749 files and directories currently installed.) Preparing to unpack .../archives/pigz_2.4-1_amd64.deb ... Unpacking pigz (2.4-1) ... Selecting previously unselected package aufs-tools. Preparing to unpack .../aufs-tools_1%3a4.9+20170918-1ubuntu1_amd64.deb ... Unpacking aufs-tools (1:4.9+20170918-1ubuntu1) ... Selecting previously unselected package cgroupfs-mount. Preparing to unpack .../cgroupfs-mount_1.4_all.deb ... Unpacking cgroupfs-mount (1.4) ... Selecting previously unselected package docker-ce. Preparing to unpack .../docker-ce_18.06.1~ce~3-0~ubuntu_amd64.deb ... Unpacking docker-ce (18.06.1~ce~3-0~ubuntu) ... Setting up aufs-tools (1:4.9+20170918-1ubuntu1) ... Setting up docker-ce (18.06.1~ce~3-0~ubuntu) ... Created symlink /etc/systemd/system/multi-user.target.wants/docker.service → /lib/systemd/system/docker.service. Created symlink /etc/systemd/system/sockets.target.wants/docker.socket → /lib/systemd/system/docker.socket. Processing triggers for ureadahead (0.100.0-20) ... ureadahead will be reprofiled on next reboot Setting up cgroupfs-mount (1.4) ... Processing triggers for libc-bin (2.27-3ubuntu1) ... Processing triggers for systemd (237-3ubuntu10.3) ... Processing triggers for man-db (2.8.3-2) ... Setting up pigz (2.4-1) ... Processing triggers for ureadahead (0.100.0-20) ... shivaraj@shivaraj-Aspire-A315-21:~$

The Docker daemon starts automatically.

Verify the installation.. with the following command...

sudo docker run hello-world
shivaraj@shivaraj-Aspire-A315-21:~$ sudo docker run hello-world Unable to find image 'hello-world:latest' locally latest: Pulling from library/hello-world 9db2ca6ccae0: Pull complete Digest: sha256:4b8ff392a12ed9ea17784bd3c9a8b1fa3299cac44aca35a85c90c5e3c7afacdc Status: Downloaded newer image for hello-world:latest Hello from Docker! This message shows that your installation appears to be working correctly. To generate this message, Docker took the following steps: 1. The Docker client contacted the Docker daemon. 2. The Docker daemon pulled the "hello-world" image from the Docker Hub. (amd64) 3. The Docker daemon created a new container from that image which runs the executable that produces the output you are currently reading. 4. The Docker daemon streamed that output to the Docker client, which sent it to your terminal. To try something more ambitious, you can run an Ubuntu container with: $ docker run -it ubuntu bash Share images, automate workflows, and more with a free Docker ID: https://hub.docker.com/ For more examples and ideas, visit: https://docs.docker.com/engine/userguide/ shivaraj@shivaraj-Aspire-A315-21:~$

Here is the video version of above tutorial..

That's it for now.. If you like.. don't forget to share it guys.. You can follow us on fb.com/opensourceinside and also subscribe our channel on Youtube..


Sunday, February 4, 2018

Installing Firefox Beta On Ubuntu

Installing Firefox Beta On Ubuntu

Mozilla Firefox is one of the popular free and open-source web browser developed by Mozilla Foundation and its subsidiary, Mozilla Corporation. Firefox is available for Windows, macOS and Linux operating systems. Its sibling, Firefox for Android, is available for Android. Firefox uses the Gecko layout engine to render web pages, which implements current and anticipated web standards.

Firefox Beta channel will provide early access to features that are going to be available in next immediate stable release... If you want to enjoy the features before anyone... Here I'm going to show you how to install Firefox Beta in Ubuntu.

Mozilla maintaining official Firefox Beta ppa for Ubuntu... We can use it to install Beta Version Of Firefox in Ubuntu.. Just run the below lines to add PPA.

sudo add-apt-repository ppa:mozillateam/firefox-next sudo apt-get update

Now you can run

sudo apt-get install firefox

Or

sudo apt-get upgrade

to install Firefox Beta...

Warning : Since Firefox's this PPA provides a beta Firefox version, you may find bugs. If you do, kindly report them at https://bugs.launchpad.net/~mozillateam

That's all for now... You can enjoy new features of Firefox... Happy Browsing...


Friday, September 16, 2016

Installing phpMyAdmin in Ubuntu 16.04

Installing phpMyAdmin in Ubuntu 16.04


phpMyAdmin is an open source tool used for the administration/management of MySQL or MariaDB with the use of a web browser. In addition to offering the capability to perform administration tasks such as creating, editing, or deleting databases, and managing users and permissions, phpMyAdmin provides a graphical user interface to do all of these tasks and more. Here, we are going to see how to install, up and run phpMyAdmin on Ubuntu 16.04.

Install phpMyAdmin

Before you start installing phpmyadmin, install PHP, apache and MySql or similar Db..

Then.. Run following command .. to install phpMyadmin on your Ubuntu installation...

sudo apt -y update && sudo apt install phpmyadmin

Continue with typing Y once the installation prompts you with Do you want to continue [Y/n]? Like in the image below.


Now we are prompted with dialog selecting our web server, in our case we are selecting apache2 like shown below.


Select <Yes> as we just want a basic installation like shown below.


Now provide a password for phpMyAdmin to use. So that it can register with the MySQL database itself. (Need not to be the same as the MySQL root user)


Enter in the phpMyAdmin password you created in last step to confirm it as follows.


phpMyAdmin is now installed, but, still we have a few more things to do.

Testing phpMyAdmin

Now we will test phpMyAdmin! Open your favorite Web Browser..
and Navigate to http://localhost/phpmyadmin/

If you end up with a page that looks like one shown below... means, phpMyadmin was installed successfully on your system..


Now lets login, the default username for phpMyAdmin is root and the password is what you have entered while installing phpMyadmin... Enter as follows.

Username: root

Password: What you selected earlier

Select Go to login.

When you log in, you'll see the user interface, which will look something like this:


Hi friends, If you found any issue or typo error, please feel free to report it.. You can report it on our Facebook Page via message (www.fb.com/opensourceinside) .

Wednesday, August 31, 2016

Installing ElasticSearch On ubuntu 16.04 and 14.04

Installing ElasticSearch On ubuntu 16.04 and 14.04


Updated On DEC 2016: Installation Script In Method 2 updated for installation of elastic search 5.x

Elasticsearch is a highly scalable open-source full-text search and analytics engine build on top of Apache Lucene(A free and open-source information retrieval software library). It allows you to store, search, and analyze big volumes of data quickly and in near real time. It is generally used as the underlying engine/technology that powers applications that have complex search features and requirements.

Here we are going to see, How to install and setup elasticsearch on Ubuntu Linux 16.04 and 14.04..
Here I am going to show you two ways to install elasticsearch on Ubuntu Linux..

The first one is manual installation of elasticsearch.. You have to follow instructions one by one ..
The second one is an easy way, there we use shell-script to install the elasticsearch as it would take care of all things.. The script will install and setup elasticsearch for you..

Installation :

Method 1 :

First things first, Before we start to install elasticsearch, we need to install Java Runtime Environment (JRE).. because Elasticsearch itself written in the Java. (Elasticsearch requires Java 7 or higher).
This step shows you how to install OpenJDK-8.
First, update the list of available packages by running apt-get update.

sudo apt-get update

Then, install OpenJDK with the command:

For Ubuntu 16.04 :

sudo apt-get -y install openjdk-8-jdk openjdk-8-jre

For Ubuntu 14.04 :

sudo add-apt-repository -y ppa:openjdk-r/ppa && sudo apt-get update && sudo apt-get -y install openjdk-8-jdk openjdk-8-jre

To verify your JRE is installed and can be used, run the command: java -version

The result should look like this:

openjdk version "1.8.0_91" OpenJDK Runtime Environment (build 1.8.0_91-8u91-b14-3ubuntu1~16.04.1-b14) OpenJDK 64-Bit Server VM (build 25.91-b14, mixed mode)
If You Have Already Installed Version of JAVA in Your System.. Please Set OpenJDK 8 as Default Version.. Otherwise you may encounter problems while starting elasticsearch.. You can configure multiple versions of java by running following command.. sudo update-alternatives --config java Now, select apropriate version of JAVA..
to verify the java version run.. java -version

Download and Install Elasticsearch :

Elasticsearch can be downloaded directly from official site as zip, tar.gz and deb

I will recommend.. Installing from zip or tar archive.. Because as far as I knew it is the best way to get Elasticsearch on Ubuntu ... from my experience the another way (installing from .deb) is very worst... has many nasty issues(tried on Ubuntu 16.04)..

Download the archive

cd && wget https://download.elastic.co/elasticsearch/release/org/elasticsearch/distribution/zip/elasticsearch/2.3.5/elasticsearch-2.3.5.zip

The above command downloads the zip archive, make sure that you have unzip installed in your system... if don't have installed unzip in your system.. run the following command.. to install unzip

sudo apt-get install unzip

Now unzip/decompress the downloaded archive.. you can do this with command given below..

unzip elasticsearch-2.3.5.zip

Move Extracted/unzipped directory to /opt :

We don't want to pollute our home folder and make it ugly with too many folders apart from default one.. and moving elasticsearch to /opt directory will also make it available to other users in your system too..

If you already have directory named elasticsearch-* in your /opt directory you will/may encounter problems while trying to move our newly extracted folder into /opt . so better remove them before you move our new elasticsearch folder into /opt. to do this run following command.... sudo rm -r /opt/elasticsearch-2*

Now move newly extracted elasticsearch directory to /opt with following command..

sudo mv elasticsearch-2.3.5/ /opt/

Now your elasticsearch is ready to use, You can run it with following command..

/opt/elasticsearch-2.3.5/bin/elasticsearch

But it's so convenient, if we can able to start it from commandline.. by simply typing 'elasticsearch' .. just like normal system commands.. to do so.. we have to create a symbolic link for elasticsearch in /bin folder.. Run following commands....

First remove symbolic link if one already exists..

sudo rm /bin/elasticsearch

now.. create new symbolic link ...

sudo ln -s /opt/elasticsearch-2.3.5/bin/elasticsearch /bin/

That's it .. now you can start elasticsearch just by typing "elasticsearch" in your terminal window..

Now the other method (method 2) show you the easiest way of getting elasticsearch up and running on your Ubuntu installation..

Method 2 :

In this method ... You just need to run the following code ... the script will take care of remaining things..

wget -O - https://raw.githubusercontent.com/shivarajnaidu/UV-Shell-Scripts/master/ElasticSearch-Installation-Scripts/elasticsearch-installation-script-for-ubuntu.sh | bash -s

Update :

The installation script is updated to support installation of elasticsearch v5.x. If you want to install elasticsearch 5.x, just run above command with argument '5' (with out quotes).

wget -O - https://raw.githubusercontent.com/shivarajnaidu/UV-Shell-Scripts/master/ElasticSearch-Installation-Scripts/elasticsearch-installation-script-for-ubuntu.sh | bash -s 5

Test your Elasticsearch installation

Start elasticsearch by typing "elasticsearch" on your command-line..
Let's ensure that everything is working well... open terminal and Run following..

elasticsearch
Elasticsearch should now be running on port 9200. Do note that Elasticsearch takes some time to fully start, so running the curl command below or checking from browser immediately might fail. It shouldn't take longer than ten seconds to start responding, so if the below command fails, something else is likely wrong. Ensure the server is started by running

To test elasticsearch run following command in terminal..

curl -X GET 'http://localhost:9200'

or even you can check from your web browser by visiting http://localhost:9200

if elasticsearch works well.. You should see the following response..

shivaraj@shivaraj-A14RM0E:~$ curl -X GET 'http://localhost:9200' { "name" : "Suicide", "cluster_name" : "elasticsearch", "version" : { "number" : "2.3.5", "build_hash" : "90f439ff60a3c0f497f91663701e64ccd01edbb4", "build_timestamp" : "2016-07-27T10:36:52Z", "build_snapshot" : false, "lucene_version" : "5.5.0" }, "tagline" : "You Know, for Search" } shivaraj@shivaraj-A14RM0E:~$
Hi friends, If you found any issue or typo error, please feel free to report it.. You can either open an issue on github or you can also report it on our Facebook Page via message (www.fb.com/opensourceinside) .

Saturday, June 4, 2016

Corebird : A Modern, Native Gtk+ Twitter client for the Linux desktop

Corebird
Native Gtk+ Twitter client for the Linux desktop

Corebird is a modern, easy-to-use and opensource Native Gtk+ Twitter client for Linux which provides support for almost all twitter features, including lists, favourites, direct messages and of course tweeting.

Install Corebird on Ubuntu :

The easiest way of installing corebird on Ubuntu is adding a PPA from ubuntuhandbook1.

sudo add-apt-repository -y ppa:ubuntuhandbook1/corebird && sudo apt-get update && sudo apt-get install corebird && sudo apt-get -f install

Install Corebird on Fedora

Note that Corebird uses relatively new Gnome technologies.. so it only works Fedora 20 and Later..

For Fedora 22 and later:

sudo dnf install corebird

For Fedora 21 and older releases:

sudo yum install corebird

Shortcuts :

Here's the some useful shortcuts for Corebird app..

KeyDescription
Ctrl + tCompose Tweet
BackGo one page back (this can be triggered via the back button on the keyboard, the back thumb button on the mouse or Alt + Left)
ForwardGo one page forward (this can be triggered via the forward button on the keyboard, the forward thumb button on the mouse or Alt + Right)
Alt + numGo to page num (between 1 and 7 at the moment)
Ctrl + Shift + sShow/Hide sidebar
Ctrl + pShow account settings
Ctrl + kShow account list
Ctrl + Shift + pShow application settings

Tuesday, April 19, 2016

Some Important Things To Do After Installing Ubuntu Linux On Your System
Some Important Things To Do After Installing Ubuntu Linux On Your System


Ubuntu Linux is one of the popular and most used Linux operating system backed by Canonical.

Requirements vary from person to person, depending upon whether the person is experienced Ubuntu user, a novice user, an artist or a programmer, but most of the things listed here are essential after a clean install of Ubuntu. Without wasting time anymore, let's have a look at must to do things after installing Ubuntu on your system.

1 . Change software sources and update your system:

First and foremost thing to do after installing Ubuntu is to change the software sources and add Canonical Partners in it. This will increase the number of applications and programs in your repository and you can easily install them via Software Center or command line.

Open Unity Dash (press Super/Windows key) and search for Software & Updates:
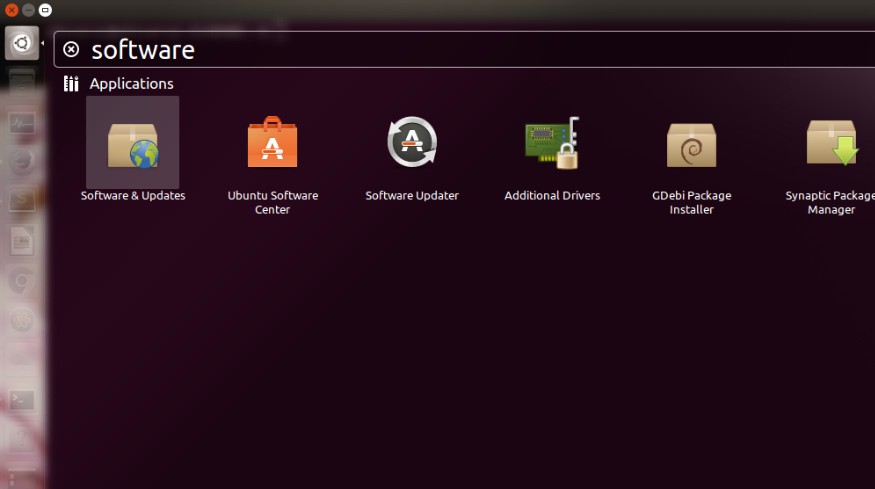
Open it and in Other Software tab, make sure that Canonical Partners is checked.
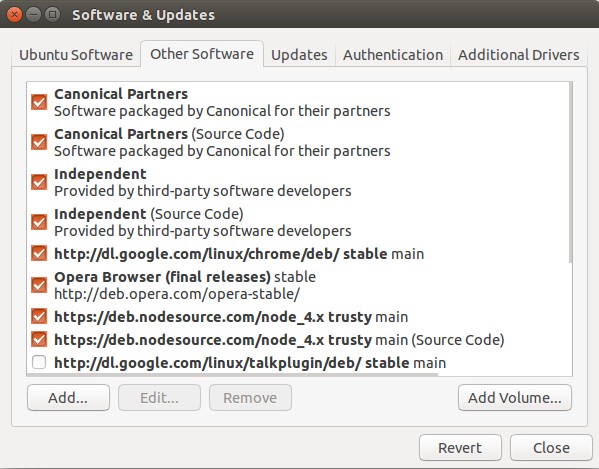
Or simply issue following command ... to do all the above things in single command..

sudo add-apt-repository "deb http://archive.ubuntu.com/ubuntu $(lsb_release -sc) main universe restricted multiverse"

Doing this will update your repository. It takes some time in doing so. Once done, open terminal (Ctrl+Alt+T) and use the following command:

sudo apt-get update && sudo apt-get upgrade

The above command will update your system.

2 . Install Ubuntu Restricted Extras for media codecs:

"Ubuntu restricted extras" is a package of several codecs that are not installed by default in Ubuntu system. The reason why these these codecs are not included by default is legal constraints in many countries. Canonical cannot include them by default but if you install these codecs, it is you who would be held responsible for the usage and not Ubuntu. Don't worry it's safe to install these codecs. With these codecs installed, you can play different media formats such as MP3, MP4, AVI and several other formats without any trouble. Install it using the following command:

sudo apt-get install ubuntu-restricted-extras

3 . Install VLC media player:

Let me confess, I cannot imagine using my personal computer without VLC media player. It's the best out there. It can download subtitles automatically, you can manually synchronize the subs, you can watch online videos with subtitles with VLC and now you can enable desktop notification for VLC in Ubuntu. Use the following command to install VLC:

sudo apt-get install vlc

4 . Play encrypted DVD in Ubuntu :

Enable encrypted DVD playback in Ubuntu using the following commands:

sudo apt-get install libdvdread4 && sudo /usr/share/doc/libdvdread4/install-css.sh

5 . Install rar ,unrar and 7zip:

To avoid error like "There is no command installed for RAR archive files" or "There is an error occured while opening RAR archive files" install RAR and 7zip using the following command:

sudo apt-get install rar unrar p7zip

6 . Improve battery life and reduce overheating:

Overheating of laptops is a common issue, not only in Ubuntu but in any operating systems. Overheating also affects the battery life. Until Ubuntu 12.10, Jupiter was the best tool to reduce overheating, but since its development has stopped, you can use TLP or CPUFREQ instead of Jupiter. Install TLP using the following command:

sudo add-apt-repository -y ppa:linrunner/tlp && sudo apt-get update && sudo apt-get install tlp tlp-rdw && sudo tlp start

7 . Tweak Unity and Gnome:

Not satisfied with the default looks of Ubuntu? You can always tweak it. Ubuntu System Settings gives you plenty of option for tweaking, Unity Tweak Tool and Gnome Tweak Tool (for Gnome users) are excellent tools to tweak the appearance to any extent.

sudo apt-get install unity-tweak-tool gnome-tweak-tool

8 . Install Google Chrome

Google Chrome is not only one of the more popular, fastest, and most reliable browsers available, but it also includes a pre-packed and fully patched version of Adobe Flash and a huge array of extensions and apps.

If Your using 64 bit OS :

wget https://dl.google.com/linux/direct/google-chrome-stable_current_amd64.deb && sudo dpkg -i google-chrome-stable_current_amd64.deb && sudo apt-get -f install

If your using 32 bit :

wget https://dl.google.com/linux/direct/google-chrome-stable_current_i386.deb && sudo dpkg -i google-chrome-stable_current_i386.deb && sudo apt-get -f install

9 . Install Sublime Text & Atom Text Editor:

Sublime Text is a cross-platform text editor with a Python application programming interface (API). It natively supports many programming languages and markup languages, and its functionality can be extended by users with plugins, typically community-built and maintained under free-software licenses

Installation :

See How to install latest version of sublime text 3 in Ubuntu

And Atom Text Editor is a another nice and feature rich cross platform open source text editor, developed by GitHub. Atom is a desktop application built using web technologies. Atom is based on Electron (formerly known as Atom Shell), a framework that enables cross-platform desktop applications using Chromium and Node.js. It can also be used as an IDE.

Installation :

See , How to install Atom text editor on Ubuntu.

10 . Install Image Applications

If you are a photography enthusiast and you want to handle and manipulate images on Ubuntu, probably you want to install the following imaging programs:

  1. GIMP (alternative for Adobe Photoshop)
  2. Darktable
  3. Rawtherapee
  4. Pinta
  5. Shotwell
  6. Inkscape (alternative for Adobe Illustrator)
  7. Digikam

This applications can be installed from Software Center or all at once by using the following command line on Terminal:

sudo apt-get install gimp gimp-plugin-registry gimp-data-extras darktable rawtherapee pinta shotwell inkscape

11 . Install Brasero(Disk Burning Program) :

Brasero - the default disk burning app is removed as the default app in Ubuntu 16.04 Xenial Xerus. The application is in very slow development and Ubuntu developers decided to remove it from the default installer image. Also who burns disks these days? However, even if it has been removed, you can still install it using GNOME software or using terminal.

sudo apt-get install brasero

12 . Install Cheese

Cheese uses your webcam to take photos and videos, applies fancy special effects and lets you share the fun with others. To install cheese on your Ubuntu desktop, enter the following command:

sudo apt-get install cheese
Note :From the release of Ubuntu 16.04 Cheese is the part of default installation.. No need to install it separately.

13 . Install Wine

Wine enables Linux, Mac, FreeBSD, and Solaris users to run Windows applications without a copy of Microsoft Windows. Wine is free software under constant development. Other platforms may benefit as well.

sudo apt-get install wine

14 . Install Samba File sharing

In order to share folders in Ubuntu with other Linux and windows machines in your network, you will need to install and configure Samba share, for instructions see how to configure Samba in Ubuntu..

sudo apt-get install samba samba-common samba-common-bin samba-vfs-modules

15 . Install Dropbox

Dropbox is a free service that lets you bring all your photos, docs, and videos anywhere. This means that any file you save to your Dropbox will automatically save to all your computers, phones and even to the Dropbox website.

Installation :

sudo apt-get install nautilus-dropbox

For dropbox configuration instructions ... see here..

16 . Install TypeCatcher

TypeCatcher is an Open Source application developed by Andrew Starr-Bochicchio. It allows you to easily download and install Google webfonts for off-line use.

sudo apt-get install typecatcher

17 . Install WinUSB

WinUSB is simple, open source graphical tool to create Windows installer bootable USB disks using ISO images, or real CD/DVD installer disks in Ubuntu and it's derivatives. Using WinUSB, we can create startup disks for Windows Vista, 7, 8, and Windows PE.

Installation

For Installation Instructions ... see here..

18 . Install UNetbootin

UNetbootin (Universal Netboot Installer) is a cross-platform utility that can create live USB systems and can load a variety of system utilities or install various Linux distributions and other operating systems without a CD.

Installation

sudo add-apt-repository -y ppa:gezakovacs/ppa && sudo apt-get update && sudo apt-get install unetbootin

19 . Install OpenTeacher

OpenTeacher is an opensource application that helps you learn a foreign language vocabulary. Just enter some answers and questions in your native and foreign language or download them from internet, and OpenTeacher will test and let you know your vocabulary test result.

Download OpenTeacher from here..

Installation

  1. Download the Ubuntu .deb file from the Download section of this website.
  2. When the download has completed, doubleclick the .deb file you just downloaded. This will open the Software Center.
  3. Click "install" to start the installation.
  4. When the installation has finished, you can start OpenTeacher from Unity Dash by typing Openteacher

20 . Install Systemback

Systemback is an open source, system backup and restore application. Using Systemback, we can easily create backups of system and users configuration files. In case of problems, we can easily restore the previous state of the system. There are extra features like system copying, system installation and Live system creation.

Installation :

sudo add-apt-repository ppa:nemh/systemback && sudo apt-get update
sudo apt-get install systemback

Next Page (part 2)

Don't Forget To Share It With Your Friends..!!
Share Your With Linux and Opensource

Monday, April 11, 2016

Ubuntu is everywhere - Infographic

Ubuntu Is Everywhere - Infographic


This infographic shows the reach of Ubuntu from International Space Station to your laptop

This is according to Canonical, which is celebrating the upcoming Ubuntu 16.04 LTS release

Ubuntu is a Debian-based Linux operating system and distribution for personal computers, smartphones and network servers. It uses Unity as its default user interface. It is based on free software and named after the Southern African philosophy of ubuntu (literally, “human-ness”), which often is translated as “humanity towards others” or “the belief in a universal bond of sharing that connects all humanity”.

The popularity of Ubuntu is such that it is used on International space station and is behind the world’s largest supercomputer. It runs the servers of popular online services like Netflix, Snapchat, Pinterest, Reddit, Dropbox, PayPal, Wikipedia, and Instagram, in Google, Tesla, George Hotz, and Uber cars. It is also employed at Bloomberg, Weta Digital and Walmart.The Brigham Young University is using Ubuntu to control the Mars Rover.

To celebrate the forthcoming Ubuntu 16.04 LTS (Xenial Xerus) operating system, due for release later this month, on April 21, Canonical took the time to put together a very nice infographic, showing the world how popular Ubuntu is across the world.

“To celebrate our upcoming 16.04 LTS we wanted to shine a bit of light on how many people in the world actually use Ubuntu,” said Alexia Emmanoulopoulou, Demand Generation Marketing Manager, Canonical. “The reality is, hundreds of millions of PCs, servers, devices, virtual machines, and containers have booted Ubuntu to date and are in use!”


Saturday, April 9, 2016

Test Drive Linux With Nothing But A Flash Drive

Test Drive Linux With Nothing But A Flash Drive


Maybe you've heard about Linux and are intrigued by it. So intrigued that you want to give it a try. But you might not know where to begin.

You've probably done a bit of research online and have run across terms like dual booting and virtualization. Those terms might mean nothing to you, and you're definitely not ready to sacrifice the operating system that you're currently using to give Linux a try. So what can you do ?

If you have a USB flash drive lying around, you can test drive Linux by creating a live USB. It's a USB flash drive that contains an operating system that can start from the flash drive. It doesn't take much technical ability to create one. Let's take a look at how to do that and how to run Linux using a live USB.

What you'll need

Aside from a desktop or laptop computer, you'll need:
  • A blank USB flash drive - preferably one that has a capacity of 4 GB or more.
  • An ISO image (an archive of the contents of a hard disk) of the Linux distribution that you want to try. More about this in a moment.
  • An application called Unetbootin, an open source tool, cross platform tool that creates a live USB. You don't need to be running Linux to use it.

Now See...

How To Create Live USB(bootable USB) using Unetbootin : #

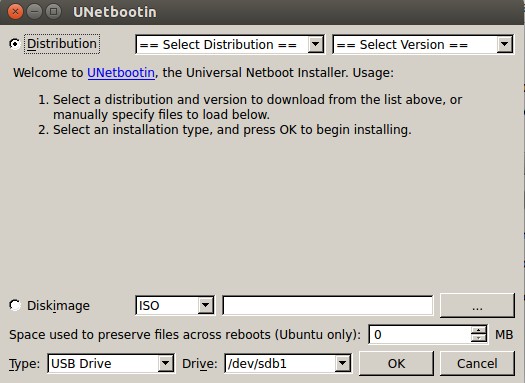
Plug your flash drive into a USB port on your computer and then fire up Unetbootin.

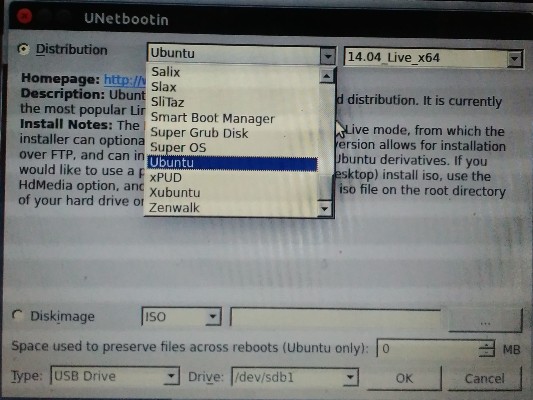
Remember the ISO image that was mentioned a few moments ago? There are two ways you can get one: either by downloading it from the website of the Linux distribution that you want to try, or by having Unetbootin download it for you. To do that latter, click Select Distribution at the top of the window, choose the distribution that you want to download, and then click Select Version to select the version of the distribution that you want to try.

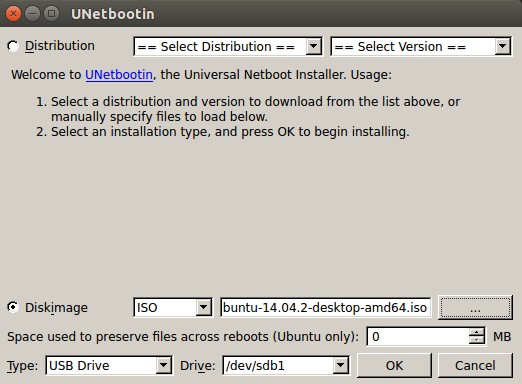
Or , you can download the distribution yourself. Usually, the Linux distributions that I want to try aren't in the list. If you go the second route, click Disk image and then click the button to search for the .iso file that you downloaded.


Notice the Space used to preserve files across reboots (Ubuntu only) option? If you're testing Ubuntu or one of its derivatives (like Lubuntu or Xubuntu), you can set aside a few megabytes of space on your flash drive to save files like web browser bookmarks or documents that you create. When you load Ubuntu from the flash drive again, you can reuse those files.

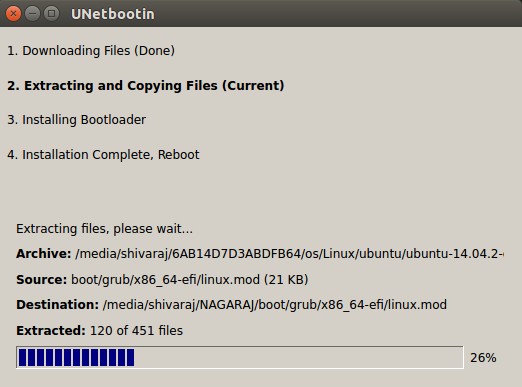
Once the ISO image is loaded, click OK. It takes anywhere from a couple of minutes to 10 minutes for Unetbootin to create the live USB.


Testing out the live USB

This is the point where you have to embrace your inner geek a bit. Not too much, but you will be taking a peek into the innards of your computer by going into the BIOS. Your computer's BIOS starts various bits of hardware and controls where the computer's operating system starts, or boots, from.

The BIOS usually looks for the operating system in this order (or something like it): hard drive, then CD-ROM or DVD drive, and then an external drive. You'll want to change that order so that the external drive (in this case, your live USB) is the one that the BIOS checks first.

To do that, restart your computer with the flash drive plugged into a USB port. When you see the message Press F2 to enter setup, do just that. On some computers, the key might be F10.

In the BIOS, use the right arrow key on your keyboard to navigate to the Boot menu. You'll see a list of drives on your computer. Use the down arrow key on your keyboard to navigate to the item labeled USB HDD and then move that item to the top of the list.

Once you've done that, press F10 to save the changes. (Note : Keys mentioned in this post for BIOS might be slightly different for computers from different manufacturers . so check out them.) You'll be kicked out of the BIOS and your computer will start up. After a short amount of time, you'll be presented with a menu listing the options for starting the Linux distribution you're trying out. Select Run without installing (or the menu item closest to it).

Once the desktop loads, you can connect to a wireless or wired network, browse the web, and give the pre-installed software a whirl. You can also check to see if, for example, your printer or scanner works with the Linux distribution you're testing. If you really, really want to you can also fiddle at the command line.

What to expect

Depending on the Linux distribution you're testing and the speed of the flash drive you're using, the operating system might take longer to load and it might run a bit slower than it would if it was installed on your hard drive.

As well, you'll only have the basic software that the Linux distribution packs out of the box. You generally get a web browser, a word processor, a text editor, a media player, an image viewer, and a set of utilities. That should be enough to give you a feel for what it's like to use Linux.

If you decide that you like using Linux, you can install it from the flash drive by double clicking on the installer.


source : opensource.com Creative Commons License

Tuesday, March 29, 2016

6 reasons people with disabilities should use Linux

6 reasons people with disabilities should use Linux


6 reasons people with disabilities should use Linux

Often, when issues of accessibility and assistive technology are brought up among people with disabilities, the topics center around the usual issues: How can I afford this device? Is it available for me? Will it meet my needs? How will I receive support?
Open source solutions, including any Linux-based operating system, are rarely, if ever, considered. The problem isn't with the solution; instead, it is a result of lack of information and awareness of FOSS and GNU/Linux in the disability community, and even among people in general. Here are six solid reasons people with disabilities should consider using Linux:

Customization and modification

Assistive technology has come a long way from its not-so-distant past; however, proprietary devices are limited in their ability to conform and adapt to their users. Few mainstream solutions are available, and even fewer are unlocked, able to be modified at the lower levels. Being able to take existing technology and adapt it to suit one's needs—rather than forcing a person to adapt to the device and/or software—is a strength of open source software and Linux, and is extremely important for those who rely on a device to accomplish what others take for granted every day.

A few years ago, for example, I worked on a grant project in my hometown. Part of the project was to loan netbooks to students with disabilities who showed significant leadership potential. One of the students really enjoyed using the netbook's webcam to take pictures; however, the operating system loaded on the device used text, not images, to differentiate between files and folders. Without being able to read the path to the folder where the webcam saved images, they were not able to find them.

After some discussion, I switched out the operating system for Ubuntu Netbook Remix, which had an easy-to-use GUI and, more importantly, an icon set that used symbols to identify what was contained in the folders: a filmstrip for videos, a music note for sound files, a letter for documents, and a square photo (like a Polaroid) for images. That's all it took—a simple change in icons and the barrier that prevented full use was eliminated.

Stability, reliability, and durability

Whether you rely on a text-to-speech program to communicate with others, a device that assists those who are blind in navigation, a speech-to-text application that assists in typing and input, or something else essential to your daily life, the thing you rely on can't be fragile nor easily broken. A stable platform that can survive extended durations of uptime without freezing, locking up, or crashing is a must. The same kernel that's used to power the world's servers is an obvious choice to keep someone's accessible device running when it's needed most.

Compatibility with obsolete or old hardware

Proprietary assistive technology devices—especially when addressing more severe disabilities—often run on older, dated hardware. Even if one is able to obtain a current version of the software they need, that doesn't always mean the hardware they own will be able to run it. Through Linux, however, an aging device can be rejuvenated, and the person with a disability won't have to constantly upgrade their hardware. This reduces cost, both in time to learn and adapt to new hardware and in monetary expense.

Control and full ownership

For future assistive technology devices to be fully accessible, the software and the device in use must be changeable and adapt to the individual, instead of forcing a change in the individual's ability to adapt to an able world. By having access to the code, people with disabilities are able to inspect and ensure that the software they are using is under their control and working for them. This access also reduces problems with privacy and security, which is doubly important when the device one relies upon handles nearly all of your sensitive data. Without ownership and full control, any benefit an assistive technology device provides is constrained and leveraged against the company that produced it, unfulfilling the assumed purpose of its programming. All of us want the hardware and software we paid for to work for us based on our demands and needs, and people with disabilities are no different.

Assistance from a large, international community

Many of us know the pain of trying to obtain assistance for a proprietary device or program, waiting on the phone and getting only limited help. This becomes even worse when trying to solve an issue with an assistive technology device; support is limited, there are often few or no brick-and-mortar retailers that will replace your device, and due to its unique, locked-in configuration, there are few local individuals who can troubleshoot and solve such problems. When you use Linux, the entire Internet is your resource. Forums, IRC/chat rooms, online videos and tutorials, and more options are all available to guide anyone—from the most novice of beginners to experience veterans of the sysadmin world—through nearly any difficulty. One notable advantage here is that when someone posts a question or describes a recent headache on the web, countless other people learn about it, and some of them may be asking the same question.

Fun

The fact is, Linux is fun. The thrill of shaping, molding, and customizing a system to individual needs is profound. Showing others what you've put together is just part of it; showing how you did it and how they can too is an integral part of the open-source community. Who wouldn't want to be included in that?

SOURCE : Opensource.com
Creative Commons License


5 things that every open source project manager should consider

5 things that every open source
project manager should consider


open source

In a 2013 survey, 11% of contributors to free and open source software identified as women. But perhaps the future looks brighter? We can answer this question by examining the participation of women in Google Summer of Code, a program that provides a stipend for post-secondary school students to contribute to open source software for a summer. From 2011 to 2015, the program consisted of about 7-10% female participants. This is an extremely low percentage and does not bode well for the future of diversity in open source.

More recently, a study on gender bias in open source was published through a joint effort between North Carolina State University and the California Polytechnical Institute at San Luis Obispo. Although the study has been widely distributed and analyzed by several media outlets, I will caveat my own analysis with the statement that the study has yet to undergo peer review. Furthermore, the findings in the study only apply to about 35% of the GitHub user base, which is not representative of the entire open source community by any respects. That being said, the study does conclude that for this particular subset of users, women do tend to have their pull requests accepted more frequently than men. What does this mean? We can conclude that although women don't make up the majority of open source contributors, their contributions are valued at an equal or greater extent to those of men.

It appears that women are more-than-capable developers but make up a small portion of the open source community. As it appears, the participation of women in open source doesn't look like it's going to increase. How can we change this? By enforcing codes of conduct, effectively moderating communications on pull requests and issues, creating a healthy and welcoming environment for new contributors, building non-digital spaces, and practicing empathy, open source projects can create communities that are diverse and inclusive.

Codes of conduct

A code of conduct is an important part of any open source software project. If you are a corporation looking to take an internal project public, be sure you have a code of conduct in place before doing so. If you are a solo developer getting ready to push the first public commit of a personal project, be sure you have a code of conduct in place before doing so. There should be no hesitation or question about whether or not a code of conduct should be included in a codebase. We have codes of conduct governing our states, our countries, and our global society, so why wouldn't we have codes of conduct present in our software? Codes of conduct solidify the expectations and objectives of a project. Believe it or not, although you might have expectations about what kind of behavior is and isn't acceptable in the community around a project, some people do not. Codes of conduct help set a baseline for the global dialogue around behavior in the digital world.

There are plenty of codes of conduct that you can use as part of your project. I personally recommend using the Contributor Covenant. The language of the document is simple, concise, easy to understand, and already contains several translations. Furthermore, it is currently used by quite reputable open source projects such as Atom and Ruby on Rails.

Dialogue on PRs and issues

Pull requests and issues can be some of the most tense environments in an open source community, and rightly so. In them, people expose their hastily written code and half-baked feature requests in addition to their well-written code and bug-reports. The exposed nature of pull requests and issues leaves new and old contributors alike nervous about their place in the project. Thus, it's important to maintain a civil, empathetic, and respectful tone when communicating with other developers in an online space. This might seem like not much to ask, but you'd be surprised how much damage can be done with an emotional mindset and a readily accessible Enter key.

Tone is difficult to discern in a digital space, and we often end up applying our current emotions and context to the things we read online. If you feel immediately annoyed or insulted by a request or a comment, read it again at another time. If you still feel ambivalent about the tone of the comment, ask for clarification. Never—and I repeat, never—apply a tone or intent to another person's comment that is fueled by your personal state of mind. This simple misunderstanding starts a lot of miscommunications and problems, and can be easily avoided by giving the person that you are communicating with the benefit of the doubt.

That being said, disagreements do happen quite often. When they do get heated or emotional, it's important for project maintainers to uphold the following rules in each discussions:

  • Critique the ideas, not the ideator or his/her abilities.
  • Include an unbiased moderator in all highly opinionated discussions.
  • Enforce the project's code of conduct appropriately.

You'll notice that I didn't mention anything about marginalized individuals in this section. This is because negative interactions on pull requests and issues affect all contributors negatively, but contributors from marginalized backgrounds even more so. When you have to be constantly vigilant about how your tone and ideas are presented in a space, someone receiving your harmless remark or less-than-perfect pull request in a negative manner can have detrimental effects.

The value of new contributors

New contributors are the lifeblood of any open source project. While some people might be tempted to exalt core developers and maintainers, it's actually new contributors that maintain the spirit of the project.
New contributors prevent an open source development team from becoming cliquey. New contributors introduce interesting new ideas to a project. New contributors present ideas that are opposite the status quo. As a result, effective engagement with new contributors should be at the forefront of any open source project.

After writing open source software for several years, you might have forgotten what it feels like to fork a repository for the first time, to nervously tap away at your keyboard writing code that you think is bad, to hover for hours over the Pull Request button wondering how your contribution will be received. Being a new contributor is an emotionally and mentally exhausting process, but there are ways to make it less so for new contributors.

First and foremost, ensuring that you have nicely written contribution guidelines is important. Whether it's a simple Markdown or plain text file, ensure that your guidelines contain complete information on a development setup, the test-driven development process, any style guidelines you use, and any procedures you have around submitting pull requests. Don't be afraid to reproduce information that exists elsewhere. It's perfectly reasonable to provide information about forking and cloning, creating branches, and committing changes. Although it puts a lot of overhead on you as the writer of the guidelines, it provides the new contributor a single, authoritative source for getting involved with a project.

In addition to including thorough contribution guidelines, consider including a screencast that visually takes new contributors through the contribution workflow. If a screencast is too much effort, consider making a quick infographic that describes the workflow. For an example, check out the contribution workflow infographic I made for Project Jupyter. Different people learn in different ways and providing different ways for new contributors to learn about getting involved with your project lets them know that you are aware and mindful of their unique perspective.

However, before new contributors can even begin to engage with a project, they have to know what they can do. Tagging issues in a project with information about the type of contribution required to complete the issue (documentation, test case, feature, bug fix, etc.), the difficulty of a particular issue (low, medium, high), and the priority level can go a long way toward helping new contributors find the perfect issue for their first pull request. Tagging the type and priority of an issue can relatively easy, but tagging the difficulty does require a bit more nuance. When tagging the difficulty of an issue, I think it is important to consider the following questions:

  1. Does addressing this issue require changes across multiple files?
  2. Does addressing this issue require special knowledge of a particular topic (threading, low-level network communication, etc.)?
  3. Does addressing this issue involve interacting with an undocumented or untested portion of the codebase?

Answering these questions not only helps you provide more information to new contributors, it helps you assess the quality of your own codebase and work toward improvements.

The importance of non-digital spaces

In addition to digital forums, it's also important to have opportunities to form real-world connections around an open source project. These connections don't have to happen at a conference or a meetup organized around the project—they can happen anywhere. There is a certain level of respect and camaraderie that can be achieved when individuals engage with each other in the real world. Members of the community can host pop-up events at local coffee shops or co-working spaces that include collaborative coding, casual conversation, and knowledge sharing. Whether we like it or not, people have different digital and real-world personas, and allowing a community to develop around your project outside the Internet gives potential contributors with strong social skills the opportunity to engage with the project.

Enhancing empathy

In an increasingly connected world, writing software with people across the country, and indeed across the world, is expected in a work environment. The worldwide interactions are even more common in open source, where anyone with access to the Internet and a text editor can learn about and contribute to open source project. This is bound to cause a lot of tensions as we attempt to engage in technical and non-technical discourse with people from countries we might not even be able to identify on the map. How do we effectively traverse the multicultural ecosystem of open source software? It involves something that you've probably heard time and time again but might have trouble getting a full grasp of: engineering empathy. I believe that empathy is a muscle that you can strengthen. Namely, the following behaviors can go a long way towards improving your empathetic skills:

  1. Read technical blog posts written by developers from different cultures.
  2. Watch technical talks from conferences held in countries different from the one you reside in.
  3. If you have some fluency in another language, try reading the news in that language. This will give you perspective into what it feels like to be a non-native English speaker in open source.

These techniques will help you discover how developers from different backgrounds think, write, speak, and share. Over time, you'll develop a sense of perspective and appreciation for the way that different people approach software development.

Final thoughts

You'll notice that the above tips I described don't specifically target marginalized individuals. When you create a space that is welcoming and receptive of marginalized individuals, you create a space that is welcoming and receptive of everyone.


SOURCE:opensource.com


Creative Commons License