Sunday, July 24, 2016

How To Install & Use ArangoDB 3 On Ubuntu 14.04 and 16.04 LTS

How To Install & Use ArangoDB 3
On
Ubuntu 14.04 and 16.04 LTS

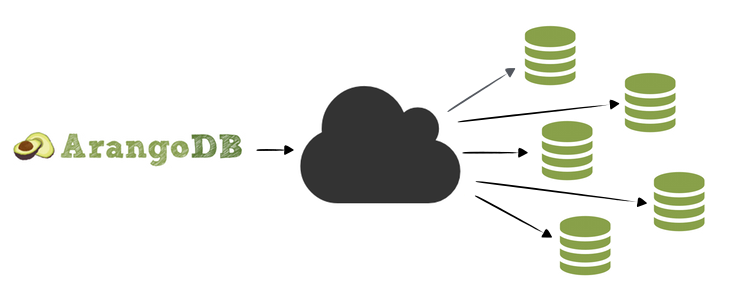
ArangoDB is a NoSQL, multi-model, open-source database with flexible data models for documents, graphs, and key-values. Build high performance applications using a convenient SQL-like query language or JavaScript extensions. Its creators refer to it as a "native multi-model" database to indicate that it was designed specifically to allow key/value, document, and graph data to be stored together and queried with a common language (known as AQL).
ArangoDB On GitHub.

Significant Features Of ArangoDB

  • Multi-Model : Documents, graphs and key-value pairs - model your data as you see fit for your application.
  • Joins : Conveniently join what belongs together for flexible ad-hoc querying, less data redundancy.
  • Transactions : Easy application development keeping your data consistent and safe. No hassle in your client.
  • It is open source (Apache License 2.0)
  • ArangoDB is multi-threaded - exploit the power of all your cores

Install ArangoDB :

Method 1:

In this method you have to execute commands shown below one by one(manually) to install ArangoDB.. but method 2 is more easy way to do this... because the second method uses shell script that will do all these installation steps automatically, for you.. .


Step 1 : First add the repository key to apt :

For Ubuntu 16.04 LTS :

wget https://www.arangodb.com/repositories/arangodb3/xUbuntu_16.04/Release.key && sudo apt-key add - < Release.key

For Ubuntu 14.04 LTS :

wget https://www.arangodb.com/repositories/arangodb3/xUbuntu_14.04/Release.key && sudo apt-key add - < Release.key The sample output should be like this..
shivaraj@shivaraj-A14RM0E:~$ wget https://www.arangodb.com/repositories/arangodb3/xUbuntu_14.04/Release.key && sudo apt-key add - < Release.key --2016-07-21 20:29:00-- https://www.arangodb.com/repositories/arangodb3/xUbuntu_14.04/Release.key Resolving www.arangodb.com (www.arangodb.com)... 85.214.140.94 Connecting to www.arangodb.com (www.arangodb.com)|85.214.140.94|:443... connected. HTTP request sent, awaiting response... 200 OK Length: 1003 [application/pgp-keys] Saving to: ‘Release.key’ 100%[=============================================================================================================>] 1,003 --.-K/s in 0s 2016-07-21 20:29:01 (9.99 MB/s) - ‘Release.key’ saved [1003/1003] [sudo] password for shivaraj: OK shivaraj@shivaraj-A14RM0E:~$

Step 2 : Create a list file for ArangoDB & Update The Source List

Next, you need to add the ArangoDB repository details so apt will know where to download the packages from... After adding the repository details, you will need to update the packages list.

For Ubuntu 16.04 LTS :

echo 'deb https://www.arangodb.com/repositories/arangodb3/xUbuntu_16.04/ /' | sudo tee /etc/apt/sources.list.d/arangodb.list && sudo apt-get update

For Ubuntu 14.04 LTS :

echo 'deb https://www.arangodb.com/repositories/arangodb3/xUbuntu_14.04/ /' | sudo tee /etc/apt/sources.list.d/arangodb.list && sudo apt-get update

Step 3 : Install the ArangoDB packages

You can install the latest stable release of ArangoDB version 3 with following command...

sudo apt-get install arangodb3

The above command will install ArangoDB from official ArangoDB repos... contains following packages..

The ArangoDB package comes with the following programs:

  • arangod: The ArangoDB database daemon. This server program is intended to run as a daemon process and to serve the various clients connection to the server via TCP / HTTP.

  • arangosh: The ArangoDB shell. A client that implements a read-eval-print loop (REPL) and provides functions to access and administrate the ArangoDB server.

  • arangoimp: A bulk importer for the ArangoDB server. It supports JSON and CSV.

  • arangodump: A tool to create backups of an ArangoDB database in JSON format.

  • arangorestore: A tool to load data of a backup back into an ArangoDB database.

  • arango-dfdb: A datafile debugger for ArangoDB. It is primarily intended to be used during development of ArangoDB.

  • arangobench: A benchmark and test tool. It can be used for performance and server function testing.

Step 4 :See The Status Of ArangoDB

Issue the following command to check the status of arangod (arangodb server)

For Ubuntu 14.04 :

sudo service arangodb3 status

If ArangoDB Running properly, you should get output like this..

shivaraj@shivaraj-A14RM0E:~$ sudo service arangodb3 status * arangod is running shivaraj@shivaraj-A14RM0E:~$

For Ubuntu 16.04 :

sudo systemctl status arangodb3

The above command will produce following output if ArangoDB works fine..

shivaraj@shivaraj-A14RM0E:~$ sudo systemctl status arangodb3 arangodb3.service - LSB: arangodb Loaded: loaded (/etc/init.d/arangodb3; bad; vendor preset: enabled) Active: active (running) since Sat 2016-07-23 17:52:15 IST; 1min 2s ago Docs: man:systemd-sysv-generator(8) CGroup: /system.slice/arangodb3.service ├─4857 /usr/sbin/arangod --uid arangodb --gid arangodb --pid-file /var/run/arangodb/arangod.pid --temp.path /var/tmp/arangod --log.fo └─4858 /usr/sbin/arangod --uid arangodb --gid arangodb --pid-file /var/run/arangodb/arangod.pid --temp.path /var/tmp/arangod --log.fo Jul 23 17:52:10 shivaraj-A14RM0E systemd[1]: Starting LSB: arangodb... Jul 23 17:52:11 shivaraj-A14RM0E arangodb3[4801]: * Starting arango database server arangod Jul 23 17:52:15 shivaraj-A14RM0E arangodb3[4801]: {startup} starting up in daemon mode Jul 23 17:52:15 shivaraj-A14RM0E arangodb3[4801]: changed working directory for child process to '/var/tmp' Jul 23 17:52:15 shivaraj-A14RM0E arangodb3[4801]: ...done. Jul 23 17:52:15 shivaraj-A14RM0E systemd[1]: Started LSB: arangodb.

Securing the installation :

The default installation contains one database _system and a user named root . Debian based packages and the Windows installer will ask for a password during the installation process. Red-Hat based packages will set a random password. For all other installation packages you need to execute.
arango-secure-installation This will asked you for a root password and sets this password.

Method 2:

In this method, the following command will download shell script from GitHub repo and will execute it to make installation of ArangoDB easy.. The downloaded script will take care of all things..

wget -O - https://raw.githubusercontent.com/shivarajnaidu/UV-Shell-Scripts/master/ArangoDB%20Installation%20Scripts/arangodb-installation-script-for-ubuntu.sh | bash -

Basic Use Of ArangoDB (On Ubuntu)..

You can interact with ArangoDB server in two ways.. One way is ArangoDB shell (arangosh) - A command line interface to interact with ArangoDB server... Another way is ArangoDB web interface which offers GUI interface to interact with ArangoDB server..

Accessing ArangoDB from shell (arangosh) :

Run the arangosh command to invoke ArangoDB Shell:

The ArangoDB shell (arangosh) is a command-line tool that can be used for administration of ArangoDB, including running ad-hoc queries. It offers a JavaScript shell environment providing access to the ArangoDB server. Arangosh can be invoked like this:

arangosh
If the above command asks you for password after its execution starts... type a password if you have set one while installing ArangoDB on your system..
If you didn't set any password while installing ArangoDB then the password is empty.. You can proceed just by leaving it as empty while it asking for password.. Just hit ENTER key..

If Arangosh started successfully You will see output like the one shown below..

shivaraj@shivaraj-A14RM0E:~$ arangosh Please specify a password: arangosh (ArangoDB 3.0.3 [linux] 64bit, using VPack 0.1.30, ICU 54.1, V8 5.0.71.39, OpenSSL 1.0.1f 6 Jan 2014) Copyright (c) ArangoDB GmbH Pretty printing values. Connected to ArangoDB 'http+tcp://127.0.0.1:8529' version: 3.0.3 [server], database: '_system', username: 'root' Type 'tutorial' for a tutorial or 'help' to see common examples 127.0.0.1:8529@_system>

We can get more detailed help for command line administration of ArangoDB by running help command.

Run help command in arangodb shell, output will look like this..

127.0.0.1:8529@_system> help ------------------------------------- Help ------------------------------------- Predefined objects: arango: ArangoConnection db: ArangoDatabase fm: FoxxManager Examples: > db._collections() list all collections > db._query(<query>).toArray() execute an AQL query > db._explain(<query>) explain an AQL query > help show help pages > exit Note: collection names and statuses may be cached in arangosh. To refresh the list of collections and their statuses, issue: > db._collections(); To cancel the current prompt, press CTRL + d. --------------------------- ArangoDatabase (db) help --------------------------- Administration Functions: _help() this help _flushCache() flush and refill collection cache Collection Functions: _collections() list all collections _collection(<name>) get collection by identifier/name _create(<name>, <properties>) creates a new collection _createEdgeCollection(<name>) creates a new edge collection _drop(<name>) delete a collection Document Functions: _document(<id>) get document by handle (_id) _replace(<id>, <data>, <overwrite>) overwrite document _update(<id>, <data>, <overwrite>, partially update document <keepNull>) _remove(<id>) delete document _exists(<id>) checks whether a document exists _truncate() delete all documents Database Management Functions: _createDatabase(<name>) creates a new database _dropDatabase(<name>) drops an existing database _useDatabase(<name>) switches into an existing database _drop(<name>) delete a collection _name() name of the current database Query / Transaction Functions: _executeTransaction(<transaction>) execute transaction _query(<query>) execute AQL query _createStatement(<data>) create and return AQL query ----------------------------- ArangoCollection help ----------------------------- ArangoCollection constructor: > col = db.mycoll; > col = db._create("mycoll"); Administration Functions: name() collection name status() status of the collection type() type of the collection truncate() delete all documents properties() show collection properties drop() delete a collection load() load a collection unload() unload a collection rename(<new-name>) renames a collection getIndexes() return defined indexes refresh() refreshes the status and name _help() this help Document Functions: count() return number of documents save(<data>) create document and return handle document(<id>) get document by handle (_id or _key) replace(<id>, <data>, <overwrite>) overwrite document update(<id>, <data>, <overwrite>, partially update document <keepNull>) remove(<id>) delete document exists(<id>) checks whether a document exists Attributes: _database database object _id collection identifier ----------------------------- ArangoStatement help ----------------------------- Create an AQL query: > stmt = new ArangoStatement(db, { "query": "FOR..." }) > stmt = db._createStatement({ "query": "FOR..." }) Set query options: > stmt.setBatchSize(<value>) set the max. number of results to be transferred per roundtrip > stmt.setCount(<value>) set count flag (return number of results in "count" attribute) Get query options: > stmt.setBatchSize() return the max. number of results to be transferred per roundtrip > stmt.getCount() return count flag (return number of results in "count" attribute) > stmt.getQuery() return query string results in "count" attribute) Bind parameters to a query: > stmt.bind(<key>, <value>) bind single variable > stmt.bind(<values>) bind multiple variables Execute query: > cursor = stmt.execute() returns a cursor Get all results in an array: > docs = cursor.toArray() Or loop over the result set: > while (cursor.hasNext()) { print(cursor.next()) } ---------------------------- ArangoQueryCursor help ---------------------------- ArangoQueryCursor constructor: > cursor = stmt.execute() Functions: hasNext() returns true if there are more results to fetch next() returns the next document toArray() returns all data from the cursor _help() this help Attributes: _database database object Example: > stmt = db._createStatement({ "query": "FOR c IN coll RETURN c" }) > cursor = stmt.execute() > documents = cursor.toArray() > cursor = stmt.execute() > while (cursor.hasNext()) { print(cursor.next()) } ----------------------------------- More help ----------------------------------- Pager: > stop_pager() stop the pager output > start_pager() start the pager Pretty printing: > stop_pretty_print() stop pretty printing > start_pretty_print() start pretty printing Color output: > stop_color_print() stop color printing > start_color_print() start color printing Print function: > print(x) std. print function > print_plain(x) print without prettifying and without colors > clear() clear screen 127.0.0.1:8529@_system>

The result is basically a JavaScript shell where you can run arbitrary JavaScript code. For example, add two numbers:

127.0.0.1:8529@_system> 23 + 2

You will get output like this..

127.0.0.1:8529@_system> 23 + 2 25 127.0.0.1:8529@_system>

User Management In ArangoDB :

ArangoDB allows to restrict access to databases to certain users. All users of the system database are considered administrators. During installation a default user root is created, which has access to all databases.
You should create a database for your application together with a user that has access rights to database.

The default installation contains one database _system and a user named root.
Debian based package installer will ask for a password during the installation process. Red-Hat based packages will set a random password. For all other installation packages you need to execute.
arango-secure-installation This would ask you for a root password and sets this password.
If you leave password field as blank ... you can login without entering password..

Creating A New User :

The following would create a user named shivaraj.. (But, by default, this user will have no access at all (to any database).. we need to give privilege to newly created user, to access database.)

var users = require("@arangodb/users"); users.save("shivaraj", "mypassword");

Or

require("@arangodb/users").save("shivaraj", "mypassword");

The Output would be look like below..

127.0.0.1:8529@_system> require("@arangodb/users").save("shivaraj", "root"); { "user" : "shivaraj", "active" : true, "extra" : { }, "changePassword" : false, "code" : 201 } 127.0.0.1:8529@_system>

The save method will take 4 parameters.. like shown below..

require("@arangodb/users").save(user, password, active, extra);

This will create a new ArangoDB user. The user_name must be specified in user and must not be empty.
The password must be given as a string, too, but can be left empty if required.
If the active attribute is not specified, it defaults to true. The extra attribute can be used to save custom data with the user.

Note: This method will fail if either the username or the passwords are not specified or given in a wrong format, or there already exists a user with the specified name.
In addition to this.. the newly created user will not have permission to access any database. You need to grant the access rights for one or more databases using grantDatabase method...

Granting & Revoking Permission To User, To Access The Database :

So after creating User we need to give privilege to new user to access the database using grantDatabase method. revokeDatabase method will revoke the right to access database.

Granting permission to access Database :

The following will grants read/write access to the database for the user.

require("@arangodb/users").grantDatabase(user, database);

For Example, The following will grant permission to user named shivaraj to access database uvdb.

require("@arangodb/users").grantDatabase("shivaraj", "uvdb");
Note : If a user has access rights to the _system database, he is considered superuser.

Revoking permission to access Database :

The following will revokes read/write access to the database for the user.

require("@arangodb/users").revokeDatabase(user, database);

For Example, The following will revoke permission to user named shivaraj to access database uvdb.

require("@arangodb/users").revokeDatabase("shivaraj", "uvdb");

List All ArangoDB Users :

The following will list all users belongs to ArangoDB...

require("@arangodb/users").all();

The output would look like following one...

127.0.0.1:8529@_system> require("@arangodb/users").all(); [ { "user" : "shivaraj", "active" : true, "extra" : { }, "changePassword" : false }, { "user" : "root", "active" : true, "extra" : { }, "changePassword" : false } ] 127.0.0.1:8529@_system>

Removing A User :

The following will delete user from ArangoDB

require("@arangodb/users").remove(user);

Remove method will remove an existing ArangoDB user from the database.
The username must be specified in User and the specified user must exist in the database.
This method will fail if the user cannot be found in the database.

For example, Following will remove user named shivaraj from ArangoDB..

require("@arangodb/users").remove("shivaraj");

See More about User Management In Official ArangoDB Documentation..

Basic Database Management :

This section will explain you ... performing basic CURD operations on Databases through ArangoDB shell(arangosh)

Creating A New Database..

We can create a new database using createDatabase method..

Syntax :
db._createDatabase(name, options, users)

The createDatabase will accept 3 parameters ...

  • The first parameter(name) will specify the name of the database we are going to create

  • The second parameter(options) currently has no meaning and is reserved for future use.

  • The optional users attribute can be used to create initial users for the new database. If specified, it must be a list of user objects. Each user object can contain the following attributes:

    1. username: the user name as a string. This attribute is mandatory.

    2. passwd: the user password as a string. If not specified, then it defaults to an empty string.

    3. active: a boolean flag indicating whether the user account should be active or not. The default value is true.

    4. extra: an optional JSON object with extra user information. The data contained in extra will be stored for the user but not be interpreted further by ArangoDB.

If no initial users are specified, a default user root will be created with an empty string password. This ensures that the new database will be accessible via HTTP after it is created.

For example.. The following will create database named 'uvdb' with user named shivaraj .

db._createDatabase("uvdb", [], [{ username: "shivaraj", passwd: "root"}]);

The sample output would look like this, if database created successfully..

127.0.0.1:8529@_system> db._createDatabase("uvdb", [], [{ username: "shivaraj", passwd: "root"}]); true 127.0.0.1:8529@_system>
Note that even if the database is created successfully, there will be no change into the current database to the new database. Changing the current database must explicitly be requested by using the db._useDatabase method.

Switch to Particular Database :

You can switch to particular database from the current database using db._useDatabase method.

Syntax :
db._useDatabase(db_name);

The following will switch to newly created database uvdb from currently working database..

db._useDatabase('uvdb');

The sample output will be look like following one..

127.0.0.1:8529@_system> db._useDatabase('uvdb'); true 127.0.0.1:8529@uvdb>

List All Existing Databases In ArangoDB :

We can list all existing Databases in ArangoDB using db._databases method..

db._databases();
Sample output :
127.0.0.1:8529@_uvdb> db._databases(); [ "_system", "uvdb" ] 127.0.0.1:8529@uvdb>

Drop/Delete A Database :

We can drop(delete) an existing database using _dropDatabase method..

db._dropDatabase(name);

For example, following will delete database named "uvdb"...

db._dropDatabase('uvdb');
Sample output :
127.0.0.1:8529@_system> db._dropDatabase('uvdb'); true 127.0.0.1:8529@_system>
Note: Dropping databases is only possible from within the _system database. The _system database itself cannot be dropped.

Basic Collection Management :

This section will explain you ... performing basic CURD operations on Collections in a Database through ArangoDB shell(arangosh)

Creating A New Collection In Database:

We can create a new collection using _create method.

db._create(collection-name);

For example, The following will create collection named "myfriends"..

db._create('myfriends');
Sample output :
127.0.0.1:8529@_uvdb>db._create('myfriends'); [ArangoCollection 119334, "myfriends" (type document, status loaded)] 127.0.0.1:8529@uvdb>
Note : You can access an existing collection using _collection method..
Syntax :
db._collection(collection-name);

List All Existing Collections Of Current Database:

The _collections method will return all existing collections from current database..

db._collections();
Sample output :
127.0.0.1:8529@_uvdb> db._collections(); [ [ArangoCollection 117935, "_apps" (type document, status loaded)], [ArangoCollection 117933, "_jobs" (type document, status loaded)], [ArangoCollection 117931, "_queues" (type document, status loaded)], [ArangoCollection 117929, "_frontend" (type document, status loaded)], [ArangoCollection 119334, "myfriends" (type document, status loaded)], [ArangoCollection 117904, "_graphs" (type document, status loaded)], [ArangoCollection 117914, "_routing" (type document, status loaded)], [ArangoCollection 117912, "_modules" (type document, status loaded)], [ArangoCollection 117927, "_aqlfunctions" (type document, status loaded)] ] 127.0.0.1:8529@uvdb>

Drop/Delete A Collection :

We can drop(delete) an existing collection using _drop method..

db._drop(collection-name);

For example, following will delete collection named "myfriends"...

db._drop('myfriends');

Basic Document Management :

This section will explain you ... performing basic CURD operations on Documents in a Collection through ArangoDB shell(arangosh)

Creating A New Document In Collection:

We can create a new document using collection.insert method.

db.collection.insert(data);

The above creates a new document in the collection from the given data. The data must be an object.

Note: Since ArangoDB 2.2, insert is an alias for save.

For example the following will create new document in collection named "myfriends"..

db.myfriends.insert( { "name" : "balu", "address" : { "street" : "Ramar Street", "village" : "Sri Rama Kuppam", "post" : "seethanjeri", "pincode" : "602026", "taluk" : "Uthukkottai", "nation" : "India" }, "education":"computer engineering", "occupation" : "software professional" } )
Sample output :
127.0.0.1:8529@_uvdb> db.myfriends.insert( ...> { ...> "name" : "balu", ...> "address" : { ...> "street" : "Ramar Street", ...> "village" : "Sri Rama Kuppam", ...> "post" : "seethanjeri", ...> "pincode" : "602026", ...> "taluk" : "Uthukkottai", ...> "nation" : "India" ...> }, ...> "education":"computer engineering", ...> "occupation" : "software professional" ...> } ...> ) { "_id" : "myfriends/142037", "_key" : "142037", "_rev" : "142037" } 127.0.0.1:8529@uvdb>

To Insert Multiple Documents into Collection :

To insert multiple documents into collection named myfriends .. pass an array of objects to insert method..

Syntax :
db.myfriends.insert([ { "name" : "balu", "address" : { "street" : "Ramar Street", "village" : "Sri Rama Kuppam", "post" : "seethanjeri", "pincode" : "602026", "taluk" : "Uthukkottai", "nation" : "India" }, "education":"computer engineering", "occupation" : "software professional" }, { "name" : "babu", "address" : { "street" : "Ramar Street", "village" : "Sri Rama Kuppam", "post" : "seethanjeri", "pincode" : "602026", "taluk" : "Uthukkottai", "nation" : "USA" }, "education":"computer engineering", "occupation" : "software professional" } ])
Sample output :
127.0.0.1:8529@_uvdb> db.myfriends.insert([ ...> { ...> "name" : "balu", ...> "address" : { ...> "street" : "Ramar Street", ...> "village" : "Sri Rama Kuppam", ...> "post" : "seethanjeri", ...> "pincode" : "602026", ...> "taluk" : "Uthukkottai", ...> "nation" : "India" ...> }, ...> "education":"computer engineering", ...> "occupation" : "software professional" ...> }, ...> { ...> "name" : "babu", ...> "address" : { ...> "street" : "Ramar Street", ...> "village" : "Sri Rama Kuppam", ...> "post" : "seethanjeri", ...> "pincode" : "602026", ...> "taluk" : "Uthukkottai", ...> "nation" : "USA" ...> }, ...> "education":"computer engineering", ...> "occupation" : "software professional" ...> } ...> ]) [ { "_id" : "myfriends/142787", "_key" : "142787", "_rev" : "142787" }, { "_id" : "myfriends/142791", "_key" : "142791", "_rev" : "142791" } ] 127.0.0.1:8529@uvdb>

Find or Query Data...

We can use the collection.byExample() method to retrieve data from a collection in ArangoDB... This method can Fetches all documents from a collection that match the specified filter or criteria and returns a cursor. You can specify the filter or criteria in a document and pass as a parameter to the byExample() method.

Syntax :
db.collection.byExample( { "field": "value" } );
We have to use toArray, next, or hasNext to access the result.

For example to find document which consists name field with value balu..

db.myfriends.byExample( { "name": "balu" } ).toArray();
Sample output :
127.0.0.1:8529@_uvdb> db.myfriends.byExample( { "name": "balu" } ).toArray(); [ { "_key" : "142787", "_id" : "myfriends/142787", "_rev" : "142787", "address" : { "street" : "Ramar Street", "village" : "Sri Rama Kuppam", "post" : "seethanjeri", "pincode" : "602026", "taluk" : "Uthukkottai", "nation" : "India" }, "education" : "computer engineering", "name" : "balu", "occupation" : "software professional" }, { "_key" : "139885", "_id" : "myfriends/139885", "_rev" : "139885", "address" : { "street" : "Ramar Street", "village" : "Sri Rama Kuppam", "post" : "seethanjeri", "pincode" : "602026", "taluk" : "Uthukkottai", "nation" : "India" }, "education" : "computer engineering", "name" : "balu", "occupation" : "software professional" } ] 127.0.0.1:8529@_uvdb>
We can also use collection.document(object) ...
The document method finds a document given an object object containing the _id or _key attribute. The method returns the document if it can be found. If both attributes are given, the _id takes precedence, it is an error, if the collection part of the _id does not match the collection.
AQL (ArangoDB Query Language) provides very extensive range of options to query or perform CURD operations..

The db.collection.toArray(); method will return all documents in a collection..

For example, db.myfriends.toArray(); will return all documents in a collection named myfriends..

db.myfriends.toArray();
Sample output :
127.0.0.1:8529@_uvdb> db.myfriends.toArray(); [ { "_key" : "142787", "_id" : "myfriends/142787", "_rev" : "142787", "address" : { "street" : "Ramar Street", "village" : "Sri Rama Kuppam", "post" : "seethanjeri", "pincode" : "602026", "taluk" : "Uthukkottai", "nation" : "India" }, "education" : "computer engineering", "name" : "balu", "occupation" : "software professional" }, { "_key" : "142791", "_id" : "myfriends/142791", "_rev" : "142791", "address" : { "street" : "Ramar Street", "village" : "Sri Rama Kuppam", "post" : "seethanjeri", "pincode" : "602026", "taluk" : "Uthukkottai", "nation" : "USA" }, "education" : "computer engineering", "name" : "babu", "occupation" : "software professional" }, { "_key" : "139885", "_id" : "myfriends/139885", "_rev" : "139885", "address" : { "street" : "Ramar Street", "village" : "Sri Rama Kuppam", "post" : "seethanjeri", "pincode" : "602026", "taluk" : "Uthukkottai", "nation" : "India" }, "education" : "computer engineering", "name" : "balu", "occupation" : "software professional" } ] 127.0.0.1:8529@uvdb>

Updating Data..

Update operations can modify/replace existing documents in a collection. The update method accepts 2 parameters:

Syntax :
collection.update(selector, data)

Updates an existing document described by the selector, which must be an object containing the _id or _key attribute. There must be a document with that _id or _key in the current collection. This document is then patched with the data given as second argument. Any attribute _id, _key or _rev in data is ignored.

db.myfriends.update({"_key" : "139885"}, {"name":"madhu"});
Sample Output :
127.0.0.1:8529@_uvdb> db.myfriends.update({"_key" : "139885"}, {"name":"madhu"}); { "_id" : "myfriends/139885", "_key" : "139885", "_rev" : "151996", "_oldRev" : "139885" } 127.0.0.1:8529@_uvdb>

see the document collections after updated..

Sample Output :
127.0.0.1:8529@_uvdb> db.myfriends.toArray(); [ { "_key" : "142787", "_id" : "myfriends/142787", "_rev" : "142787", "address" : { "street" : "Ramar Street", "village" : "Sri Rama Kuppam", "post" : "seethanjeri", "pincode" : "602026", "taluk" : "Uthukkottai", "nation" : "India" }, "education" : "computer engineering", "name" : "balu", "occupation" : "software professional" }, { "_key" : "142791", "_id" : "myfriends/142791", "_rev" : "142791", "address" : { "street" : "Ramar Street", "village" : "Sri Rama Kuppam", "post" : "seethanjeri", "pincode" : "602026", "taluk" : "Uthukkottai", "nation" : "USA" }, "education" : "computer engineering", "name" : "babu", "occupation" : "software professional" }, { "_key" : "139885", "_id" : "myfriends/139885", "_rev" : "151996", "address" : { "street" : "Ramar Street", "village" : "Sri Rama Kuppam", "post" : "seethanjeri", "pincode" : "602026", "taluk" : "Uthukkottai", "nation" : "India" }, "education" : "computer engineering", "name" : "madhu", "occupation" : "software professional" } ] 127.0.0.1:8529@uvdb>

Replace a Document

Syntax :
collection.replace(selector, data)

Replaces an existing document described by the selector, which must be an object containing the _id or _key attribute. There must be a document with that _id or _key in the current collection. This document is then replaced with the data given as second argument. Any attribute _id, _key or _rev in data is ignored.

db.myfriends.replace({"_key" : "142787"}, {"name":"abilash"});

The above will replace document with key 142787 with new document specified as second parameter.

Sample Output :
127.0.0.1:8529@_uvdb> db.myfriends.replace({"_key" : "142787"}, {"name":"abilash"}); { "_id" : "myfriends/142787", "_key" : "142787", "_rev" : "164288", "_oldRev" : "142787" } 127.0.0.1:8529@uvdb>

Now look at the document.. compare it with old one..

127.0.0.1:8529@_uvdb> db.myfriends.toArray(); [ { "_key" : "142787", "_id" : "myfriends/142787", "_rev" : "164288", "name" : "abilash" }, { "_key" : "142791", "_id" : "myfriends/142791", "_rev" : "142791", "address" : { "street" : "Ramar Street", "village" : "Sri Rama Kuppam", "post" : "seethanjeri", "pincode" : "602026", "taluk" : "Uthukkottai", "nation" : "USA" }, "education" : "computer engineering", "name" : "babu", "occupation" : "software professional" }, { "_key" : "139885", "_id" : "myfriends/139885", "_rev" : "151996", "address" : { "street" : "Ramar Street", "village" : "Sri Rama Kuppam", "post" : "seethanjeri", "pincode" : "602026", "taluk" : "Uthukkottai", "nation" : "India" }, "education" : "computer engineering", "name" : "madhu", "occupation" : "software professional" } ] 127.0.0.1:8529@uvdb>

Removing Document from Collection..

We can easily remove data with collection.remove() method..

collection.remove(selector);

Removes a document described by the selector, which must be an object containing the _id or _key attribute. There must be a document with that _id or _key in the current collection. This document is then removed.

db.myfriends.remove({"_key" : "142791"});

This will remove document with key value "142791" .

Sample Output :
127.0.0.1:8529@_uvdb> db.myfriends.remove({"_key" : "142791"}); { "_id" : "myfriends/142791", "_key" : "142791", "_rev" : "142791" } 127.0.0.1:8529@uvdb>

After this operation check the documents.. you can notice that one document got removed from collection..

127.0.0.1:8529@_uvdb> db.myfriends.toArray() [ { "_key" : "142787", "_id" : "myfriends/142787", "_rev" : "164288", "name" : "abilash" }, { "_key" : "139885", "_id" : "myfriends/139885", "_rev" : "151996", "address" : { "street" : "Ramar Street", "village" : "Sri Rama Kuppam", "post" : "seethanjeri", "pincode" : "602026", "taluk" : "Uthukkottai", "nation" : "India" }, "education" : "computer engineering", "name" : "madhu", "occupation" : "software professional" } ] 127.0.0.1:8529@uvdb>
Note : Note that the above examples use notation that looks like db.collection.method().. The beauty of ArangoDB is, instead of above, we can also use db._method(); like notation..
Means, we can use db._document(); instead of db.collection.document(); ..
You can find more about this here..

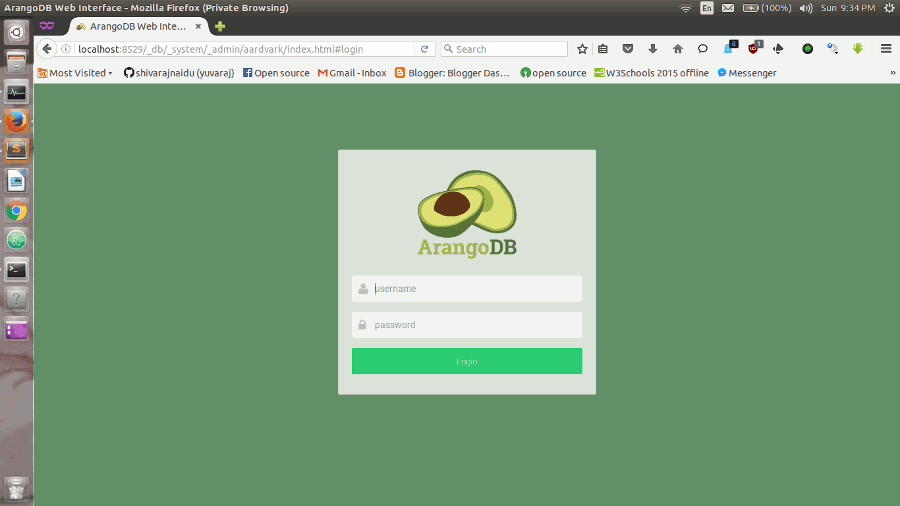
Accessing ArangoDB From Web interface :

ArangoDB comes with a built-in web interface for administration. The web interface can be accessed via the URL:

http://127.0.0.1:8529

Or

http://localhost:8529

To get familiar with the database system you can use the web interface (code name Aardvark) for basic interaction. The web interface will become available shortly after you started arangod. You can access it in your browser at http://localhost:8529..

If everything works as expected, you should see the login view..


ArangoDB web interface login view

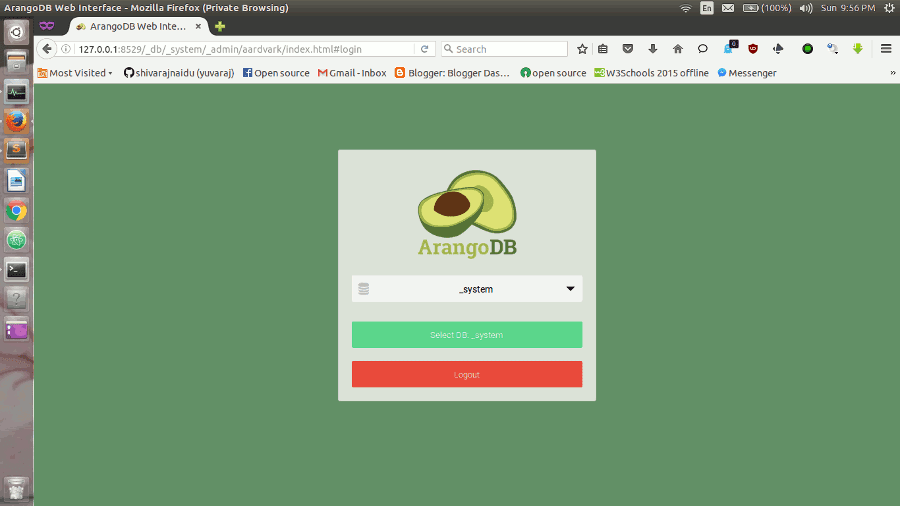
Next you will be asked which database to use. Every server instance comes with a _system database. Select this database to continue.


ArangoDB web interface db select

You should then be presented the dashboard with server statistics like this..


ArangoDB web interface graph view

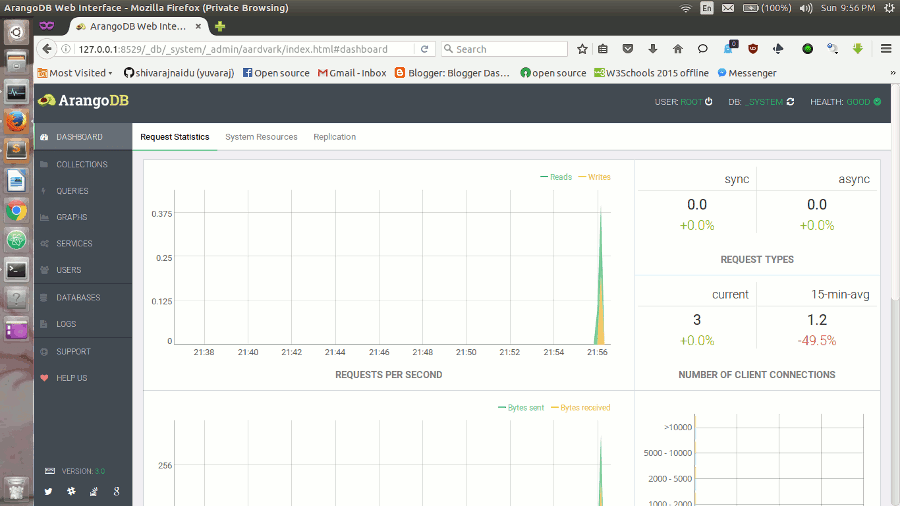
For a more detailed description of the interface, see Web Interface.

SQL to ArangoDB..

Here you can find SQL to ArangoDB mapping guide....

Hi friends, If you found any issue or typo error, please feel free to report it.. You can either open an issue on github or you can also report it on our Facebook Page via message(www.fb.com/opensourceinside) .

Monday, July 18, 2016

How To Fix "Failed To Start Session" Error At Ubuntu Login

How To Fix
"Failed To Start Session"
Error At Ubuntu Login


Failed start to start session in Login - Ubuntu 16.04, Ubuntu 15.04, Ubuntu 14.04 or Ubuntu 14.10. Here's how to fix "failed to start session" at login in Ubuntu Systems:

I have installed Ubuntu 16.04 LTS in one of my friends Laptop and installed/removed certain things after that as usual rebooted the system... Entered my password and it shows "failed to start session" error in Login screen.. even , I can't able to login to guest session. So, Little bit, I have googled about this issue and found the reason for this issue.. It's because Ubuntu's Unity desktop got broken in some way..

There are two methods available to fix this problem... If first method fails ... use second one..

Method 1 : Installing/Reinstalling Ubuntu Desktop

Step 1:

Switch to command-line (Press CTRL+ALT+F1) and type your user name and password... Then, run the following command to install Unity desktop again..

sudo apt-get update && sudo apt-get install ubuntu-desktop

If it's already installed try to reinstall it..

sudo apt-get install --reinstall ubuntu-desktop

Once the installation finished reboot the system..

sudo reboot

Now try to login.. You should be able to login to your system.. But .. if you still get "Failed to start session error" try alternate method (METHOD 2) shown below..

Method 2: Reconfigure Installed Packages and Install Gnome DESKTOP :

After reinstalling Ubuntu Desktop.. if you still get "Failed to start session".. try to reconfigure all installed packages.. This may solve the problem..

sudo dpkg-reconfigure -a

If you still not able to login, install gnome-desktop... so that you can simply login through that one...
Install Gnome DESKTOP with following command..

sudo apt-get update && sudo apt-get install gnome-shell ubuntu-gnome-desktop

After successful installation, issue following command to reboot your system..

sudo reboot

Finally, This will solve your problem to log into the system.. and you should be able to log into your system successfully..


Sunday, July 17, 2016

How To Install & Use Mongodb On Ubuntu 14.04 and 16.04 LTS

How To Install & Use Mongodb
On
Ubuntu 14.04 and 16.04 LTS


Introduction :

MongoDB is a free and open-source cross-platform document-oriented database. Classified as a NoSQL database, MongoDB avoids the traditional table-based relational database structure (RDBMS) in favor of JSON-like documents with dynamic schema s (MongoDB calls the format BSON), making the integration of data in certain types of applications easier and faster. As of July 2015, MongoDB was the fourth most widely mentioned database engine on the web, and the most popular for document stores.

Here, I am going to show you how to install Mongodb on Ubuntu 14.04 and Ubuntu 16.04 and How to use it to perform basic CURD operations..

Features :

Ad hoc queries, Replication, Indexing, Load Balancing, File storage, Aggregation and Server-side JavaScript execution are some of the salient features of MongoDB.

Install MongoDB :

Why, We Don't Use Ubuntu repository For MongoDB Installation :

That it is always recommended to use the packages (.deb) from the officially MongoDB repository and not from Ubuntu repository. Why? With MongoDB Repository we will assure we are up to date.
At the time of writing this, Ubuntu repository only includes version 2.6.10. While the most current version available is 3.2.5. If you want to install MongoDB from Ubuntu repositories .... use following command..
sudo apt-get install mongodb

Method 1:

In this method you have to execute following commands one by one(manually) to install MongoDB.. but method 2 is more easy way to do this... because the second method uses shell script that will do all these installation steps automatically, for you.. .


Note : Getting MongoDB up and running successfully on Ubuntu 16.04 is challenging. Because of lack of support for systemd in MongoDB.
So using method 2 will do all required tweaks/workarounds for you.
So if you ask me ... I will suggest you to use the second method for easy of installation...

Step 1 : Import the public key used by the package management system

The Ubuntu package management tools (i.e. dpkg and apt) ensure package consistency and authenticity by requiring that distributors sign packages with GPG keys. Issue the following command to import theMongoDB public GPG Key:

sudo apt-key adv --keyserver hkp://keyserver.ubuntu.com:80 --recv EA312927

The sample output should be like this..

Executing: /tmp/tmp.O4U6gXwK4V/gpg.1.sh --keyserver hkp://keyserver.ubuntu.com:80 --recv EA312927 gpg: requesting key EA312927 from hkp server keyserver.ubuntu.com gpg: key EA312927: public key "MongoDB 3.2 Release Signing Key " imported gpg: Total number processed: 1 gpg: imported: 1 (RSA: 1)

Step 2 : Create a list file for MongoDB & Update The Source List

Next, you will need to add the MongoDB repository details so apt will know where to download the packages from.. . After adding the repository details, you will need to update the packages list.

echo "deb http://repo.mongodb.org/apt/ubuntu trusty/mongodb-org/3.2 multiverse" | sudo tee /etc/apt/sources.list.d/mongodb-org-3.2.list && sudo apt-get update

Step 3 : Install the MongoDB packages

You can install the latest stable version of MongoDB with following command...

sudo apt-get install -y --allow-unauthenticated mongodb-org
The above command will install MongoDB from official MongoDB repos... contains following packages..
  • mongodb-org : A metapackage that will automatically install the four component packages listed below.
  • mongodb-org-server : Contains the mongod daemon and associated configuration and init scripts.
  • mongodb-org-mongos : Contains the mongos daemon.
  • mongodb-org-shell : Contains the mongo shell.
  • mongodb-org-tools : Contains the following MongoDB tools: mongoimport bsondump, mongodump, mongoexport, mongofiles, mongooplog, mongoperf, mongorestore, mongostat, and mongotop.

Important !

After successfully installing MongoDB, Create Directory named db inside another directory named data (at systems Root directory) and give enough permissions to it... where MongoDB stores the database.. (Otherwise you may encounter 'failed to start' error while starting MongoDB server..). Run following command to create required directory.
sudo mkdir -p /data/db/ && sudo chmod -R 775 /data/

Step 4 :Start MongoDB

Issue the following command to start mongod (mongodb server)

For Ubuntu 14.04 LTS

sudo service mongod start

If mongod starts successfully, you will get output like this...

shivaraj@shivaraj-A14RM0E:~$ sudo service mongod start mongod start/running, process 4518 shivaraj@shivaraj-A14RM0E:~$

For Ubuntu 16.04 LTS

In order to properly launch MongoDB as a service on Ubuntu 16.04, we need to create a unit file which determines how to start or stop the service.

Create a configuration file named mongodb.service to setup unit file as shown below..

sudo touch /etc/systemd/system/mongodb.service

Now open it with your favorite text editor.. (following command will open mongodb.service file with gedit text editor.. you can use your preferred text editor)

sudo gedit /etc/systemd/system/mongodb.service

Now, Paste the following in it..

[Unit] Description=High-performance, schema-free document-oriented database After=network.target [Service] User=mongodb ExecStart=/usr/bin/mongod --quiet --config /etc/mongod.conf [Install] WantedBy=multi-user.target

Once you have finishes, you can start the mongo server with following command on Ubuntu 16.04.

sudo systemctl start mongodb

You can also check that the service has started properly, run the following command:

sudo systemctl status mongodb

You should see the following output:

⚫ mongodb.service - High-performance, schema-free document-oriented database Loaded: loaded (/etc/systemd/system/mongodb.service; enabled; vendor preset: enabled) Active: active (running) since Wed 2016-07-13 12:56:59 IST; 2h 48min ago Main PID: 947 (mongod) CGroup: /system.slice/mongodb.service └─947 /usr/bin/mongod --quiet --config /etc/mongod.conf Jul 13 12:56:59 shivaraj-A14RM0E systemd[1]: Started High-performance, schema-free document-oriented database.
If you want to enable the MongoDB service that start automatically, when system starts. You can do this by running the following command (For Ubuntu 16.04); sudo systemctl enable mongodb See How To Enable Disable Services On Linux

Method 2:

In this method, the following command will download shell script from GitHub repo and will execute it to make installation of MongoDB easy.. The downloaded script will take care of all things..

wget -O - https://raw.githubusercontent.com/shivarajnaidu/UV-Shell-Scripts/master/MongoDB%20Installation%20Scripts/mongodb-installation-script-for-ubuntu.sh | bash -

Basic Use MongoDB (On Ubuntu)..

Run the mongo command to invoke MongoDB Shell:

mongo

You should get output like the one shown below..

shivaraj@shivaraj-A14RM0E:~$ mongo MongoDB shell version: 3.2.8 connecting to: test Server has startup warnings: 2016-07-13T16:08:29.041+0530 I CONTROL [initandlisten] 2016-07-13T16:08:29.041+0530 I CONTROL [initandlisten] ** WARNING: /sys/kernel/mm/transparent_hugepage/enabled is 'always'. 2016-07-13T16:08:29.041+0530 I CONTROL [initandlisten] ** We suggest setting it to 'never' 2016-07-13T16:08:29.041+0530 I CONTROL [initandlisten] 2016-07-13T16:08:29.041+0530 I CONTROL [initandlisten] ** WARNING: /sys/kernel/mm/transparent_hugepage/defrag is 'always'. 2016-07-13T16:08:29.041+0530 I CONTROL [initandlisten] ** We suggest setting it to 'never' 2016-07-13T16:08:29.041+0530 I CONTROL [initandlisten] >

Run help command in mongodb shell, you will get sample output like this..

> help db.help() help on db methods db.mycoll.help() help on collection methods sh.help() sharding helpers rs.help() replica set helpers help admin administrative help help connect connecting to a db help help keys key shortcuts help misc misc things to know help mr mapreduce show dbs show database names show collections show collections in current database show users show users in current database show profile show most recent system.profile entries with time >= 1ms show logs show the accessible logger names show log [name] prints out the last segment of log in memory, 'global' is default use set current database db.foo.find() list objects in collection foo db.foo.find( { a : 1 } ) list objects in foo where a == 1 it result of the last line evaluated; use to further iterate DBQuery.shellBatchSize = x set default number of items to display on shell exit quit the mongo shell >

Create or Switch to particular Database :

In mongodb we use keyword use to create new database or to switch to one already exist..

syntax :

use name_of_the_database

For example following will create database named uvdb.. if it's already exists following will switch to that specified database..

use uvdb

To check your currently selected database use the command db.

db
> use uvdb switched to db uvdb > db uvdb >

Insert a Document

Insert a document into a collection named myfriends. The operation will insert document into collection named myfriends, if one exist already.. Otherwise it will create new collection with specified name and then insert the document..

Syntax :
db.collection.insert()

db.collection.insert() inserts a single document or multiple documents into a collection. To insert a single document, pass a document (JSON like object) to the method; to insert multiple documents, pass an array of documents (array of objects) to the method.

To Insert Single Document into Collection

To insert single document into collection named myfriends .. pass a single object to insert method..

db.myfriends.insert( { "name" : "balu", "address" : { "street" : "Ramar Street", "village" : "Sri Rama Kuppam", "post" : "seethanjeri", "pincode" : "602026", "taluk" : "Uthukkottai", "nation" : "India" }, "education":"computer engineering", "occupation" : "software professional" } )

To Insert Multiple Documents into Collection

To insert multiple documents into collection named myfriends .. pass an array of objects to insert method..

db.myfriends.insert([ { "name" : "balu", "address" : { "street" : "Ramar Street", "village" : "Sri Rama Kuppam", "post" : "seethanjeri", "pincode" : "602026", "taluk" : "Uthukkottai", "nation" : "India" }, "education":"computer engineering", "occupation" : "software professional" }, { "name" : "babu", "address" : { "street" : "Ramar Street", "village" : "Sri Rama Kuppam", "post" : "seethanjeri", "pincode" : "602026", "taluk" : "Uthukkottai", "nation" : "USA" }, "education":"computer engineering", "occupation" : "software professional" } ])

The method returns a WriteResult object with the status of the operation...

If document get successfully inserted into collection you will get output like one shown below.. (here we have inserted 2 doucments so we get "nInserted" : 2).

BulkWriteResult({ "writeErrors" : [ ], "writeConcernErrors" : [ ], "nInserted" : 2, "nUpserted" : 0, "nMatched" : 0, "nModified" : 0, "nRemoved" : 0, "upserted" : [ ] })

Find or Query Data...

You can use the find() method to issue a query to retrieve data from a collection in MongoDB...
Queries can return all documents in a collection or only the documents that match a specified filter or criteria. You can specify the filter or criteria in a document and pass as a parameter to the find() method.
The find() method returns query results in a cursor, which is an iterable object that yields documents.

Query for All Documents in a Collection :

To return all documents in a collection, call the find() method without any arguments. For example, the following operation queries for all documents in the myfriends collection.

db.myfriends.find()

You will get out put like this..(The result set contains all documents in the myfriends collection.)

> db.myfriends.find() { "_id" : ObjectId("578795114b9734840360599c"), "name" : "balu", "address" : { "street" : "Ramar Street", "village" : "Sri Rama Kuppam", "post" : "seethanjeri", "pincode" : "602026", "taluk" : "Uthukkottai", "nation" : "India" }, "education" : "computer engineering", "occupation" : "software professional" } { "_id" : ObjectId("578795114b9734840360599d"), "name" : "babu", "address" : { "street" : "Ramar Street", "village" : "Sri Rama Kuppam", "post" : "seethanjeri", "pincode" : "602026", "taluk" : "Uthukkottai", "nation" : "USA" }, "education" : "computer engineering", "occupation" : "software professional" } >

Query data from collection using field names..

You can pass field names as parameters for find method.. so that it will return matched documents..

Syntax :
db.collection.find( { "field": "value" } )
Don't forget to put quotes around fields and value.. when we use dot notation to access an an embedded document(means an property or other object inside an object..) we must use quotes around fields.. otherwise quotes or not mandatory for top level fields like , name field in our example..

For example to find document which consists name field with value balu..

db.myfriends.find({name:"balu"})

or

db.myfriends.find({"name":"balu"})

See the above example ... here name is top level field so quotes are optional.. but my suggestion is always use quotes around fields.

The output of the above query is shown below..

> db.myfriends.find({name:"balu"}) { "_id" : ObjectId("578795114b9734840360599c"), "name" : "balu", "address" : { "street" : "Ramar Street", "village" : "Sri Rama Kuppam", "post" : "seethanjeri", "pincode" : "602026", "taluk" : "Uthukkottai", "nation" : "India" }, "education" : "computer engineering", "occupation" : "software professional" } >

Querying data from embedded documents .. means using dot notation needs quotes around field names.... This is mandatory...
See the following example..

We are going to query village embedded inside a address document..

db.myfriends.find({"address.village":"Sri Rama Kuppam"})

Sample output

> db.myfriends.find({"address.village":"Sri Rama Kuppam"}) { "_id" : ObjectId("578795114b9734840360599c"), "name" : "balu", "address" : { "street" : "Ramar Street", "village" : "Sri Rama Kuppam", "post" : "seethanjeri", "pincode" : "602026", "taluk" : "Uthukkottai", "nation" : "India" }, "education" : "computer engineering", "occupation" : "software professional" } { "_id" : ObjectId("578795114b9734840360599d"), "name" : "babu", "address" : { "street" : "Ramar Street", "village" : "Sri Rama Kuppam", "post" : "seethanjeri", "pincode" : "602026", "taluk" : "Uthukkottai", "nation" : "USA" }, "education" : "computer engineering", "occupation" : "software professional" } >

For more query statement usage .. refer Official Documentation..

Updating Data..

Update operations can modify/replace existing documents in a collection. The method accepts following as its parameters:

  • a filter document to match the documents to update
  • an update document to specify the modification to perform
  • an options parameter (optional).

By default, the update() method updates a single document. Use the multi option to update all documents that match the criteria.
You cannot update the _id field.

db.collection.update(parameters....)

For example, we are going to update name field which has value "balu" with another value "shyamala".. in our demo database.

db.myfriends.update({"name":"balu"}, {$set: { "name":"Shyamala"}} )

The above will update document with name field value with balu, with the new value shyamala..

To update multiple documents in a collection which matches to match object use multi option..

db.myfriends.update({"name":"balu"}, {$set: { "name":"Shyamala"}}, { multi: true} )
The update operation returns a WriteResult object which contains the status of the operation.
Sample Output..
> db.myfriends.update({"name":"balu"}, ... {$set: { "name":"Shyamala"}}, ... { multi: true} ... ) WriteResult({ "nMatched" : 1, "nUpserted" : 0, "nModified" : 1 }) >

Replace a Document
To replace the entire document except for the _id field, pass an entirely new document as the second argument to the update() method. The replacement document can have different fields from the original document. In the replacement document, you can omit the _id field since the _id field is immutable. If you do include the _id field, it must be the same value as the existing value.

db.myfriends.update({"name":"Shyamala"}, { "name" : "yuvaraj", "address" : { "village" : "Sri Rama Kuppam", "state" : "Tamil Nadu", "nation" : "India" } })

Sample Output..
Note that the WriteResult object showing status of operation..

> db.myfriends.update({"name":"Shyamala"}, ... { ... "name" : "yuvaraj", ... "address" : { ... "village" : "Sri Rama Kuppam", ... "state" : "Tamil Nadu", ... "nation" : "India" ... } ... }) WriteResult({ "nMatched" : 1, "nUpserted" : 0, "nModified" : 1 }) >

Now , if you check the database .. it will looks like below one..

> db.myfriends.find({"address.village":"Sri Rama Kuppam"}) { "_id" : ObjectId("578795114b9734840360599c"), "name" : "yuvaraj", "address" : { "village" : "Sri Rama Kuppam", "state" : "Tamil Nadu", "nation" : "India" } } { "_id" : ObjectId("578795114b9734840360599d"), "name" : "babu", "address" : { "street" : "Ramar Street", "village" : "Sri Rama Kuppam", "post" : "seethanjeri", "pincode" : "602026", "taluk" : "Uthukkottai", "nation" : "USA" }, "education" : "computer engineering", "occupation" : "software professional" } >

Here you can find more about UPDATE method..

Removing Data..

We can easily remove data with remove() method.. This method takes query statement like parameters to determines the documents to remove.

Syntax :
db.collection.remove(parameters...)

Remove All Documents That Match a with condition..

db.myfriends.remove({"name":"yuvaraj"})
Sample OutPut:
> db.myfriends.remove({"name":"yuvaraj"}) WriteResult({ "nRemoved" : 1 })

To Remove All Documents in the collection....

db.collection.remove( { } )

For example to remove all documents in our demo database collection named "myfriends.."

db.myfriends.remove( { } )

Drop a Collection
To drop a whole collection.. use drop method..

db.collection.drop()

For our case..

db.myfriends.drop()

Upon successful drop of the collection, the operation returns true.

true

If the collection to drop does not exist, the operation will return false.

> db.myfriends.drop() true >

For More information about remove method and drop method .. see Official documentation for remove and drop methods..

SQL to MongoDB..

Here you can find SQL to MongoDB mapping guide....

Hi friends, If you found any issue or typo error, please feel free to report it.. You can either open an issue on github or you can also report it on our Facebook Page via message(www.fb.com/opensourceinside) .

Thursday, July 7, 2016

How To Install LightTable 0.8.1 On Linux

How To Install
LightTable 0.8.1
On Linux


Lightable is an opensource, feature-rich text editor/ Integrated Development Environment (IDE) developed by Chris Granger and Robert Attorri. Released under MIT License.

It features real-time feedback allowing instant execution, debugging and access to documentation. The instant feedback provides an unusual execution environment intended to help developing abstractions.

According to wikipedia,
The developers claim that the software can reduce programming time by up to 20%.

Following are the some of the significant features of LightTable..

Features :

  • Free and open source
  • Cross-platform
  • In-line evaluation
  • Split views and instant feedback
  • Fuzzy finder
  • Auto updates
  • Modern UI
  • Auto-complete
  • Customizable

Here is how to install LightTable on Linux systems...

Installation :

There are two ways we can install LightTable on Linux

Method 1 :

Step 1 :

Just open terminal and copy paste the following code...

wget https://github.com/LightTable/LightTable/releases/download/0.8.1/lighttable-0.8.1-linux.tar.gz && tar -xzvf lighttable-0.8.1-linux.tar.gz && sudo mv lighttable-0.8.1-linux/ /opt/lighttable && sudo ln -sf /opt/lighttable/LightTable /usr/bin/lighttable

Step 2 :

Then, copy and paste the code given below on terminal

cat << EOF | sudo tee /usr/share/applications/light-table.desktop &> /dev/null [Desktop Entry] Version=1.0 Name=Light Table GenericName=Text Editor Exec=/opt/lighttable/LightTable Terminal=false Icon=/opt/lighttable/resources/app/core/img/lticon.png Type=Application Categories=GTK;Utility;TextEditor;Application;IDE;Development; EOF sudo chmod +x /usr/share/applications/light-table.desktop

Method 2 :

In this method we just use a shell script to automate above process.. Just copy and paste the code shown below...

wget -O - https://raw.githubusercontent.com/shivarajnaidu/UV-Shell-Scripts/master/LightTable-Installation-Script-For-Linux/LightTable%200.8.1%20Installation%20Script/LightTable-0.8.1-Installation-Script-For-Linux.sh | bash -

The above code will download installation script from Github and run it after file download completed.

Hi friends, I've only tested this script on Ubuntu 14.04 LTS and Ubuntu 16.04 LTS. But I hope this will work fine on other Linux distributions too.. If you can, please test it out on other Linux distributions. If you found any problem while installing LightTable with this methods.. please feel free to report it.. You can either open an issue on github or you can also report it on our Facebook Page via message(www.fb.com/opensourceinside) .

Removing/Uninstalling Lighttable From Your Linux System :

If you want to remove LightTable from your Linux system..

sudo rm -r /opt/lighttable/ /usr/bin/lighttable /usr/share/applications/light-table.desktop

Happy Coding !

Friends, Don't forget to share....