Friday, December 30, 2016

How To Get Rid Of "N: Ignoring file '20auto-upgrades.ucf-dist' in directory '/etc/apt/apt.conf.d/' as it has an invalid filename extension" Warning Message In Ubuntu 16.04

How To Get Rid Of
"N: Ignoring file '20auto-upgrades.ucf-dist' in directory '/etc/apt/apt.conf.d/' as it has an invalid filename extension"
Warning Message In Ubuntu 16.04

shivaraj@shivaraj-A14RM0E:~$ sudo apt upgrade [sudo] password for shivaraj: Reading package lists... Done Building dependency tree Reading state information... Done Calculating upgrade... Done 0 upgraded, 0 newly installed, 0 to remove and 0 not upgraded. N: Ignoring file '20auto-upgrades.ucf-dist' in directory '/etc/apt/apt.conf.d/' as it has an invalid filename extension shivaraj@shivaraj-A14RM0E:~$

As usual, today morning, I ran sudo apt-get -y upgrade in my Ubuntu Linux box.. But at the end of the upgrade I got "N: Ignoring file '20auto-upgrades.ucf-dist' in directory '/etc/apt/apt.conf.d/' as it has an invalid filename extension".... I googled about it to find the reason for this kind of nasty warnings...

Finally, found the reason and solution for this issue from Ask Ubuntu...

According to AskUbuntu, The reason for this warning message is, the update contains a new version of configuration file.. but if you choose system package manager to keep old one itself... then the new config file would just exists there, along with old configuration file...

So every time we use package manager, it is printing file with invalid extension warning message... However, it will not cause any issues.. We can just ignore it... But if you want to get rid of this warning message.. Just follow the bellow instructions...

We can get rid of this message by removing redundant new configuration file which came with updates..
Just execute bellow command to remove the new redundant configuration file.. So that we can get rid of warning message..

sudo rm -f /etc/apt/apt.conf.d/20auto-upgrades.ucf-dist

Now run sudo apt upgrade... This time you wouldn't get warning message..

shivaraj@shivaraj-A14RM0E:~$ sudo rm -f /etc/apt/apt.conf.d/20auto-upgrades.ucf-dist shivaraj@shivaraj-A14RM0E:~$ sudo apt upgrade Reading package lists... Done Building dependency tree Reading state information... Done Calculating upgrade... Done 0 upgraded, 0 newly installed, 0 to remove and 0 not upgraded. shivaraj@shivaraj-A14RM0E:~$

Thats all... Follow us on facebook fb.com/opensourceinside..


Sunday, December 25, 2016

How To Send Email From Nodejs To Gmail

How To Send Email From Nodejs To Gmail
(Using NodeMailer)


In PHP, we can send e-mail using mail() function which internally uses/requires sendmail program (or equivalent program like postfix on Linux..)
See how to install and configure postfix to send e-mail from postfix

In the case of NodeJs, we can use NodeMailer NPM module to send emails from NodeJS. Here I'm going to show you how to send email from NodeJs to Gmail using NodeMailer NPM.

Step 1: Create/Initialize New Node Project

Create a folder and run npm init then create file named mail.js

Create New Folder For Node Project and Enter Into That Folder:

mkdir node-email && cd node-email

Now initialize project with npm init

npm init

The output of above command will look like following one..

shivaraj@shivaraj-A14RM0E:~/node-email$ npm init
This utility will walk you through creating a package.json file.
It only covers the most common items, and tries to guess sensible defaults.

See `npm help json` for definitive documentation on these fields
and exactly what they do.

Use `npm install <pkg> --save` afterwards to install a package and
save it as a dependency in the package.json file.

Press ^C at any time to quit.
name: (node-email) 
version: (1.0.0) 
description: 
entry point: (index.js) 
test command: 
git repository: 
keywords: 
author: 
license: (ISC) 
About to write to /home/shivaraj/node-email/package.json:

{
  "name": "node-email",
  "version": "1.0.0",
  "description": "",
  "main": "index.js",
  "scripts": {
    "test": "echo \"Error: no test specified\" && exit 1"
  },
  "author": "",
  "license": "ISC"
}


Is this ok? (yes) 
shivaraj@shivaraj-A14RM0E:~/node-email$ 

After completing above step you will see new file named package.json inside your node project directory. with following content..

{ "name": "node-email", "version": "1.0.0", "description": "", "main": "index.js", "scripts": { "test": "echo \"Error: no test specified\" && exit 1" }, "author": "", "license": "ISC" }

Step 2: Now Install NodeMailer NPM

Now install NodeMailer NPM by running following command...

npm install nodemailer --save

You will see output similar to bellow one..

shivaraj@shivaraj-A14RM0E:~/node-email$ npm install nodemailer --save
node-email@1.0.0 /home/shivaraj/node-email
`-- nodemailer@2.7.0 
  +-- libmime@3.0.0 
  | +-- iconv-lite@0.4.15 
  | +-- libbase64@0.1.0 
  | `-- libqp@1.1.0 
  +-- mailcomposer@4.0.0 
  | `-- buildmail@4.0.0 
  |   +-- addressparser@1.0.1 
  |   `-- punycode@2.0.1 
  +-- nodemailer-direct-transport@3.3.2 
  | `-- smtp-connection@2.12.0 
  |   `-- httpntlm@1.6.1 
  |     +-- httpreq@0.4.22 
  |     `-- underscore@1.7.0 
  +-- nodemailer-shared@1.1.0 
  | `-- nodemailer-fetch@1.6.0 
  +-- nodemailer-smtp-pool@2.8.2 
  | `-- nodemailer-wellknown@0.1.10 
  +-- nodemailer-smtp-transport@2.7.2 
  `-- socks@1.1.9 
    +-- ip@1.1.4 
    `-- smart-buffer@1.0.11 

npm WARN node-email@1.0.0 No description
npm WARN node-email@1.0.0 No repository field.
shivaraj@shivaraj-A14RM0E:~/node-email$ 

The package.json file will now look like this...

{ "name": "node-email", "version": "1.0.0", "description": "", "main": "index.js", "scripts": { "test": "echo \"Error: no test specified\" && exit 1" }, "author": "", "license": "ISC", "dependencies": { "nodemailer": "^2.7.0" } }

Note the extra line added in package.json file...

"dependencies": { "nodemailer": "^2.7.0" }

The dependencies section indicates installed npm module name and version of that npm module... So we are using NodeMailer version 2.7 for this tutorial...

Step 3: Create app.js

Now create app.js file inside our project folder which is going to host our code for sending email...

Step 4: Now start to write code to send email from nodejs..

Import NodeMailer module into your app.js file...

var nodemailer = require('nodemailer');

Now configure/initialize nodemailer by providing required data...

var transporter = nodemailer.createTransport({ host: 'smtp.gmail.com', port: 465, secure: true, //true --> will use ssl auth: { user: 'yourusername@gmail.com', pass: 'your password' } });
Don't forget to replace user and pass fields with your email ID and password...
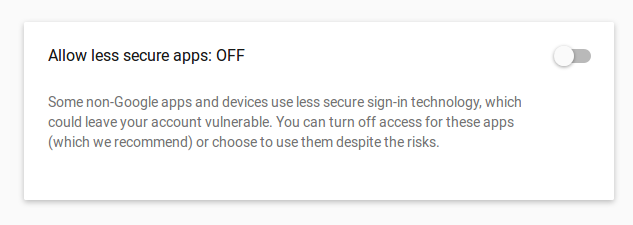
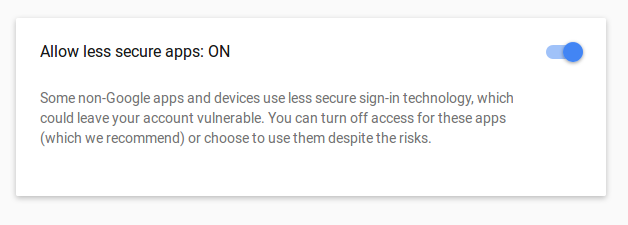
You have to Turn On Allow less secure apps in-order to use your nodemailer client work properly with gmail.. To do this go to https://myaccount.google.com/security/lesssecureapps find Allow less secure apps option and Turn On it..


Now send mail with transporter.sendMail(mailOptions, callback)... where mailOptions is an object which holds from address, to address and subject of mail etc... the second one is a callback function...

var mailOptions = { from: 'yourusername@gmail.com', to: 'friend1@gmail.com, friend2@gmail.com', subject: 'Hello', text: 'Hello world', html: '<b>Hello world </b>' }; transporter.sendMail(mailOptions, function(error, info) { if (error) { console.log(error); } else { console.log('Message sent: ' + info.response); } transporter.close(); });

call transport.close() method to close the connection..

The final version of app.js file will look like below one..

var nodemailer = require('nodemailer'); var transporter = nodemailer.createTransport({ host: 'smtp.gmail.com', port: 465, secure: true, auth: { user: 'yourusername@gmail.com', pass: 'your password' } }); var mailOptions = { from: 'yourusername@gmail.com', to: 'friend1@gmail.com, friend2@gmail.com', subject: 'Hello', text: 'Hello world', html: '<b>Hello world </b>' }; transporter.sendMail(mailOptions, function(error, info) { if (error) { console.log(error); } else { console.log('Message sent: ' + info.response); } transporter.close(); });
You can download full code sample from github..

That's all... Now run the app.js file to send email to your friend1@gmail.com, friend2@gmail.com....

node app.js

If your email get delivered successfully then you will see output similar to one shown below..

shivaraj@shivaraj-A14RM0E:~/node-email$ node app.js
Message sent: 250 2.0.0 OK 148xxxxxxx s5sxxxxxxxxxpgj.19 - gsmtp
shivaraj@shivaraj-A14RM0E:~/node-email$ 
Hi friends, If you found any issue or typo error, please feel free to report it.. You can either open an issue on github or you can also report it on our Facebook Page via message (www.fb.com/opensourceinside) .

That's it for now.. If you like don't forget to share it guys.. You can follow us on fb.com/opensourceinside and also subscribe our channel on Youtube..

Happy Coding !!


Thursday, December 15, 2016

How To Install Linux Kernel 4.9 In Ubuntu Linux And Its Derivatives

How To Install Linux Kernel 4.9 In Ubuntu Linux And Its Derivatives


As usual, Last Sunday (11, DEC 2016), Linux creator Linus Torvalds officially announced the final release of Linux Kernel 4.9, codenamed 'Roaring Lionus'. Which is also the final and biggest ever release of 2016. As of writing this, Linux 4.9 is mainline kernel and the most advanced Linux kernel available in market for GNU Linux Distros...
As Soon as it was released, immediately it will be available for rolling release distros such as Arch Linux, Solus, or even openSUSE. Soon it will be available for Fedora users also.. But for Ubuntu, you have to manually install Linux 4.9, if you want to upgrade your current Linux kernel installed in your system. Here we are going to see how to install Linux 4.9 in Ubuntu Linux and It's derivatives.

So new kernel release means, new features, support for more hardware and many more bug fixes and improvements.. Here is some new features and improvements Linux kernel 4.9 brings..

Some Of The New Features Of Linux 4.9

  • Experimental support for older AMD Radeon graphics cards
  • Memory Protection Keys (MPK) are now mainlined.
  • AMDGPU virtual display support.
  • Support for 29 more ARM machines by the mainline Linux kernel.
  • and Click To See More Changes Of Linux 4.9 Here...

Install Linux 4.9

If you want to automate the installation processor.. follow the instructions given Method 1, otherwise if you want to know and install step by step follow Method 2.

Method 1 :

Just open and copy-paste the following in your terminal..

To Install Linux Kernel 4.9 in your system run the following command..

wget -O - https://gist.githubusercontent.com/shivarajnaidu/cfd4ddc12de1798a82d1dbe0b8fad0b2/raw/df86e39b818c9a6e007b0b8bd9736ea1ba0f7800/install_linux4.9_in_ubuntu.sh | sh -s

If script execution completes successfully then you are ready to go.. Just restart your system to use latest kernel... Enjoy !

If you want to remove Linux kernel for any reason.. Just pass 'd' (with out single quotes) as argument to above command

To Remove Linux Kernel 4.9 from your system run the following command..

wget -O - https://gist.githubusercontent.com/shivarajnaidu/cfd4ddc12de1798a82d1dbe0b8fad0b2/raw/df86e39b818c9a6e007b0b8bd9736ea1ba0f7800/install_linux4.9_in_ubuntu.sh | sh -s d

Method 2 :

In this method i will show you step by step process of installing Linux kernel 4.9 .....

First update your system package source list and upgrade all installed packages to latest version by running following commands..

sudo apt-get update; sudo apt-get upgrade
Warning : The Linux kernel is a critical element of the system. To do the upgrade costs when one of your hardware devices is not working properly, and the new kernel may fix this problem. But at the same time installing a new kernel unnecessarily can lead to undesirable regressions, such as: no network connection, no sound or even the inability to boot the system, so install a new kernel on your own risk.

Now make a new folder/directory to download and store required binaries files...

mkdir linux4.9 && cd linux4.9

Now download required files with following command..

For 64 bit:

wget http://kernel.ubuntu.com/~kernel-ppa/mainline/v4.9/linux-headers-4.9.0-040900_4.9.0-040900.201612111631_all.deb; wget http://kernel.ubuntu.com/~kernel-ppa/mainline/v4.9/linux-headers-4.9.0-040900-generic_4.9.0-040900.201612111631_amd64.deb; wget http://kernel.ubuntu.com/~kernel-ppa/mainline/v4.9/linux-image-4.9.0-040900-generic_4.9.0-040900.201612111631_amd64.deb;

For 32 bit:

wget http://kernel.ubuntu.com/~kernel-ppa/mainline/v4.9/linux-headers-4.9.0-040900_4.9.0-040900.201612111631_all.deb; wget http://kernel.ubuntu.com/~kernel-ppa/mainline/v4.9/linux-headers-4.9.0-040900-generic_4.9.0-040900.201612111631_i386.deb; wget http://kernel.ubuntu.com/~kernel-ppa/mainline/v4.9/linux-image-4.9.0-040900-generic_4.9.0-040900.201612111631_i386.deb

Or if you want to download manually.. you can download from here.. and put them in one directory.
if you are downloading manually.. download correct binaries for your architecture...
If you are not sure about your OS architecture.. Run getconf LONG_BIT command.. This will tell you whether the kernel is 64 bit or 32 bit..
See More On Finding System Architecture..

That's all for now.. Don't Like us on fb.com/opensourceinside