Tuesday, April 19, 2016

Some Important Things To Do After Installing Ubuntu Linux On Your System

Some Important Things To Do After Installing Ubuntu Linux On Your System


Ubuntu Linux is one of the popular and most used Linux operating system backed by Canonical.

Requirements vary from person to person, depending upon whether the person is experienced Ubuntu user, a novice user, an artist or a programmer, but most of the things listed here are essential after a clean install of Ubuntu. Without wasting time anymore, let's have a look at must to do things after installing Ubuntu on your system.

1 . Change software sources and update your system:

First and foremost thing to do after installing Ubuntu is to change the software sources and add Canonical Partners in it. This will increase the number of applications and programs in your repository and you can easily install them via Software Center or command line.

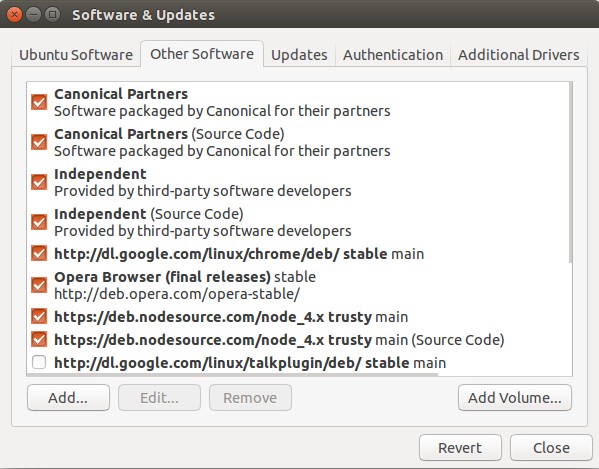
Open Unity Dash (press Super/Windows key) and search for Software & Updates:

Open it and in Other Software tab, make sure that Canonical Partners is checked.

Or simply issue following command ... to do all the above things in single command..

sudo add-apt-repository "deb http://archive.ubuntu.com/ubuntu $(lsb_release -sc) main universe restricted multiverse"

Doing this will update your repository. It takes some time in doing so. Once done, open terminal (Ctrl+Alt+T) and use the following command:

sudo apt-get update && sudo apt-get upgrade

The above command will update your system.

2 . Install Ubuntu Restricted Extras for media codecs:

"Ubuntu restricted extras" is a package of several codecs that are not installed by default in Ubuntu system. The reason why these these codecs are not included by default is legal constraints in many countries. Canonical cannot include them by default but if you install these codecs, it is you who would be held responsible for the usage and not Ubuntu. Don't worry it's safe to install these codecs. With these codecs installed, you can play different media formats such as MP3, MP4, AVI and several other formats without any trouble. Install it using the following command:

sudo apt-get install ubuntu-restricted-extras

3 . Install VLC media player:

Let me confess, I cannot imagine using my personal computer without VLC media player. It's the best out there. It can download subtitles automatically, you can manually synchronize the subs, you can watch online videos with subtitles with VLC and now you can enable desktop notification for VLC in Ubuntu. Use the following command to install VLC:

sudo apt-get install vlc

4 . Play encrypted DVD in Ubuntu :

Enable encrypted DVD playback in Ubuntu using the following commands:

sudo apt-get install libdvdread4 && sudo /usr/share/doc/libdvdread4/install-css.sh

5 . Install rar ,unrar and 7zip:

To avoid error like "There is no command installed for RAR archive files" or "There is an error occured while opening RAR archive files" install RAR and 7zip using the following command:

sudo apt-get install rar unrar p7zip

6 . Improve battery life and reduce overheating:

Overheating of laptops is a common issue, not only in Ubuntu but in any operating systems. Overheating also affects the battery life. Until Ubuntu 12.10, Jupiter was the best tool to reduce overheating, but since its development has stopped, you can use TLP or CPUFREQ instead of Jupiter. Install TLP using the following command:

sudo add-apt-repository -y ppa:linrunner/tlp && sudo apt-get update && sudo apt-get install tlp tlp-rdw && sudo tlp start

7 . Tweak Unity and Gnome:

Not satisfied with the default looks of Ubuntu? You can always tweak it. Ubuntu System Settings gives you plenty of option for tweaking, Unity Tweak Tool and Gnome Tweak Tool (for Gnome users) are excellent tools to tweak the appearance to any extent.

sudo apt-get install unity-tweak-tool gnome-tweak-tool

8 . Install Google Chrome

Google Chrome is not only one of the more popular, fastest, and most reliable browsers available, but it also includes a pre-packed and fully patched version of Adobe Flash and a huge array of extensions and apps.

If Your using 64 bit OS :

wget https://dl.google.com/linux/direct/google-chrome-stable_current_amd64.deb && sudo dpkg -i google-chrome-stable_current_amd64.deb && sudo apt-get -f install

If your using 32 bit :

wget https://dl.google.com/linux/direct/google-chrome-stable_current_i386.deb && sudo dpkg -i google-chrome-stable_current_i386.deb && sudo apt-get -f install

9 . Install Sublime Text & Atom Text Editor:

Sublime Text is a cross-platform text editor with a Python application programming interface (API). It natively supports many programming languages and markup languages, and its functionality can be extended by users with plugins, typically community-built and maintained under free-software licenses

Installation :

See How to install latest version of sublime text 3 in Ubuntu

And Atom Text Editor is a another nice and feature rich cross platform open source text editor, developed by GitHub. Atom is a desktop application built using web technologies. Atom is based on Electron (formerly known as Atom Shell), a framework that enables cross-platform desktop applications using Chromium and Node.js. It can also be used as an IDE.

Installation :

See , How to install Atom text editor on Ubuntu.

10 . Install Image Applications

If you are a photography enthusiast and you want to handle and manipulate images on Ubuntu, probably you want to install the following imaging programs:

  1. GIMP (alternative for Adobe Photoshop)
  2. Darktable
  3. Rawtherapee
  4. Pinta
  5. Shotwell
  6. Inkscape (alternative for Adobe Illustrator)
  7. Digikam

This applications can be installed from Software Center or all at once by using the following command line on Terminal:

sudo apt-get install gimp gimp-plugin-registry gimp-data-extras darktable rawtherapee pinta shotwell inkscape

11 . Install Brasero(Disk Burning Program) :

Brasero - the default disk burning app is removed as the default app in Ubuntu 16.04 Xenial Xerus. The application is in very slow development and Ubuntu developers decided to remove it from the default installer image. Also who burns disks these days? However, even if it has been removed, you can still install it using GNOME software or using terminal.

sudo apt-get install brasero

12 . Install Cheese

Cheese uses your webcam to take photos and videos, applies fancy special effects and lets you share the fun with others. To install cheese on your Ubuntu desktop, enter the following command:

sudo apt-get install cheese
Note :From the release of Ubuntu 16.04 Cheese is the part of default installation.. No need to install it separately.

13 . Install Wine

Wine enables Linux, Mac, FreeBSD, and Solaris users to run Windows applications without a copy of Microsoft Windows. Wine is free software under constant development. Other platforms may benefit as well.

sudo apt-get install wine

14 . Install Samba File sharing

In order to share folders in Ubuntu with other Linux and windows machines in your network, you will need to install and configure Samba share, for instructions see how to configure Samba in Ubuntu..

sudo apt-get install samba samba-common samba-common-bin samba-vfs-modules

15 . Install Dropbox

Dropbox is a free service that lets you bring all your photos, docs, and videos anywhere. This means that any file you save to your Dropbox will automatically save to all your computers, phones and even to the Dropbox website.

Installation :

sudo apt-get install nautilus-dropbox

For dropbox configuration instructions ... see here..

16 . Install TypeCatcher

TypeCatcher is an Open Source application developed by Andrew Starr-Bochicchio. It allows you to easily download and install Google webfonts for off-line use.

sudo apt-get install typecatcher

17 . Install WinUSB

WinUSB is simple, open source graphical tool to create Windows installer bootable USB disks using ISO images, or real CD/DVD installer disks in Ubuntu and it's derivatives. Using WinUSB, we can create startup disks for Windows Vista, 7, 8, and Windows PE.

Installation

For Installation Instructions ... see here..

18 . Install UNetbootin

UNetbootin (Universal Netboot Installer) is a cross-platform utility that can create live USB systems and can load a variety of system utilities or install various Linux distributions and other operating systems without a CD.

Installation

sudo add-apt-repository -y ppa:gezakovacs/ppa && sudo apt-get update && sudo apt-get install unetbootin

19 . Install OpenTeacher

OpenTeacher is an opensource application that helps you learn a foreign language vocabulary. Just enter some answers and questions in your native and foreign language or download them from internet, and OpenTeacher will test and let you know your vocabulary test result.

Download OpenTeacher from here..

Installation

  1. Download the Ubuntu .deb file from the Download section of this website.
  2. When the download has completed, doubleclick the .deb file you just downloaded. This will open the Software Center.
  3. Click "install" to start the installation.
  4. When the installation has finished, you can start OpenTeacher from Unity Dash by typing Openteacher

20 . Install Systemback

Systemback is an open source, system backup and restore application. Using Systemback, we can easily create backups of system and users configuration files. In case of problems, we can easily restore the previous state of the system. There are extra features like system copying, system installation and Live system creation.

Installation :

sudo add-apt-repository ppa:nemh/systemback && sudo apt-get update
sudo apt-get install systemback

Next Page (part 2)

Don't Forget To Share It With Your Friends..!!
Share Your With Linux and Opensource


Wednesday, April 13, 2016

5 reasons to use Docker for productivity software installation

5 reasons to use Docker for productivity software installation

WhenDocker brought new life to Linux containers at the beginning of 2013, the technology quickly gained popularity among software developers. Today Docker has millions of container downloads, thousands of community contributors, and countless third party projects who are using it. What explains this extraordinary popularity?

There are many articles out there trying to answer that question, describing the Docker features and benefits, mostly for developers. But when it comes to ordinary users and even system administrators, we still have some questions. In this article, I try to sum up the main advantages of using Docker for people, like me, who are looking for ways to use Docker with a project management tool. I specialize in productivity software and receive a lot of questions about software installation, which can be simplified with Docker.

I'll focus on...

  • OnlyOffice, an all-in-one solution for businesses that offers a set of tools for project management, including Gantt Charts, as well as integration with CRM, email, document management tools with online editors, calendars, etc. It has a public automated Docker repository with more than 10,000 pulls.
  • OpenProject, a project management tool with a wide range of features and plugins. There are 19 different Docker repositories for OpenProject, the most popular one with more than 10,000 pulls.
  • Redmine, a popular project management and issue tracking web application. There are over 180 different Redmine repositories in Docker Hub. The most popular ones are the official repository, with over 100,000 pulls, and the repository owned by sameersbn, which has a similar number.

#1. Save time

Project management tools are intended to carry a project through all its stages, and help users quickly and efficiently achieve their goals. Thus, the installation should be quick and easy. But sometimes, going through all of the installation steps might take a few hours even if we use the packages instead of compiling the source code. The main reason for this is that these tools require some additional components to be installed on the machine, and managing different versions can be tedious.

To work correctly, OnlyOffice requires Mono 3.2 or later, MySQL 5.6 or later, and nginx. OpenProject's list of dependencies is: Ruby 2.1, Apache or nginx, Phusion Passenger or Unicorn as an application server, MySQL 5.6, or later or PostgreSQL 9.1 or later as a database. To deploy and run Redmine, we need to install at least Ruby for a given Redmine version, one of the supported database back-ends (MySQL, PostgreSQL, Microsoft SQL Server, SQLite 3) to store data, and Bundler to manage gems dependencies.

These dependencies also have a lot of dependencies themselves.

When we use the Docker image, the only dependency to be installed is Docker itself. Then, all we need is to execute one single command to deploy the selected project management tool with all the necessary dependencies.

#2. Avoid dependency errors

As additional components are required, more issues might occur when installing and configuring them. Docker reduces the number of dependencies and thus the number of errors that might occur especially for ordinary users.

#3. Save resources

To ensure the proper project management tool works, our machine must meet all the system requirements specified by developers. But the reality is that the settings and environment of our machine could differ from those of the machine used by developers for writing and testing the code. Of course, we can use an "empty" machine (or two machines in the case of OnlyOffice, if we plan to use the online document editors as well) and try to reproduce the environment. Regardless of the time spent, we would not be able to install anything else on this machine. Or, you may find that you need to hire a system administrator or a developer to reproduce the necessary environment.

Docker allows us to minimize these costs by providing a way to run an application securely isolated in a container allowing us to run many containers simultaneously on one machine.

#4. Update faster and easier

Data security is one of the main reasons why people prefer open source and server solutions to cloud-based solutions. And, the updating process itself takes even more time than the software installation.

With Docker, the updating process becomes much easier. We can store data on the host machine (mount the data volumes by specifying the -v option in the Docker run command) and back it up with any software available for such purposes. Then, all we need is to remove the current container, remove the current image, and run the new image with the same map paths. In sum, three commands to update the whole project management system.

#5. Keep the machine in order

Choosing the right project management tool(s) might take some time. Most of them offer a cloud version to try, like OnlyOffice and OpenProject.

Docker allows us to test the toolset on our local machine and evaluate its capacities without blocking up the system. We won't need to search for the dependencies and uninstall them one by one, you can uninstall an inappropriate tool with one single command.


Creative Commons License
Source : opensource.com

What is Docker ? (An Introduction To Docker)

What is Docker ?
An Introduction To Docker


What is Docker ?

Docker is all about making it easier to create, deploy, and run applications by using containers. Containers allow a developer to package up an application with all of the parts it needs, such as libraries and other dependencies, and ship it all out as one package. By doing so, thanks to the container, the developer can rest assured that the application will run on any other Linux machine regardless of any customized settings that machine might have that could differ from the machine used for writing and testing the code.

In a way, Docker is a bit like a virtual machine. But unlike a virtual machine, rather than creating a whole virtual operating system, Docker allows applications to use the same Linux kernel as the system that they're running on and only requires applications be shipped with things not already running on the host computer. This gives a significant performance boost and reduces the size of the application.

And importantly, Docker is open source. This means that anyone can contribute to Docker and extend it to meet their own needs if they need additional features that aren't available out of the box.

Who is Docker for ?

Docker is a tool that is designed to benefit both developers and system administrators, making it a part of many DevOps (developers + operations) toolchains. For developers, it means that they can focus on writing code without worrying about the system that it will ultimately be running on. It also allows them to get a head start by using one of thousands of programs already designed to run in a Docker container as a part of their application. For operations staff, Docker gives flexibility and potentially reduces the number of systems needed because of its small footprint and lower overhead.

Getting started

Here are some resources that will help you get started using Docker in your workflow. Docker provides a web-based tutorial with a command-line simulator that you can try out basic Docker commands with and begin to understand how it works. There is also a beginners guide to Docker that introduces you to some basic commands and container terminology. Or watch the video below for a more in-depth look:


Docker and security

Docker brings security to applications running in a shared environment, but containers by themselves are not an alternative to taking proper security measures.

Dan Walsh, a computer security leader best known for his work on SELinux, gives his perspective on the importance of making sure Docker containers are secure. He also provides a detailed breakdown of security features currently within Docker, and how they function.


Creative Commons License
Source : opensource.com

Monday, April 11, 2016

Ubuntu is everywhere - Infographic

Ubuntu Is Everywhere - Infographic


This infographic shows the reach of Ubuntu from International Space Station to your laptop

This is according to Canonical, which is celebrating the upcoming Ubuntu 16.04 LTS release

Ubuntu is a Debian-based Linux operating system and distribution for personal computers, smartphones and network servers. It uses Unity as its default user interface. It is based on free software and named after the Southern African philosophy of ubuntu (literally, “human-ness”), which often is translated as “humanity towards others” or “the belief in a universal bond of sharing that connects all humanity”.

The popularity of Ubuntu is such that it is used on International space station and is behind the world’s largest supercomputer. It runs the servers of popular online services like Netflix, Snapchat, Pinterest, Reddit, Dropbox, PayPal, Wikipedia, and Instagram, in Google, Tesla, George Hotz, and Uber cars. It is also employed at Bloomberg, Weta Digital and Walmart.The Brigham Young University is using Ubuntu to control the Mars Rover.

To celebrate the forthcoming Ubuntu 16.04 LTS (Xenial Xerus) operating system, due for release later this month, on April 21, Canonical took the time to put together a very nice infographic, showing the world how popular Ubuntu is across the world.

“To celebrate our upcoming 16.04 LTS we wanted to shine a bit of light on how many people in the world actually use Ubuntu,” said Alexia Emmanoulopoulou, Demand Generation Marketing Manager, Canonical. “The reality is, hundreds of millions of PCs, servers, devices, virtual machines, and containers have booted Ubuntu to date and are in use!”


Saturday, April 9, 2016

Test Drive Linux With Nothing But A Flash Drive

Test Drive Linux With Nothing But A Flash Drive


Maybe you've heard about Linux and are intrigued by it. So intrigued that you want to give it a try. But you might not know where to begin.

You've probably done a bit of research online and have run across terms like dual booting and virtualization. Those terms might mean nothing to you, and you're definitely not ready to sacrifice the operating system that you're currently using to give Linux a try. So what can you do ?

If you have a USB flash drive lying around, you can test drive Linux by creating a live USB. It's a USB flash drive that contains an operating system that can start from the flash drive. It doesn't take much technical ability to create one. Let's take a look at how to do that and how to run Linux using a live USB.

What you'll need

Aside from a desktop or laptop computer, you'll need:
  • A blank USB flash drive - preferably one that has a capacity of 4 GB or more.
  • An ISO image (an archive of the contents of a hard disk) of the Linux distribution that you want to try. More about this in a moment.
  • An application called Unetbootin, an open source tool, cross platform tool that creates a live USB. You don't need to be running Linux to use it.

Now See...

How To Create Live USB(bootable USB) using Unetbootin : #

Plug your flash drive into a USB port on your computer and then fire up Unetbootin.

Remember the ISO image that was mentioned a few moments ago? There are two ways you can get one: either by downloading it from the website of the Linux distribution that you want to try, or by having Unetbootin download it for you. To do that latter, click Select Distribution at the top of the window, choose the distribution that you want to download, and then click Select Version to select the version of the distribution that you want to try.

Or , you can download the distribution yourself. Usually, the Linux distributions that I want to try aren't in the list. If you go the second route, click Disk image and then click the button to search for the .iso file that you downloaded.


Notice the Space used to preserve files across reboots (Ubuntu only) option? If you're testing Ubuntu or one of its derivatives (like Lubuntu or Xubuntu), you can set aside a few megabytes of space on your flash drive to save files like web browser bookmarks or documents that you create. When you load Ubuntu from the flash drive again, you can reuse those files.

Once the ISO image is loaded, click OK. It takes anywhere from a couple of minutes to 10 minutes for Unetbootin to create the live USB.


Testing out the live USB

This is the point where you have to embrace your inner geek a bit. Not too much, but you will be taking a peek into the innards of your computer by going into the BIOS. Your computer's BIOS starts various bits of hardware and controls where the computer's operating system starts, or boots, from.

The BIOS usually looks for the operating system in this order (or something like it): hard drive, then CD-ROM or DVD drive, and then an external drive. You'll want to change that order so that the external drive (in this case, your live USB) is the one that the BIOS checks first.

To do that, restart your computer with the flash drive plugged into a USB port. When you see the message Press F2 to enter setup, do just that. On some computers, the key might be F10.

In the BIOS, use the right arrow key on your keyboard to navigate to the Boot menu. You'll see a list of drives on your computer. Use the down arrow key on your keyboard to navigate to the item labeled USB HDD and then move that item to the top of the list.

Once you've done that, press F10 to save the changes. (Note : Keys mentioned in this post for BIOS might be slightly different for computers from different manufacturers . so check out them.) You'll be kicked out of the BIOS and your computer will start up. After a short amount of time, you'll be presented with a menu listing the options for starting the Linux distribution you're trying out. Select Run without installing (or the menu item closest to it).

Once the desktop loads, you can connect to a wireless or wired network, browse the web, and give the pre-installed software a whirl. You can also check to see if, for example, your printer or scanner works with the Linux distribution you're testing. If you really, really want to you can also fiddle at the command line.

What to expect

Depending on the Linux distribution you're testing and the speed of the flash drive you're using, the operating system might take longer to load and it might run a bit slower than it would if it was installed on your hard drive.

As well, you'll only have the basic software that the Linux distribution packs out of the box. You generally get a web browser, a word processor, a text editor, a media player, an image viewer, and a set of utilities. That should be enough to give you a feel for what it's like to use Linux.

If you decide that you like using Linux, you can install it from the flash drive by double clicking on the installer.


source : opensource.com Creative Commons License

Saturday, April 2, 2016

How To Upgrade Linux Kernel on Supported Ubuntu Releases and Its Derivatives To Ububntu 16.04 's Kernel (linux 4.4.X)

How To Upgrade Linux Kernel on Supported Ubuntu Releases and Its Derivatives To Ububntu 16.04 's Kernel (linux 4.4.X)


You may know that we can get latest stable kernel on Ubuntu from point release( or LTSEnablementStack) which is released by Ubuntu for every 6 moths.
The Ubuntu LTS enablement stacks provide newer kernel and X support for existing LTS releases. These can be installed manually, or are automatically shipped if installing from point releases like.. 12.04.2/14.04.2 and newer release media.

Brand new hardware devices are released to the public always more frequently. And we want such hardware to be always working on Ubuntu, even if it has been released after an Ubuntu release. Six months (the time it takes for a new Ubuntu release to be made) is a very long period in the IT field. Hardware Enablement (HWE) is about that: catching up with the newest hardware technologies.

The 12.04.x , 14.04.x and newer point release will ship with an updated kernel and X stack by default. If you have installed with older media you can use the following to install the newer HWE kernel derived from Ubuntu 16.04 (XenialXerus):

Install Ubuntu 16.04 's Kernel(Linux kernel 4.4.x)

Step 1 :

Open The Terminal (press Ctrl+Alt+T )


Step 2

Update Your System's Source List

sudo apt-get update

Step 3 :

Now run the following command to install linux kernel 4.4 which is provided by Ubuntu as HWE stack

sudo apt-get install linux-generic-lts-xenial

Now package manager will ask for your confirmation ..that whether you want to continue or you want to abort installation process..
So, give Y (yes) and press Enter


That's it ,,, Now you have system installed with 16.04 's kernel (Linux kernel 4.4)


If you encounter any issues after installing this kernel .. you can easily un-install this kernel.
Run the following command to un install the kernel that you have installed just before.

sudo apt-get remove linux-generic-lts-xenial


How to Manage Systemd Services on Linux

How to Manage Systemd Services
on Linux


Composants systemd

Systemd is now used by default in most Linux distributions, from Fedora and Red Hat to Ubuntu, Debian, openSUSE, and Arch. The systemctl command allows you to get information about systemd's status and control running services.

Despite the controversy, this at least introduces some standardization across Linux distributions. The same commands will allow you to manage services in the same way on any Linux distribution using systemd.

Note: To modify your system configuration on Linux distribution like Ubuntu that uses sudo, you'll need to prefix the commands here with sudo. On other Linux distributions, you'll need to become the root user with the su command first.

What's Systemd ?

systemd is a system and service manager for Linux, compatible with SysV and LSB init scripts.
systemd

  • Provides aggressive parallelization capabilities
  • Uses socket and D-Bus activation for starting services
  • Offers on-demand starting of daemons
  • Implements transactional dependency-based service control logic
  • Tracks processes using Linux cgroups
  • Supports snapshotting and restoring
  • Maintains mount and automount points

  • Check If Your Linux System Is Using Systemd

    If you're not sure whether your Linux distribution is using systemd, open a Terminal window and run the following command. This shows you the version number of systemd on your Linux system, if it does have systemd installed:

    systemd --version
    OR

    systemctl --version

    Output :

    systemd 215 +PAM +AUDIT +SELINUX +IMA +SYSVINIT +LIBCRYPTSETUP +GCRYPT +ACL +XZ -SECCOMP -APPARMOR

    Systemctl

    systemctl is the main tool used to introspect and control the state of the "systemd" system and service manager. You can use systemctl for instance to enable/disable services permanently or only for the current session.See man systemctl for more details.

    Tip:
    • You can use all of the following systemctl commands with the
      -H user@host switch to control a systemd instance on a remote machine. This will use SSH to connect to the remote systemd instance.
    • systemadm is the official graphical frontend for systemctl. It is provided by systemd-ui from the official repositories or by systemd-ui-gitAUR from the AUR for the development version.
    • Plasma users can install systemd-kcm as a graphical fronted for systemctl. After installing the module will be added under System administration.

    Analyze the Boot Process

    The systemd-analyze command allows you to view information about your boot process, such as how long it took and which services (and other processes) added the most time to the boot process.

    To view information about the startup process in general, run this command:

    systemd-analyze

    To view how long each process took to start, run this command:

    systemd-analyze blame

    Analyzing the system state

    Show system status using:

    systemctl status

    Using units

    Systemd uses "units", which can be services (.service), mount points (.mount), devices (.device), or sockets (.socket). The same systemctl command manages all these types of units.

    List running units:

    systemctl
    or: systemctl list-units

    List failed units:

    systemctl --failed

    To view all available unit files on your system:

    The available unit files can be seen in /usr/lib/systemd/system/ and /etc/systemd/system/ (the latter takes precedence). List installed unit files with:

    systemctl list-unit-files

    Managing services with systemd

    To view a list of enabled and disabled services, you use the same systemctl command as above, but tell it to only list services:

    systemctl list-unit-files --type=service

    List all running services:

    systemctl

    Note:

    When using systemctl, you generally have to specify the complete name of the unit file, including its suffix, for example sshd.socket. There are however a few short forms when specifying the unit in the following systemctl commands:

    • If you do not specify the suffix, systemctl will assume .service. For example, netctl and netctl.service are equivalent.
    • Mount points will automatically be translated into the appropriate .mount unit. For example, specifying /home is equivalent to home.mount.
    • Similar to mount points, devices are automatically translated into the appropriate .device unit, therefore specifying /dev/sda2 is equivalent to dev-sda2.device.

    Activates the service named "example1" immediately:

    systemctl start example1

    Deactivates the service "example1" immediately:

    systemctl stop example1

    Restarts the service "example1" immediately:

    systemctl restart example1

    Shows status of the service "example1":

    systemctl status example1

    Enables "example1" to be started on bootup:

    systemctl enable example1

    Disables "example1" to not start during bootup:

    systemctl disable example1

    Power management using Systemd

    polkit is necessary for power management as an unprivileged user. If you are in a local systemd-logind user session and no other session is active, the following commands will work without root privileges. If not (for example, because another user is logged into a tty), systemd will automatically ask you for the root password.


    Shut down and reboot the system:

    systemctl reboot

    Shut down and power-off the system:

    systemctl poweroff

    Suspend the system:

    systemctl suspend

    Put the system into hibernation:

    systemctl hibernate

    Put the system into hybrid-sleep state (or suspend-to-both):

    systemctl hybrid-sleep


    Friday, April 1, 2016

    Ubuntu (Linux) For Windows

    Ubuntu (Linux) For Windows


    Ubuntu-windows

    Soon you'll be able to run Linux apps on Windows thanks to a partnership between Microsoft and Canonical, the company behind the popular Ubuntu version of Linux.

    This summer, Microsoft will release Ubuntu for Windows, the company announced at its annual Build conference today. This marriage of former foes will not only bring a set of key Linux tools to the Windows desktop but make it easy to install other Linux programs without the need for those programs to be rewritten to work on the Windows OS.

    That might not sound particularly useful, since commercial software companies like Adobe and Intuit tend to prioritize building applications for Windows over Linux. But it could make life easier for programmers. "This is a developer-focused release that removes a major barrier for developers who want or need to use Linux tools as part of their workflow," Microsoft employee Scott Hanselman explained in a blog post.

    More specifically, Ubuntu for Windows is ideal for web developers, says Fintan Ryan of the analyst firm RedMonk. If you're building a website or web application, chances are it's going to end up running on Linux. About 68 percent of websites are powered by Unix-style operating systems, according to a W3techs survey; other estimates put that rate even higher. Many programmers, particularly those who work for large corporations, are still stuck using Windows to develop software that will eventually run on Linux, Ryan says. The trouble is, Linux has its own tools and its own way of doing things. Ubuntu for Windows could create a more consistent experience for web developers working on Windows and make their lives a bit easier overall.

    The Big Bash


    Ubuntu-windows

    For example, Microsoft demonstrated today how developers can use the the popular open source command line interface Bash to manage a web project from a Windows desktop using the exact same commands they'd use on a Linux server.

    Sure, you can already use Linux apps on Windows by running the entire operating system in what's called a virtual machine, but that can be resource intensive. Many of the tools Linux developers use are already available through Cygwin and other efforts to port open source apps to Windows, but that effort requires each application to be at least partially rewritten.

    Ubuntu for Windows will use a new piece of technology Microsoft created called Windows Subsystem for Linux, Canonical's Dustin Kirkland said in a blog post. Instead of relying on a virtual machine or manually rewriting apps, the Windows Subsystem for Linux translates commands meant for the Linux kernel-the core part of the operating system-into commands for the Windows kernel. It's not perfect, Hanselman and Kirkland admit, and there's much work left to be done. But it should become possible to run many Linux tools on Windows without needing to make any changes.

    Canonical's Dustin Kirkland explains a bit further. Users will be able to type "bash" into the Windows 10 start menu to open a command line console that users Ubuntu's /bin/bash.

    The system features a full Ubuntu user space complete with support for tools including ssh, grep, wget, curl, python, mysql, ruby, php, vim, and more.

    Kirkland says Bash for Windows 10 differs from tools like Cygwin, because it's not just a set of tools that have been recompiled to run on Windows. Instead, the complete Ubuntu subsystem is available, making this more like an emulation layer. It's kind of like the opposite of WINE, which allows you to run (some) Windows apps on Linux.

    In this case, Linux system calls are translated into Windows calls in real-time, allowing you to run some Ubuntu programs on Windows without making any modifications to those programs.

    Currently the tools are based on Ubuntu 14.04, but soon everything will be updated to Ubuntu 16.04.

    Ubuntu for Windows is part of Microsoft's larger strategy to make Windows the main place programmers develop applications for a wide variety of platforms, from Linux to Android to iOS. But Ryan doubts Microsoft will win any Linux developers over to Windows with this new piece of technology. Rather, he thinks it's designed to keep developers from defecting away from Microsoft. Given a choice, many developers who use Windows for work today would rather just use Linux or the Unix-like Macintosh OS X operating system to do development work than mess with virtual machines or ported apps. Making life easier for them might keep them using Microsoft products once they have a say in what they use.