Friday, December 30, 2016

How To Get Rid Of "N: Ignoring file '20auto-upgrades.ucf-dist' in directory '/etc/apt/apt.conf.d/' as it has an invalid filename extension" Warning Message In Ubuntu 16.04

How To Get Rid Of
"N: Ignoring file '20auto-upgrades.ucf-dist' in directory '/etc/apt/apt.conf.d/' as it has an invalid filename extension"
Warning Message In Ubuntu 16.04

shivaraj@shivaraj-A14RM0E:~$ sudo apt upgrade [sudo] password for shivaraj: Reading package lists... Done Building dependency tree Reading state information... Done Calculating upgrade... Done 0 upgraded, 0 newly installed, 0 to remove and 0 not upgraded. N: Ignoring file '20auto-upgrades.ucf-dist' in directory '/etc/apt/apt.conf.d/' as it has an invalid filename extension shivaraj@shivaraj-A14RM0E:~$

As usual, today morning, I ran sudo apt-get -y upgrade in my Ubuntu Linux box.. But at the end of the upgrade I got "N: Ignoring file '20auto-upgrades.ucf-dist' in directory '/etc/apt/apt.conf.d/' as it has an invalid filename extension".... I googled about it to find the reason for this kind of nasty warnings...

Finally, found the reason and solution for this issue from Ask Ubuntu...

According to AskUbuntu, The reason for this warning message is, the update contains a new version of configuration file.. but if you choose system package manager to keep old one itself... then the new config file would just exists there, along with old configuration file...

So every time we use package manager, it is printing file with invalid extension warning message... However, it will not cause any issues.. We can just ignore it... But if you want to get rid of this warning message.. Just follow the bellow instructions...

We can get rid of this message by removing redundant new configuration file which came with updates..
Just execute bellow command to remove the new redundant configuration file.. So that we can get rid of warning message..

sudo rm -f /etc/apt/apt.conf.d/20auto-upgrades.ucf-dist

Now run sudo apt upgrade... This time you wouldn't get warning message..

shivaraj@shivaraj-A14RM0E:~$ sudo rm -f /etc/apt/apt.conf.d/20auto-upgrades.ucf-dist shivaraj@shivaraj-A14RM0E:~$ sudo apt upgrade Reading package lists... Done Building dependency tree Reading state information... Done Calculating upgrade... Done 0 upgraded, 0 newly installed, 0 to remove and 0 not upgraded. shivaraj@shivaraj-A14RM0E:~$

Thats all... Follow us on facebook fb.com/opensourceinside..


Sunday, December 25, 2016

How To Send Email From Nodejs To Gmail

How To Send Email From Nodejs To Gmail
(Using NodeMailer)


In PHP, we can send e-mail using mail() function which internally uses/requires sendmail program (or equivalent program like postfix on Linux..)
See how to install and configure postfix to send e-mail from postfix

In the case of NodeJs, we can use NodeMailer NPM module to send emails from NodeJS. Here I'm going to show you how to send email from NodeJs to Gmail using NodeMailer NPM.

Step 1: Create/Initialize New Node Project

Create a folder and run npm init then create file named mail.js

Create New Folder For Node Project and Enter Into That Folder:

mkdir node-email && cd node-email

Now initialize project with npm init

npm init

The output of above command will look like following one..

shivaraj@shivaraj-A14RM0E:~/node-email$ npm init
This utility will walk you through creating a package.json file.
It only covers the most common items, and tries to guess sensible defaults.

See `npm help json` for definitive documentation on these fields
and exactly what they do.

Use `npm install <pkg> --save` afterwards to install a package and
save it as a dependency in the package.json file.

Press ^C at any time to quit.
name: (node-email) 
version: (1.0.0) 
description: 
entry point: (index.js) 
test command: 
git repository: 
keywords: 
author: 
license: (ISC) 
About to write to /home/shivaraj/node-email/package.json:

{
  "name": "node-email",
  "version": "1.0.0",
  "description": "",
  "main": "index.js",
  "scripts": {
    "test": "echo \"Error: no test specified\" && exit 1"
  },
  "author": "",
  "license": "ISC"
}


Is this ok? (yes) 
shivaraj@shivaraj-A14RM0E:~/node-email$ 

After completing above step you will see new file named package.json inside your node project directory. with following content..

{ "name": "node-email", "version": "1.0.0", "description": "", "main": "index.js", "scripts": { "test": "echo \"Error: no test specified\" && exit 1" }, "author": "", "license": "ISC" }

Step 2: Now Install NodeMailer NPM

Now install NodeMailer NPM by running following command...

npm install nodemailer --save

You will see output similar to bellow one..

shivaraj@shivaraj-A14RM0E:~/node-email$ npm install nodemailer --save
node-email@1.0.0 /home/shivaraj/node-email
`-- nodemailer@2.7.0 
  +-- libmime@3.0.0 
  | +-- iconv-lite@0.4.15 
  | +-- libbase64@0.1.0 
  | `-- libqp@1.1.0 
  +-- mailcomposer@4.0.0 
  | `-- buildmail@4.0.0 
  |   +-- addressparser@1.0.1 
  |   `-- punycode@2.0.1 
  +-- nodemailer-direct-transport@3.3.2 
  | `-- smtp-connection@2.12.0 
  |   `-- httpntlm@1.6.1 
  |     +-- httpreq@0.4.22 
  |     `-- underscore@1.7.0 
  +-- nodemailer-shared@1.1.0 
  | `-- nodemailer-fetch@1.6.0 
  +-- nodemailer-smtp-pool@2.8.2 
  | `-- nodemailer-wellknown@0.1.10 
  +-- nodemailer-smtp-transport@2.7.2 
  `-- socks@1.1.9 
    +-- ip@1.1.4 
    `-- smart-buffer@1.0.11 

npm WARN node-email@1.0.0 No description
npm WARN node-email@1.0.0 No repository field.
shivaraj@shivaraj-A14RM0E:~/node-email$ 

The package.json file will now look like this...

{ "name": "node-email", "version": "1.0.0", "description": "", "main": "index.js", "scripts": { "test": "echo \"Error: no test specified\" && exit 1" }, "author": "", "license": "ISC", "dependencies": { "nodemailer": "^2.7.0" } }

Note the extra line added in package.json file...

"dependencies": { "nodemailer": "^2.7.0" }

The dependencies section indicates installed npm module name and version of that npm module... So we are using NodeMailer version 2.7 for this tutorial...

Step 3: Create app.js

Now create app.js file inside our project folder which is going to host our code for sending email...

Step 4: Now start to write code to send email from nodejs..

Import NodeMailer module into your app.js file...

var nodemailer = require('nodemailer');

Now configure/initialize nodemailer by providing required data...

var transporter = nodemailer.createTransport({ host: 'smtp.gmail.com', port: 465, secure: true, //true --> will use ssl auth: { user: 'yourusername@gmail.com', pass: 'your password' } });
Don't forget to replace user and pass fields with your email ID and password...
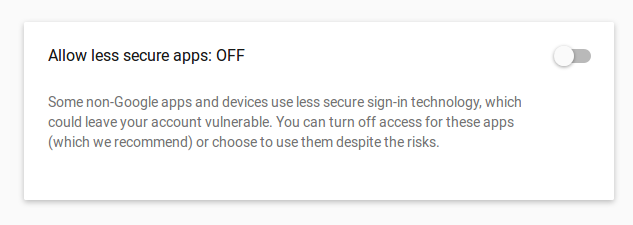
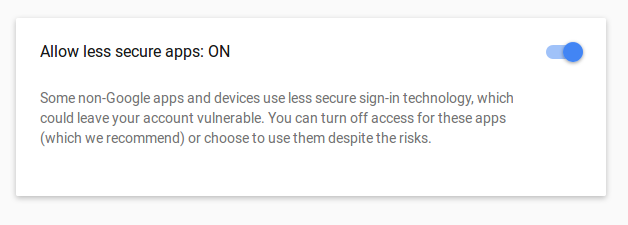
You have to Turn On Allow less secure apps in-order to use your nodemailer client work properly with gmail.. To do this go to https://myaccount.google.com/security/lesssecureapps find Allow less secure apps option and Turn On it..


Now send mail with transporter.sendMail(mailOptions, callback)... where mailOptions is an object which holds from address, to address and subject of mail etc... the second one is a callback function...

var mailOptions = { from: 'yourusername@gmail.com', to: 'friend1@gmail.com, friend2@gmail.com', subject: 'Hello', text: 'Hello world', html: '<b>Hello world </b>' }; transporter.sendMail(mailOptions, function(error, info) { if (error) { console.log(error); } else { console.log('Message sent: ' + info.response); } transporter.close(); });

call transport.close() method to close the connection..

The final version of app.js file will look like below one..

var nodemailer = require('nodemailer'); var transporter = nodemailer.createTransport({ host: 'smtp.gmail.com', port: 465, secure: true, auth: { user: 'yourusername@gmail.com', pass: 'your password' } }); var mailOptions = { from: 'yourusername@gmail.com', to: 'friend1@gmail.com, friend2@gmail.com', subject: 'Hello', text: 'Hello world', html: '<b>Hello world </b>' }; transporter.sendMail(mailOptions, function(error, info) { if (error) { console.log(error); } else { console.log('Message sent: ' + info.response); } transporter.close(); });
You can download full code sample from github..

That's all... Now run the app.js file to send email to your friend1@gmail.com, friend2@gmail.com....

node app.js

If your email get delivered successfully then you will see output similar to one shown below..

shivaraj@shivaraj-A14RM0E:~/node-email$ node app.js
Message sent: 250 2.0.0 OK 148xxxxxxx s5sxxxxxxxxxpgj.19 - gsmtp
shivaraj@shivaraj-A14RM0E:~/node-email$ 
Hi friends, If you found any issue or typo error, please feel free to report it.. You can either open an issue on github or you can also report it on our Facebook Page via message (www.fb.com/opensourceinside) .

That's it for now.. If you like don't forget to share it guys.. You can follow us on fb.com/opensourceinside and also subscribe our channel on Youtube..

Happy Coding !!


Thursday, December 15, 2016

How To Install Linux Kernel 4.9 In Ubuntu Linux And Its Derivatives

How To Install Linux Kernel 4.9 In Ubuntu Linux And Its Derivatives


As usual, Last Sunday (11, DEC 2016), Linux creator Linus Torvalds officially announced the final release of Linux Kernel 4.9, codenamed 'Roaring Lionus'. Which is also the final and biggest ever release of 2016. As of writing this, Linux 4.9 is mainline kernel and the most advanced Linux kernel available in market for GNU Linux Distros...
As Soon as it was released, immediately it will be available for rolling release distros such as Arch Linux, Solus, or even openSUSE. Soon it will be available for Fedora users also.. But for Ubuntu, you have to manually install Linux 4.9, if you want to upgrade your current Linux kernel installed in your system. Here we are going to see how to install Linux 4.9 in Ubuntu Linux and It's derivatives.

So new kernel release means, new features, support for more hardware and many more bug fixes and improvements.. Here is some new features and improvements Linux kernel 4.9 brings..

Some Of The New Features Of Linux 4.9

  • Experimental support for older AMD Radeon graphics cards
  • Memory Protection Keys (MPK) are now mainlined.
  • AMDGPU virtual display support.
  • Support for 29 more ARM machines by the mainline Linux kernel.
  • and Click To See More Changes Of Linux 4.9 Here...

Install Linux 4.9

If you want to automate the installation processor.. follow the instructions given Method 1, otherwise if you want to know and install step by step follow Method 2.

Method 1 :

Just open and copy-paste the following in your terminal..

To Install Linux Kernel 4.9 in your system run the following command..

wget -O - https://gist.githubusercontent.com/shivarajnaidu/cfd4ddc12de1798a82d1dbe0b8fad0b2/raw/df86e39b818c9a6e007b0b8bd9736ea1ba0f7800/install_linux4.9_in_ubuntu.sh | sh -s

If script execution completes successfully then you are ready to go.. Just restart your system to use latest kernel... Enjoy !

If you want to remove Linux kernel for any reason.. Just pass 'd' (with out single quotes) as argument to above command

To Remove Linux Kernel 4.9 from your system run the following command..

wget -O - https://gist.githubusercontent.com/shivarajnaidu/cfd4ddc12de1798a82d1dbe0b8fad0b2/raw/df86e39b818c9a6e007b0b8bd9736ea1ba0f7800/install_linux4.9_in_ubuntu.sh | sh -s d

Method 2 :

In this method i will show you step by step process of installing Linux kernel 4.9 .....

First update your system package source list and upgrade all installed packages to latest version by running following commands..

sudo apt-get update; sudo apt-get upgrade
Warning : The Linux kernel is a critical element of the system. To do the upgrade costs when one of your hardware devices is not working properly, and the new kernel may fix this problem. But at the same time installing a new kernel unnecessarily can lead to undesirable regressions, such as: no network connection, no sound or even the inability to boot the system, so install a new kernel on your own risk.

Now make a new folder/directory to download and store required binaries files...

mkdir linux4.9 && cd linux4.9

Now download required files with following command..

For 64 bit:

wget http://kernel.ubuntu.com/~kernel-ppa/mainline/v4.9/linux-headers-4.9.0-040900_4.9.0-040900.201612111631_all.deb; wget http://kernel.ubuntu.com/~kernel-ppa/mainline/v4.9/linux-headers-4.9.0-040900-generic_4.9.0-040900.201612111631_amd64.deb; wget http://kernel.ubuntu.com/~kernel-ppa/mainline/v4.9/linux-image-4.9.0-040900-generic_4.9.0-040900.201612111631_amd64.deb;

For 32 bit:

wget http://kernel.ubuntu.com/~kernel-ppa/mainline/v4.9/linux-headers-4.9.0-040900_4.9.0-040900.201612111631_all.deb; wget http://kernel.ubuntu.com/~kernel-ppa/mainline/v4.9/linux-headers-4.9.0-040900-generic_4.9.0-040900.201612111631_i386.deb; wget http://kernel.ubuntu.com/~kernel-ppa/mainline/v4.9/linux-image-4.9.0-040900-generic_4.9.0-040900.201612111631_i386.deb

Or if you want to download manually.. you can download from here.. and put them in one directory.
if you are downloading manually.. download correct binaries for your architecture...
If you are not sure about your OS architecture.. Run getconf LONG_BIT command.. This will tell you whether the kernel is 64 bit or 32 bit..
See More On Finding System Architecture..

That's all for now.. Don't Like us on fb.com/opensourceinside


Sunday, October 30, 2016

Installing Rust On Ubuntu 16.04 and 14.04

Installing Rust On Ubuntu 16.04 and 14.04


Rust Programming Logo

Rust, also known as Rust-Lang, is a new programming language which aims safety, speed and concurrency... It's designed to create highly concurrent and secure Applications/Systems by having more a number of compile-time safety checks that produce no runtime overhead, while eliminating all data races.... According to documentation, Rust also aims to achieve ‘zero-cost abstractions’ even though some of these abstractions feel like those of a high-level language.

Here.. We are going to see how to install and getting start with rust on Ubuntu Linux 16.04 & 14.04

Step 1: Update Source(Package) List

Open terminal and run the following commands to ensure that package source list is upto date and also install curl...

For Ubuntu 16.04

sudo apt update && sudo apt -y install curl

For Ubuntu 14.04

sudo apt-get update && sudo apt-get -y install curl

Step 2: Install Rust

Now run the following command which download and runs a script that will install rust on your Linux box..

wget -O - https://static.rust-lang.org/rustup.sh | sh

Or If you have curl installed..

curl -sSf https://static.rust-lang.org/rustup.sh | sh

Rust packages are available in three different release channels namely stable, beta and nightly... The above command will install current stable version of rust on your system..

If you want to install beta version(A preview of the upcoming stable release, intended for testing) of rust, run the following command..

wget -O - https://static.rust-lang.org/rustup.sh | sh -s -- --channel=beta

Or

curl -sSf https://static.rust-lang.org/rustup.sh | sh -s -- --channel=beta

If you want to enjoy features that are not available in stable and beta channels, install rust from nightly release channel.. (Be aware, Features which are available in nightly channel are unstable may change anytime before they get into beta channel)

wget -O - https://static.rust-lang.org/rustup.sh | sh -s -- --channel=nightly

Or

curl -sSf https://static.rust-lang.org/rustup.sh | sh -s -- --channel=nightly

Step 3: Verify The Installation

You can verify the successful installation of rust in your System by running rustc -V . You will get output similar to output shown below..

shivaraj@shivaraj-A14RM0E:~$ rustc -V rustc 1.12.1 (d4f39402a 2016-10-19)

Get start with rust..

If you see output similar to above.. that means your installation was successful.. So now here i am going to show how to write a hello world program in rust and run it..

Create file named main.rs, open it with your favorite text-editor, then copy and paste the following code in that file and save it...

fn main() { println!("Hello, World"); }

Now compile it with rustc main.rs, you will get executable file named main .... execute it by running ./main .. You will see.. "Hello, World" text on your screen..

shivaraj@shivaraj-A14RM0E:~$ ./main Hello, World shivaraj@shivaraj-A14RM0E:~$

Here, You Can Learn Rust Programming..


Here is the video for above tutorial...


Happy Coding !!

Wednesday, September 28, 2016

How To Install And Configure Postfix To Send Mail By Using Gmail As Mail Relay In Ubuntu 16.04 & 14.04

How To Install And Configure Postfix To Send Mail By Using Gmail As Mail Relay In Ubuntu 16.04 & 14.04

Postfix is a cross platform, free and opensource Mail Transfer Agent (MTA) designed to be an alternative to the widely-used Sendmail program. The main aim of Postfix is to be fast, easy to administer, and secure. The outside has a definite Sendmail-ish flavor, but the inside is completely different. Today we are going to see how to install and configure Postfix to send E-mail using gmail as mail relay server... and I'm using Ubuntu 16.04 LTS for this tutorial..(also tested in 14..04)

Installation

You can get Postfix from offical Ubuntu repositories.. So you can install it by running the apt install command..

For Ubuntu 16.04

sudo apt update && sudo apt -y install libsasl2-modules postfix

For Ubuntu 14.04

sudo apt-get update && sudo apt-get -y install libsasl2-modules postfix

Postfix Configuration..

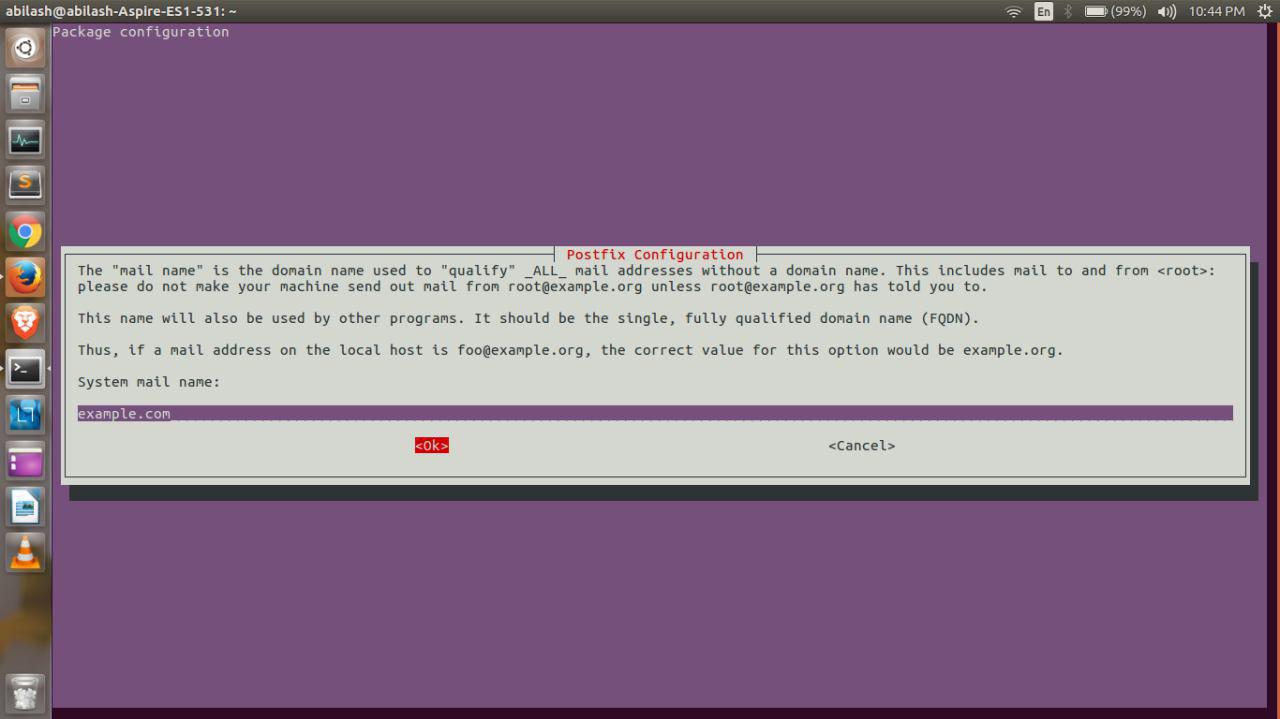
During the installation of Postfix, you will be asked to choose default configuration for postfix...
Select Internet Site...


Enter Fully Qualified Domain Name(FQDN).. for example if you are going to use myuser.example.com then you have to fill example.com for following field..


After installation has completed successfully, proceed following steps to use gmail SMTP server as relayhost.

Configuring Postfix To Use Gmail's SMTP server as Relayhost..

Now we will see how to configure Postfix to send E-mails using gmail as relay host.. To do this we need to edit /etc/postfix/main.cf... open main.cf file in your favorite text editor.. here i am using sublime text(it's my favorite editor )..
See How To Install Sublime Text On Linux

subl /etc/postfix/main.cf

If you want to open with gedit run following the command..

sudo gedit /etc/postfix/main.cf

Then add following lines to the end of main.cf file..

# enable SASL authentication smtp_sasl_auth_enable = yes # disallow methods that allow anonymous authentication. smtp_sasl_security_options = noanonymous # where to find sasl_passwd smtp_sasl_password_maps = hash:/etc/postfix/sasl_passwd # Enable STARTTLS encryption smtp_use_tls = yes # where to find CA certificates smtp_tls_CAfile = /etc/ssl/certs/ca-certificates.crt

And also set relayhost value to [smtp.gmail.com]:587..

relayhost = [smtp.gmail.com]:587

Configure Gmail Username and Password For Authentication :

first you have to create file named sasl_passwd inside /etc/postfix/...

sudo touch /etc/postfix/sasl_passwd

Then open recently created file with your choice of text editor..

sudo gedit /etc/postfix/sasl_passwd

or, if you have sublime text editor... run following..

subl /etc/postfix/sasl_passwd

Now add your smtp server address, port, username and password details in the format shown below..

[smtp relayhost ip or name]:port username:password

For our case (gmail)... following is more suitable example...

[smtp.gmail.com]:587 abcd@gmail.com:mypassword
You have to Turn On Allow less secure apps in-order to use your Postfix MTA work properly with gmail.. To do this go to https://myaccount.google.com/security/lesssecureapps find Allow less secure apps option and Turn On it..


Don't forget to replace with abcd and mypassword with your username and password..

then save and create lookup-table or hash for above file.. by running postmap command..
if you ma any changes

sudo postmap /etc/postfix/sasl_passwd
The above command will create new file sasl_passwd.db in the same location as sasl_passwd file exists..
You should recompile sasl_passwd file.. means you have to run above command whenever you make change in sasl_passwd file...

Restart or Reload Postfix :

Before you use, You should reload or restart Postfix whenever you make changes to main.cf file..

For Ubuntu 16.04

sudo systemctl restart postfix

For Ubuntu 14.04

sudo service postfix restart

Or you can reload postfix with it's own implementation..

sudo postfix reload

Testing Postfix Installation

The easy way to test your postfix installation and configuration is use mail command or sendmail command..

Testing using mail command :

You can use mail command to send mail as follows..

echo message_text | mail -s "subject" Recipient Email Address

For example.. if you want to send mail to myfriendd@outlook.com ... the above command will looks like the following one..

echo Hello | mail -s "Test Mail Subject" shivarajnaidu@outlook.com

Testing using sendmail command :

You can even postfix's implementation of sendmail command..

sendmail shivarajnaidu@outlook.com From: you@example.com Subject: Test Mail Subject Hello .
Note the trailing "." (dot) in sendmail command example.
Usually send mail will consider "." (dot) as end of message

Debugging :

If you didn't receive mail, when you test with above commands.. then see mail.log and mail.err files which are present in /var/log/... From these two files you can point-out the problem and it will be helpful for troubleshooting the problem.


Here is the video for above tutorial...


That's it for now.. If you like don't forget to share it guys.. You can follow us on fb.com/opensourceinside and also subscribe our channel on Youtube..


Thursday, September 22, 2016

Create Password Protected PDF Files Using LibreOffice

Create Password Protected PDF Files Using LibreOffice

Portable Document Format (PDF) is one of the commonly used file formats in our day to day life.. There may be a times, we need to create PDF files from word documents.. Here I am going to show you how to create PDF files from word documents and protect them with passwords (using Libre Office)

Step 1 :

Open your document with LibreOffice which you want to convert into PDF format...

Step 2 :

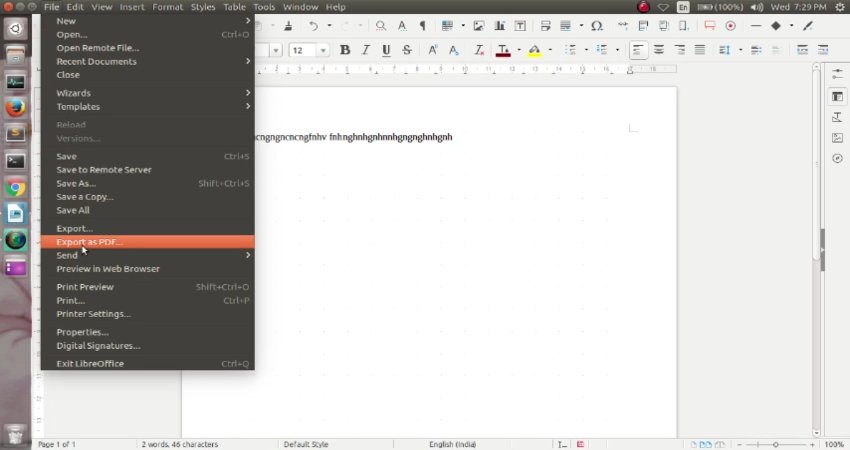
Then goto File menu and select Export As PDF

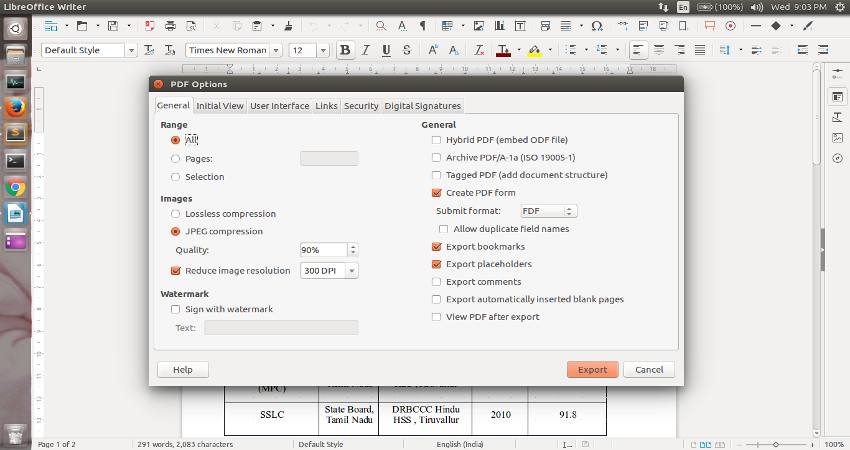
Now you will see dialog box like one shown below..

Step 3 :

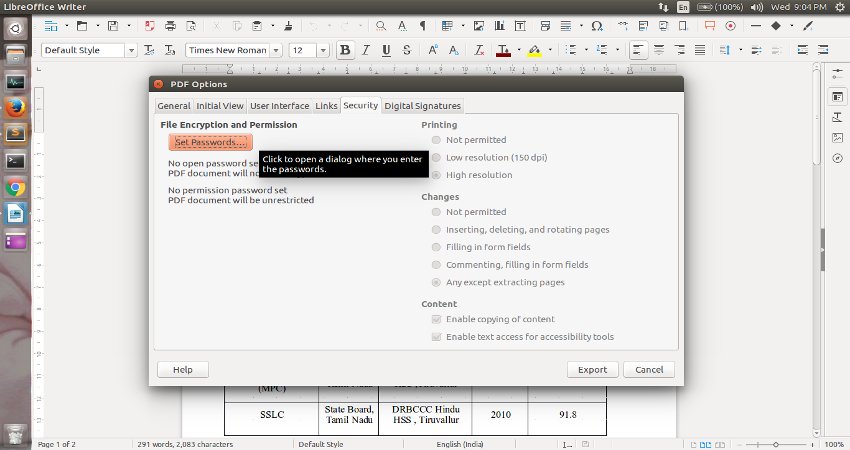
Then Navigate to tab named Security and Click Set Passwords button..

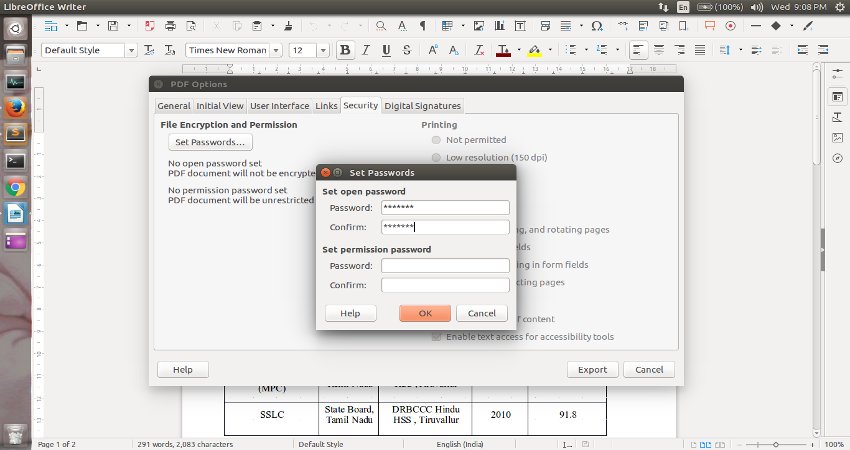
After Clicked on Set Passwords button you will see set password dialog shown below..
Enter the password you want to set to PDF file.. and click on OK.. and then on Export

Step 4 :

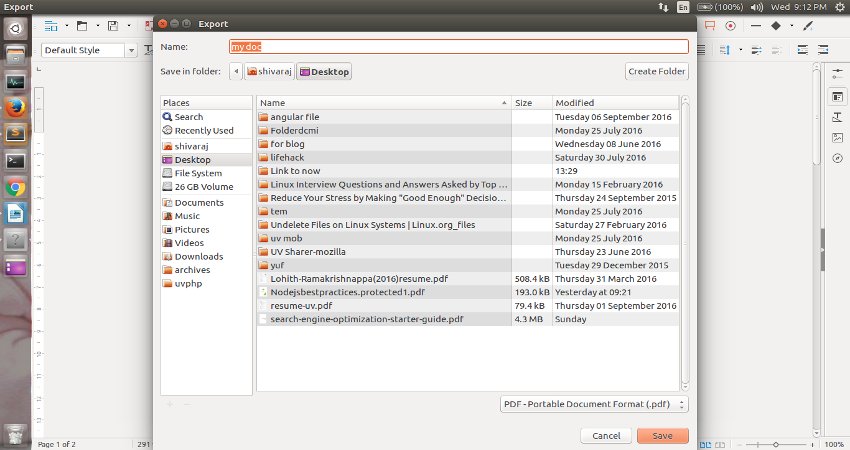
When you click on Export you will get save dialog box like one shown below..
You can save your newely created PDF document on your file system..

Step 5 :

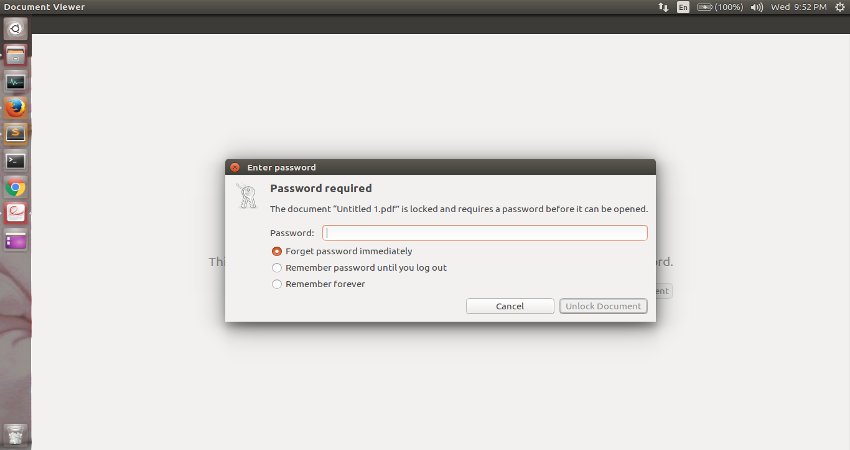
Now try to open newely created PDF document ... It will ask you for password to open the PDF document...

That's it for now ... You can follow us on fb.com/opensourceinside and take a glipse of our youtube channel and don't forget to Subscribe it guys..


Here is the video for above tip...


Tuesday, September 20, 2016

How To Remove Password From Password Protected PDF File Using Google Chrome

How To Remove Password From Password Protected PDF File Using Google Chrome

Portable Document Format (PDF) is one of the commonly used file formats in our day to day life... While it offers grade of security with optional password protection, there are times when we may need unsecured copy of password protected PDF file.
Here, we are going to see, how to achieve the above with the evergreen web browser Google Chrome (of course, we can do the same with Mozilla Firefox )

So, Before we start, you need to have Google Chrome installed in your system... (See, How To Install Google Chrome On Ubuntu Linux).

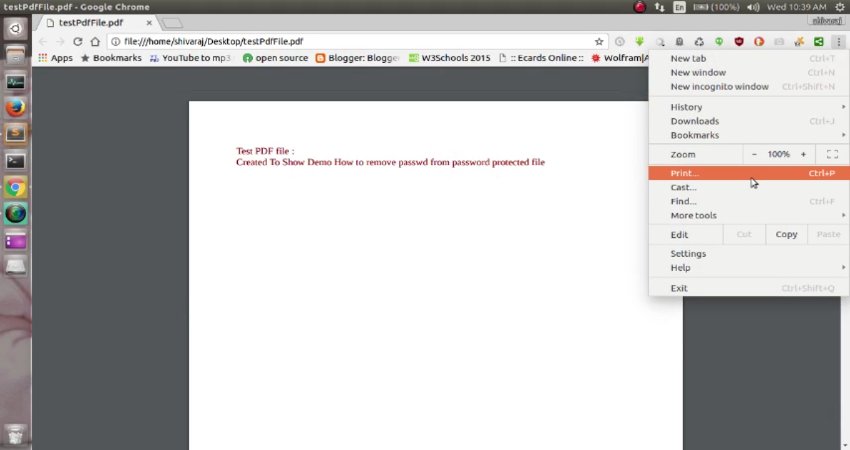
Step 1 :

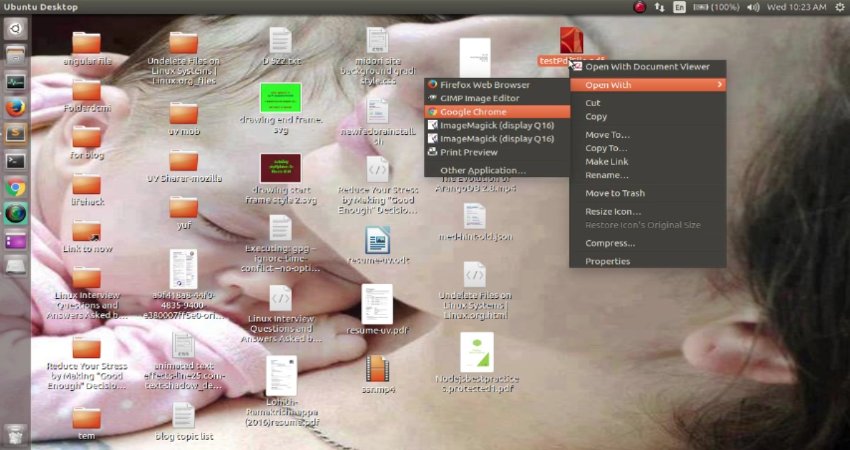
Open your password protected PDF file either with Google Chrome or with Mozilla Firefox...

Step 2 :

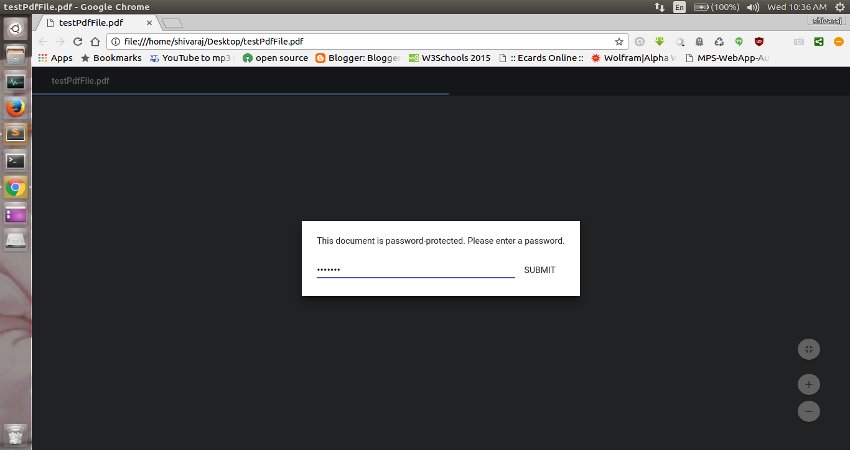
It will ask you for password ... provide it..
After entering password the PDF will be displayed by your browser..

Step 3 :

Now, Press Ctrl + P on your keyboard or go to options and click on Print option..

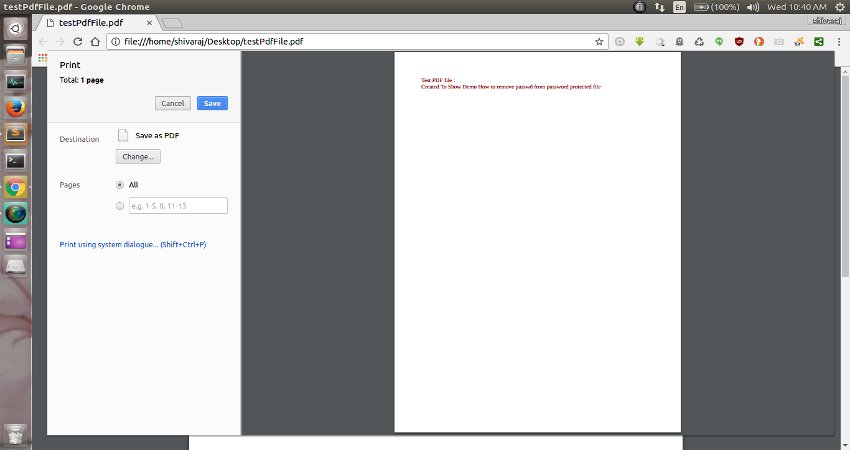
After you click on print option you will see dialog like shown below..

Step 4 :

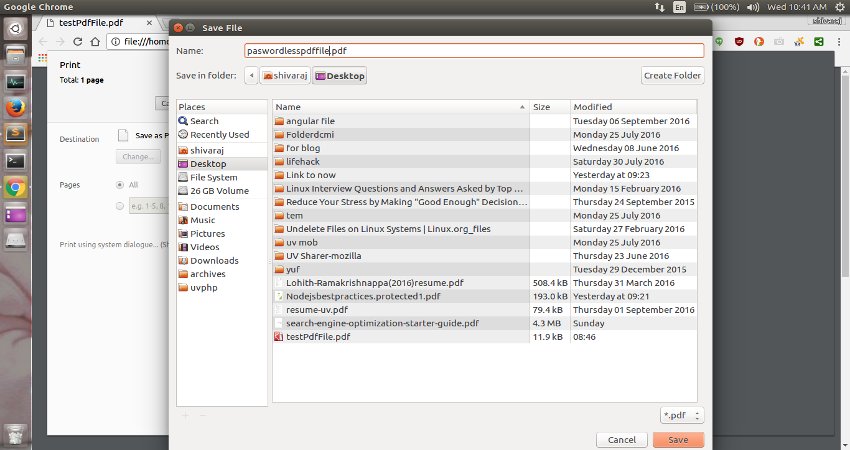
Now click on Save button and Save the new copy of PDF file in somewhere else..
This new copy is password free ....


That's it ... Your new password less copy of PDF file is now ready...

Friends.. If you like this tip.. Do share this small trick on social media with your friends... You can follow more updates on our Facebook page


Here is the video for above tip...


Friday, September 16, 2016

Installing phpMyAdmin in Ubuntu 16.04

Installing phpMyAdmin in Ubuntu 16.04


phpMyAdmin is an open source tool used for the administration/management of MySQL or MariaDB with the use of a web browser. In addition to offering the capability to perform administration tasks such as creating, editing, or deleting databases, and managing users and permissions, phpMyAdmin provides a graphical user interface to do all of these tasks and more. Here, we are going to see how to install, up and run phpMyAdmin on Ubuntu 16.04.

Install phpMyAdmin

Before you start installing phpmyadmin, install PHP, apache and MySql or similar Db..

Then.. Run following command .. to install phpMyadmin on your Ubuntu installation...

sudo apt -y update && sudo apt install phpmyadmin

Continue with typing Y once the installation prompts you with Do you want to continue [Y/n]? Like in the image below.


Now we are prompted with dialog selecting our web server, in our case we are selecting apache2 like shown below.


Select <Yes> as we just want a basic installation like shown below.


Now provide a password for phpMyAdmin to use. So that it can register with the MySQL database itself. (Need not to be the same as the MySQL root user)


Enter in the phpMyAdmin password you created in last step to confirm it as follows.


phpMyAdmin is now installed, but, still we have a few more things to do.

Testing phpMyAdmin

Now we will test phpMyAdmin! Open your favorite Web Browser..
and Navigate to http://localhost/phpmyadmin/

If you end up with a page that looks like one shown below... means, phpMyadmin was installed successfully on your system..


Now lets login, the default username for phpMyAdmin is root and the password is what you have entered while installing phpMyadmin... Enter as follows.

Username: root

Password: What you selected earlier

Select Go to login.

When you log in, you'll see the user interface, which will look something like this:


Hi friends, If you found any issue or typo error, please feel free to report it.. You can report it on our Facebook Page via message (www.fb.com/opensourceinside) .

Wednesday, August 31, 2016

Installing ElasticSearch On ubuntu 16.04 and 14.04

Installing ElasticSearch On ubuntu 16.04 and 14.04


Updated On DEC 2016: Installation Script In Method 2 updated for installation of elastic search 5.x

Elasticsearch is a highly scalable open-source full-text search and analytics engine build on top of Apache Lucene(A free and open-source information retrieval software library). It allows you to store, search, and analyze big volumes of data quickly and in near real time. It is generally used as the underlying engine/technology that powers applications that have complex search features and requirements.

Here we are going to see, How to install and setup elasticsearch on Ubuntu Linux 16.04 and 14.04..
Here I am going to show you two ways to install elasticsearch on Ubuntu Linux..

The first one is manual installation of elasticsearch.. You have to follow instructions one by one ..
The second one is an easy way, there we use shell-script to install the elasticsearch as it would take care of all things.. The script will install and setup elasticsearch for you..

Installation :

Method 1 :

First things first, Before we start to install elasticsearch, we need to install Java Runtime Environment (JRE).. because Elasticsearch itself written in the Java. (Elasticsearch requires Java 7 or higher).
This step shows you how to install OpenJDK-8.
First, update the list of available packages by running apt-get update.

sudo apt-get update

Then, install OpenJDK with the command:

For Ubuntu 16.04 :

sudo apt-get -y install openjdk-8-jdk openjdk-8-jre

For Ubuntu 14.04 :

sudo add-apt-repository -y ppa:openjdk-r/ppa && sudo apt-get update && sudo apt-get -y install openjdk-8-jdk openjdk-8-jre

To verify your JRE is installed and can be used, run the command: java -version

The result should look like this:

openjdk version "1.8.0_91" OpenJDK Runtime Environment (build 1.8.0_91-8u91-b14-3ubuntu1~16.04.1-b14) OpenJDK 64-Bit Server VM (build 25.91-b14, mixed mode)
If You Have Already Installed Version of JAVA in Your System.. Please Set OpenJDK 8 as Default Version.. Otherwise you may encounter problems while starting elasticsearch.. You can configure multiple versions of java by running following command.. sudo update-alternatives --config java Now, select apropriate version of JAVA..
to verify the java version run.. java -version

Download and Install Elasticsearch :

Elasticsearch can be downloaded directly from official site as zip, tar.gz and deb

I will recommend.. Installing from zip or tar archive.. Because as far as I knew it is the best way to get Elasticsearch on Ubuntu ... from my experience the another way (installing from .deb) is very worst... has many nasty issues(tried on Ubuntu 16.04)..

Download the archive

cd && wget https://download.elastic.co/elasticsearch/release/org/elasticsearch/distribution/zip/elasticsearch/2.3.5/elasticsearch-2.3.5.zip

The above command downloads the zip archive, make sure that you have unzip installed in your system... if don't have installed unzip in your system.. run the following command.. to install unzip

sudo apt-get install unzip

Now unzip/decompress the downloaded archive.. you can do this with command given below..

unzip elasticsearch-2.3.5.zip

Move Extracted/unzipped directory to /opt :

We don't want to pollute our home folder and make it ugly with too many folders apart from default one.. and moving elasticsearch to /opt directory will also make it available to other users in your system too..

If you already have directory named elasticsearch-* in your /opt directory you will/may encounter problems while trying to move our newly extracted folder into /opt . so better remove them before you move our new elasticsearch folder into /opt. to do this run following command.... sudo rm -r /opt/elasticsearch-2*

Now move newly extracted elasticsearch directory to /opt with following command..

sudo mv elasticsearch-2.3.5/ /opt/

Now your elasticsearch is ready to use, You can run it with following command..

/opt/elasticsearch-2.3.5/bin/elasticsearch

But it's so convenient, if we can able to start it from commandline.. by simply typing 'elasticsearch' .. just like normal system commands.. to do so.. we have to create a symbolic link for elasticsearch in /bin folder.. Run following commands....

First remove symbolic link if one already exists..

sudo rm /bin/elasticsearch

now.. create new symbolic link ...

sudo ln -s /opt/elasticsearch-2.3.5/bin/elasticsearch /bin/

That's it .. now you can start elasticsearch just by typing "elasticsearch" in your terminal window..

Now the other method (method 2) show you the easiest way of getting elasticsearch up and running on your Ubuntu installation..

Method 2 :

In this method ... You just need to run the following code ... the script will take care of remaining things..

wget -O - https://raw.githubusercontent.com/shivarajnaidu/UV-Shell-Scripts/master/ElasticSearch-Installation-Scripts/elasticsearch-installation-script-for-ubuntu.sh | bash -s

Update :

The installation script is updated to support installation of elasticsearch v5.x. If you want to install elasticsearch 5.x, just run above command with argument '5' (with out quotes).

wget -O - https://raw.githubusercontent.com/shivarajnaidu/UV-Shell-Scripts/master/ElasticSearch-Installation-Scripts/elasticsearch-installation-script-for-ubuntu.sh | bash -s 5

Test your Elasticsearch installation

Start elasticsearch by typing "elasticsearch" on your command-line..
Let's ensure that everything is working well... open terminal and Run following..

elasticsearch
Elasticsearch should now be running on port 9200. Do note that Elasticsearch takes some time to fully start, so running the curl command below or checking from browser immediately might fail. It shouldn't take longer than ten seconds to start responding, so if the below command fails, something else is likely wrong. Ensure the server is started by running

To test elasticsearch run following command in terminal..

curl -X GET 'http://localhost:9200'

or even you can check from your web browser by visiting http://localhost:9200

if elasticsearch works well.. You should see the following response..

shivaraj@shivaraj-A14RM0E:~$ curl -X GET 'http://localhost:9200' { "name" : "Suicide", "cluster_name" : "elasticsearch", "version" : { "number" : "2.3.5", "build_hash" : "90f439ff60a3c0f497f91663701e64ccd01edbb4", "build_timestamp" : "2016-07-27T10:36:52Z", "build_snapshot" : false, "lucene_version" : "5.5.0" }, "tagline" : "You Know, for Search" } shivaraj@shivaraj-A14RM0E:~$
Hi friends, If you found any issue or typo error, please feel free to report it.. You can either open an issue on github or you can also report it on our Facebook Page via message (www.fb.com/opensourceinside) .

Saturday, August 6, 2016

ZeXtras Suit For Your Zimbra Collaboration Suite (ZCS)

ZEXTRAS


We are in 21st century... Today, there is nothing that we couldn't done through Internet... Since the creation of opensource softwares like Linux, Git and Richard Stallman's GNU Foundation.. Collaboration software becomes a backbone of each and every open software and now the backbone of the whole IT infrastructure ...
In early days there was only propitiatory solutions for collaboration such as MS Exchange ,Sharepoint etc... But as the opensource software gains momentum, as it enters into every part of IT software products..
Around the year 2000, however, the Open Source community (and of course OSS-minded companies) entered the corporate-level collaboration software development world and several projects for collaboration software were started: one of those projects, thanks to its clever design choices and cutting edge user experience took and still holds the lead as the most used Email and Collaboration software worldwide: Zimbra Collaboration.
In its 15-year history, Zimbra has taken the collaboration world by storm, quickly becoming a well known powerhouse serving more than 500million mailboxes worldwide and attracting the interest of companies like Yahoo, VMWare, Telligent and finally Synacor, which acquired the Zimbra Inc. company and assets in 2015.

The software consists of both client and server components, and a desktop client. Two versions of Zimbra are available: an open-source version, and a commercially supported version ("Network Edition") with closed-source components such as a proprietary Messaging Application Programming Interface connector to Outlook for calendar and contact synchronization.

The ZCS Web Client is a full-featured collaboration suite that supports email, group calendars, and document sharing using an Ajax web interface that enables tool tips, drag-and-drop items, and right-click menus in the UI. Also included are advanced searching capabilities and date relations, online document authoring, "Zimlet" mashups, and a full administration UI. It is written using the Zimbra Ajax Toolkit.

ZCS can synchronize mail, contacts, and calendar items with open-source mail clients such as Evolution and also with proprietary clients such as Microsoft Outlook and Apple Mail, either through proprietary connectors or using the ActiveSync protocol, both available exclusively in the commercially supported version. Zimbra also provides native two-way sync to many mobile devices (Windows Mobile, iPhone, Android).

However, as the world evolves fast.. the requirements of business environment has been changing fast, Zimbra alone can't fit to satisfy all needs of corporate world.. That's where ZeXtras Suite comes in.. It is made to expand the capabilities of your Zimbra Open Source Edition.

ZeXtras Suite :

ZeXtras Suite is a modular extension for Zimbra that aims to cater high-level corporate features to Zimbra Open Source Edition. Each module adds a new feature, giving you the power to do things you thought impossible with Zimbra Open Source Edition. It's entirely developed by ZeXtras, and sold online through the Zextras Store at https://store.zextras.com as well as worldwide by ZeXtras' network of resellers and partners. It doesn't include any code owned by Zimbra and is neither a fork nor a reverse engineered version of Zimbra Network Edition.

ZeXtras is packaged as a modular solution allowing you to pay only what you actually need. You buy what you need, for the time you need it, and in the way you prefer. Create your own license! Our online store is so flexible that you can reconfigure your license almost real-time.
Migrate ANY flavour of Zimbra Comunication Server to your Zimbra Open Source Edition with ZeXtras using ZxMig, included FREE with the Suite, in just a few clicks.
Manage all your Modules via the ZeXtras Administration Zimlet.
Decrease the Time Consumption Overhead of your mail system while making it better... extraordinary, isn't it?

What is ZeXtras Is and What ZeXtras is Not ?

What ZeXtras Suite is NOT What ZeXtras Suite is
ZeXtras Suite is not a Modification of Zimbra Collaboration Server. ZeXtras Suite is an Add-On for Zimbra Collaboration Server (Open Source Edition).
ZeXtras Suite is not a fork nor a derivative work of Zimbra Collaboration Server. ZeXtras Suite is developed from scratch by an independent company named ZeXtras.
ZeXtras Suite is not a Hack, nor a Cracked version of Zimbra Communication Server. ZeXtras Suite is an Extension to Zimbra Collaboration Server (Open Source Edition).
ZeXtras Suite is not a reverse engineered version of the Zimbra Network Edition modules. ZeXtras Suite is designed, developed and maintained by ZeXtras accordingly to it's own original ideas.
ZeXtras Suite is not supported nor endorsed nor related in any way to Zimbra inc., Yahoo inc., VMWare inc. ZeXtras Suite is developed and supported only by ZeXtras and sold only by ZeXtras and its partners worldwide.
ZeXtras Suite is not distributed with any binary file or piece of source code copyrighted by Zimbra. ZeXtras Suite is distributed as a package of its own. Said package includes the ZeXtras Core, the ZeXtras Zimlets, the ZeXtras Migration Tool and the ZeXtras Installers.

ZeXtras Suite Modules :

ZxBackup :

Data is the most important aspect of your computer. The operating system can be reinstalled and so can applications, but it may be difficult or impossible to recreate your original data. It is essential that you always back up your important information and have a plan for recovering from a system failure. Data may be corrupted or wiped out by a hardware problem.. You should back up your personal/critical work data on a regular basis. This means copying your files over to a protected system that you can access when those files are needed.

ZeXtras Backup (ZxBackup) provides excellent way to safeguard your data through an ever-consistent realtime backup engine and avoid any data loss...
It’s specifically designed to avoid any data loss by using atomic and ever-consistent algorithms, while still saving disk space thanks to an intelligent deduplication and compression system.

ZeXtras Suit provides complete backup solution for your Zimbra email system. All modes are 100% independent of OS, Architecture and Version independent, meaning that you can restore data on any supported Zimbra version regardless of the version of the source server. Zextras Backup also allows you to take a complete snapshot of the mail system and store it anywhere.

Following are some of the salient features of ZeXtras Suit..

  • Real Time Backup :

    Backup any change in the system as soon as it happens. No more lost data caused by backup scheduling issues..

  • Different Restore Modes :

    Five different restore options to always be able to recover what you need, from a single item to an entire domain.

  • Save all, restore all :

    We can store everything.. from configurations to whole system ...

  • Easy To Use :

    The main beauty of ZeXtras is its User Interface looks very simple but still very powerful.

  • Environment Independent :

    ZeXtras Backup is 100% environment independent, that means, no matter what OS, Architecture, Version Of Software using.. ZeXtras works anywhere regardless of your working environment.

  • Quick Disaster Response :

    Zextras Backup is designed to get you back online ASAP after a disaster. Both a live backup folder or an "external backup" can be used to restore, and all accounts are available within minutes while the restore of the data is still being executed

  • Self-consistent Snapshots :

    Over and above the Real Time backup engine, Zextras Backup includes an “External Backup” feature that allows you to save self-consistent snapshots of the data in the Zimbra server to be stored on a remote location or tape drive for additional safety.

  • Compressed Backup Store :

    ZeXtras will compress data in smart way.. without losing anything.. The average backup store will be 70% of the size of the current data contained in the server.

  • Intelligent Storaging :

    By using atomic write algorithms, all data saved in the backup store will always remain 100% consistent and can be moved onto storage media, like tape devices and optical disks even when the backup system is running

ZxMobile :

We are in Mobile age.. We are using Mobile for everything ..The ZeXtras Mobile module provides an ActiveSync, cool and simple interface to any Zimbra Open Source Edition server, allowing your users to synchronize their mobile phones to the mail server giving access to both Email and advanced features like Calendars, Address Books and Notes.

Some Features of ZeXtras Mobile..

  • Push emails, calendars and address books.
  • Fully featured Calendar synchronization including Calendar Attachments and Recurring Appointments.
  • Fully featured Address Book synchronization including Contact Photos, Custom Fields and Multiple Entries.
  • Shared folder synchronization
  • Advanced search - perform mailbox-wide searches even on not synchronized items.
  • Attachment Management.
  • Send, accept, decline or reschedule meetings directly from your mobile
  • No configuration needed - enable the ZeXtras Mobile Module and manage your devices via the ZeXtras Adminsitration Zimlet!
  • Manage multiple accounts on the same device.
  • You can find more at ZeXtras wiki..

ZxPowerStore

Storage Management is a total pain in the assignments of a system administrator. Moving large chunks of data from this or that storage media, find the most performing solution, calculate dates and predictions on storage sizes.. ZeXtras PowerStore Module helps you to organize your data by automatically managing all your data management policies according to a ruleset you define, showing you statistics and giving you a bird-eye view on all of your storage media.

These are the Some salient features of ZxPowerStore ..

  • HSM support for Zimbra Open Source Edition
  • Type-level policy management
  • Advanced Volume Management
  • Volume Compression and Item Deduplication for major storage space saving
  • Complete integration with the Zimbra Administration Console
  • ZeXtras Backup integration
  • See more at ZeXtras wiki..

ZxChat

ZeXtras Chat is one of the modules of ZeXtras Suite. It provides an integrated IM server and client to Zimbra, allowing your users to communicate through text chat directly from their Zimbra Web Client. Both the chat server and client have been developed by ZeXtras to guarantee the highest integration possible with your Zimbra server.
The ZeXtras Chat module is available 100% free of charge!

Some Important Features of ZxChat :

  • Add an IM contact from the ZeXtras Chat panel.
  • Assign a nickname to your buddies.
  • Start an IM chat by clicking on a buddy in your list.
  • New in ZeXtras Suite 2.0: Video-Chat
  • Remove/Rename IM contacts.
  • 4 IM statuses (online, do not disturb, away, invisible).
  • "Away" status automatically set after some minutes of inactivity.
  • Hundreds of Emoji.
  • 2 UI modes: DockView and Sidebar.
  • Chat History.
  • Send chat conversations by email.
  • Built-in User Preferences.
  • Desktop Notifications (Unity UI or Google Chrome).
  • XMPP compatible: you can connect to ZeXtras Chat with any XMPP Client.
  • Supported browsers: Firefox and Chrome.
  • Also works with: Internet Explorer 8/9/10.
  • Contact group management.
  • See More at ZeXtras Wiki..

Planned Features For ZxChat :

  • Group chat
  • Video conferencing

ZxAdmin

ZeXtras Admin Module provides a highly configurable 'Junior Admin' set of ACLs to the Zimbra's Administration Console. Give Junior Admin permission to any of your users and have full control of what they get to see and change, allowing them to act as an Administrator for their own domain(s). Happier customers and less stressed system administrators: kill two birds with a stone!

Major features of ZeXtras Admin Module are:

  • Delegated Admin management.
  • Choose which Delegated Admins can use the "View Mail" button.
  • No external Administration Consoles.
  • Set the maximum quota that a Domain Admin can assign to any user.
  • Set an account limit for each domain in your Zimbra server.
  • Per-domain Class of Service management.
  • Per-domain mailbox quota management.
  • Monthly reports.
  • Admin Log Browsing.
  • See More at ZeXtras wiki..