Monday, June 27, 2016

Create Bootable USB Disk For Linux With "dd" Command

Create Bootable USB Disk For Linux With "dd" Command


Bootable USB Disk creation is one of the common thing that Linux users will do often in their Linux Life..
There's a several ways are available to create bootable USB Disk for Linux (such as UNetbootin, Linux live usb.. etc..).
"dd" command is one of the simple way to create bootable USB disk for Linux through Linux Command Line..and also, The most Linux distros comes with "dd" tool pre-installed.
Today i am going to show how to create bootable USB with "dd" command..

Note : dd is very powerful tool. dd stands for "Data Duplicator" which is make copy using block by block from one device into another device. So we can also use dd tool for data backup and restore from one device into another device. at the same time be careful wile using dd tool. because improper use may make your target device/memory stick unusable..

Now see how to create one with dd command....

The first thing you have to do is , identifying your USB device label.. it's very important, Because if we identify it wrongly.. we will end up with data loss.. So be careful with while identifying which one is your intended USB disk for this operation.. Just see following example..

Sector size (logical/physical): 512 bytes / 4096 bytes I/O size (minimum/optimal): 4096 bytes / 4096 bytes Disk identifier: 0x000d5d58 Device Boot Start End Blocks Id System /dev/sda1 * 2048 52002815 26000384 83 Linux /dev/sda2 52004862 312580095 130287617 5 Extended Partition 2 does not start on physical sector boundary. /dev/sda5 262002688 312580095 25288704 7 HPFS/NTFS/exFAT /dev/sda6 52004864 60002303 3998720 82 Linux swap / Solaris /dev/sda7 60004352 261988351 100992000 83 Linux Partition table entries are not in disk order Disk /dev/sdb: 15.6 GB, 15631122432 bytes 255 heads, 63 sectors/track, 1900 cylinders, total 30529536 sectors Units = sectors of 1 * 512 = 512 bytes Sector size (logical/physical): 512 bytes / 512 bytes I/O size (minimum/optimal): 512 bytes / 512 bytes Disk identifier: 0x00000000 Device Boot Start End Blocks Id System /dev/sdb1 32 30529535 15264752 c W95 FAT32 (LBA) shivaraj@shivaraj-A14RM0E:~$

Just note that... sdb is my pen drive/device (sdb1 is partition present in my pendrive /dev/sdb). That is assigned by Linux operating system automatically while inserting pen drive into our system. You can identify it by typing following command

sudo fdisk -l

After identifying our intended device to create bootable USB disk, we need to format our pen drive/device..
Before formatting the device/pen drive , we have to unmount all of its mounted partitions ..

So , unmount it first with following command..

sudo umount /dev/sdb1

Now format the pen drive to FAT32 disk format..

sudo mkfs.vfat -I /dev/sdb

The above command will format the pen drive and makes FAT filesystem.
After that use dd command to create bootable USB disk..

sudo dd if=/path to iso/name_of_the_iso.iso of=/dev/sdb bs=1M; sync

For example, here i am going to create bootable USB disk from ubuntu-16.04-desktop-amd64.iso which is stored at ~/Downloads/os/.

sudo dd if=~/Downloads/os/ubuntu-16.04-desktop-amd64.iso of=/dev/sdb bs=1M; sync

Here,
If stands for input file. It is used to specify the location of the ISO file.
Of stands for output file. It specifies where to write the ISO file. In our case, it's /dev/sdb

It takes some time to copy one disk to another disk. dd tool does not show progressing status.

That’s all. You can use the same procedure to make any OS to make bootable USB drive.

Note that..While creating bootable USB by using above method, dd tool will make several partition on that pen drive. So after using bootable USB, It is best to format and use the pen drive for making another bootable ISO.

Don't forget to unmount the USB ... after unmounting the usb drive, run the following command to format it..

sudo mkfs.vfat -I /dev/sdb

That's all for now... and guys, Don't forget to share it with fellow Linux friends..

Happy Linux..


Saturday, June 25, 2016

How To Solve gvfsd-smb-browse 100% CPU usage Issue in Linux

How To Solve
gvfsd-smb-browse 100% CPU usage Issue
in Linux

Shortly, after installing Ubuntu 16.04 LTS and SAMBA file sharing in one of my friends laptop, I noticed that his laptop hangs on file open, save and on some other system operations... I have found this is caused by gvfsd-smb-browse. Yes, the theif is gvfsd-smb-browse. it's consuming 100% of your system's CPU, that makes Ubuntu 16.04 lagging badly..

Ubuntu isn't the only Linux distro which is affected by this bug, after googling about this issue, I found that Fedora Linux and some other Linux distros also affected by this gvfs issue.
Someone already filed a bug about this issue on Launchpad and Red Hat Bugzilla.
Hope soon we will get bug-fix update for this issue..

However, we can also get rid of this issue by small workaround.. I found this workaround on Ask Ubuntu forms..

Solution

We can fix this issue just by changing the permission of gvfsd-smb-browse file located in /usr/lib/gvfs/ to 744. So that we can prevent gvfsd-smb-browse from starting on system startup and now it can only be executed by sudo or root user.

open Terminal app in your Linux system and run the following command to change the the permission..

sudo chmod 744 /usr/lib/gvfs/gvfsd-smb-browse

Solution 2 :

One of our facebook page follower commented another solution for this issue..

That solution is posted in Red Hat Bugzilla.. According to that post mentioned in Red hat bugzilla, we can solve this issue just by adding single line in /etc/samba/smb.conf file

Note : This change only addresses the 100% CPU usage when opening the Nautilus file browser after a initial boot or reboot. I am not sure what other issues with gvfsd-smb-browse and 100% CPU usage this may impact so your experience may vary.

Step 1 :

Make a back up of your /etc/samba/smb.conf file.

Step 2 :

Using your preferred editor edit the smb.conf file and add the following line below the "[global]" statement

name resolve order = wins lmhosts bcast

Step 3 :

Your file should look like this:

[global] name resolve order = wins lmhosts bcast

Step 4 :

Save the file and reboot.

This should resolve the 100% CPU usage problem and you should notice that the "Network" Icon and label should appear in your file browser much quicker that before.

If you find any changes required to this post or find any typo error please let us know about it.. please drop your comment on our facebook page message box fb.com/opensourceinside


Friday, June 24, 2016

How To Upgrade Fedora 23 to Fedora 24

How To Upgrade Fedora 23 to Fedora 24


Fedora 24 officially released on 21-JUNE-2016 and You'll likely want to upgrade your system. Here I'll show you how to upgrade Fedora 23 to Fedora 24 using DNF system upgrade plugin.

1. Upgrade and back up your system

Before doing anything, It's good habit to back-up your system and ensure that you have the latest software running on your Fedora 23 .. You can upgrade all packages to its latest version by running command shown below in your terminal..

sudo dnf upgrade --refresh
Common issues in upgrading Fedora 23 to 24 :
According to official Fedora 24 release notes... "Rpmfusion packages block Fedora upgrade".

At the time of release, rpmfusion packages were blocking Fedora upgrades with a message similar to:

Error: Package a52dec-0.7.4-19.fc24.x86_64.rpm is not signed

This is a third-party repository issue outside of Fedora control. You can read more about possible solutions in this blog post. The repository maintainers are supposedly working on signing their repo, so that the issue disappears in the future.

2. Install the DNF plugin

Next, open a terminal and type the following command to install the plugin..

sudo dnf install dnf-plugin-system-upgrade

3. Start upgrading your system..

Now that your system is up-to-date, backed up, and you have the DNF plugin installed, you can begin the upgrade by using the following command in a terminal

sudo dnf system-upgrade download --releasever=24

You can also include the --allowerasing option which helps to remove all packages that may break the upgrade process as a result of certain packages not having updates, retired packages or even broken dependency issues.

5. Reboot and upgrade

Once the previous command finishes downloading all of the upgrades, your system will be ready for rebooting. To boot your system into the upgrade process, type the following command in a terminal

sudo dnf system-upgrade reboot

This will reboot your machine immediately. The system should boot again info Fedora using the same kernel, but this time, the upgrade process appears on the boot screen.

Further Information

For more detailed instructions on using dnf for upgrading, including a breakdown of other flags, check out the DNF system upgrade wiki article. This page also has frequently asked questions you may have during an upgrade and also don't forget to check known issues.

Happy Upgrades!

DNF system upgrade plugin develpment page Github. If you find any issue with this plugin open an issue on Github.


Upgrading Fedora (With DNF system upgrade)

Upgrading Fedora
(With DNF system upgrade)


When it comes to upgrading Fedora Linux, you're likely familiar with the fedup tool. However the new Fedora releases which uses dnf as package manager(Fedora 22 and later..), features a new release method. Now we can upgrade Fedora with DNF system upgrade plugin. Using this plugin will make your upgrading process simple and easy.

From the release of Fedora 23, you can even upgrade your system to next release easily using the GUI gnome-software (referred to as Software app in a fully updated Fedora 23).

1. Upgrade and back up your system

Before doing anything, It's good habit to back-up your system and ensure that you have the latest software running on your current system.. You can upgrade all packages to its latest version by running command shown below in your terminal..

sudo dnf upgrade --refresh

2. Read about common problems

Further down in this page there is a list of common problems specific to yum or dnf upgrades for specific versions. Some of them require attention before the upgrade.

General advice on upgrading Fedora can be found on the Upgrading page. You should also read the Installation Guide and Release Notes for the version you plan to upgrade to - they contain important information regarding upgrading issues. Finally, check the list of Common bugs.

3. Install the DNF plugin

Next, open a terminal and type the following command to install the plugin..

sudo dnf install dnf-plugin-system-upgrade

4. Now, You're Ready To Upgrade Your System..

Now that your system is up-to-date, backed up, and you have the DNF plugin installed, you can begin the upgrade by using the following command in a terminal

sudo dnf system-upgrade download --releasever=release_number

Don't forget to replace "release_number"(highlighted in red color) with Release Number of Fedora which you want to upgrade to..

For example, if you're going to upgrade your Fedora 23 system to Fedora 24, the above command will looks like one shown below..

sudo dnf system-upgrade download --releasever=24

You can also include the --allowerasing option which helps to remove all packages that may break the upgrade process as a result of certain packages not having updates, retired packages or even broken dependency issues.

5. Reboot and upgrade

Once the previous command finishes downloading all of the upgrades, your system will be ready for rebooting. To boot your system into the upgrade process, type the following command in a terminal

sudo dnf system-upgrade reboot

This will reboot your machine immediately. The system should boot again info Fedora using the same kernel, but this time, the upgrade process appears on the boot screen.

Further Information

For more detailed instructions on using dnf for upgrading, including a breakdown of other flags, check out the DNF system upgrade wiki article. This page also has frequently asked questions you may have during an upgrade and also don't forget to check known issues.

Happy Upgrades!

DNF system upgrade plugin develpment page Github. If you find any issue with this plugin open an issue on Github.


Tuesday, June 21, 2016

Snaps(apps) Everywhere - New Ruler For Linux Application World

Snaps(apps) Everywhere
New Ruler For Linux Application World


Ubuntu 'Snap' packages now available for Linux Distros based on Arch Linux, Debian, Fedora and Gentoo

Canonical Ltd. announced this month() that the lightweight Snappy Ubuntu Core's "snap" mechanism, which can now also work with other Linux distributions. Yes, You heard correctly...!! Snappy apps can now run on several different Linux distributions, including Arch, Debian, Fedora, and Gentoo.

This wide-ranging support could see Snap apps become the de-facto Linux app package format. Imagine it: a single binary package that will work perfectly, predictably and securely on any Linux desktop, server, cloud or device regardless of which flavor of Linux it runs.

"Linux fragmentation (Especially, Fragmentation In Linux Application Ecosystem)" is one of the issues being faced by Linux community for longtime, But Cross distro support for Snap apps may end this...

"Snaps bring apps to every Linux desktop, server, device or cloud machine, giving users freedom to choose any Linux distribution while retaining access to the best apps."

The idea behind Snaps is that it will help software vendors distribute their Linux-based apps more easily.

"We strive to offer users a great experience and make Firefox available across many platforms, devices and operating systems. With the introduction of snaps, continually optimizing Firefox will become possible, providing Linux users the most up-to-date features," said Nick Nguyen, Vice President of Product, Firefox at Mozilla, in a statement.

Boudewijn Rempt, project lead at the Krita Foundation who said: "Maintaining .deb packages in a private repository was complex and time consuming, snaps are much easier to maintain, package and distribute. Putting the snap in the store was particularly simple, this is the most streamlined app store I have published software in."

Some Salient Features Of Snappy Apps :

Enhanced security for apps and devices

Each snap is confined using a range of kernel isolation and security mechanisms, tailored to the snap, ensuring that vulnerabilities in the application are contained to the greatest degree currently possible. A careful review process ensures that snaps only receive the permissions they require to operate. Users do not have to make complex security decisions when installing the snap.

"Security is particularly important when running third-party software," said Steve Langasek, a Debian developer. "Snaps meet that challenge with robust confinement, neatly addressing many of the risks of apps in sensitive environments."

Simpler and easier to create

The snap format is simpler than the native internal package formats of individual Linux distributions, because it is focused purely on applications rather than the core system itself. Snaps are essentially self-contained zip files that can be executed very fast in place, making them easy to create.

"Snaps are much easier to create than traditional Linux packages, and allow us to evolve dependencies independent of the base operating system."

Automatic updates

Updated snaps are delivered automatically, improving the flow of features and fixes as well as the feedback cycle both for commercial applications and for open source applications.

Stable, candidate, beta and daily versions

Stable releases, release candidates, beta versions and daily builds of a snap can all be published at the same time, enabling users to preview upcoming releases with different levels of stability.

"Rolling updates are popular in the Arch community," said Tim Jester-Pfadt, an Arch contributor. "One nice feature of snaps is support for edge and beta channels, which allow users to opt-in to the pre-release developer versions of software or stick with the latest stable versions".

On top of this, they can be both updated or rolled back to previous versions. One area where this aspect is being used is in IoT.

Free software on Github

The snap format, designed by Canonical, is handled by snapd, a free software project on Github. Porting snapd to a wide range of Linux distributions has proven straightforward, and the community has grown to include contributors from a wide range of Linux backgrounds.

Snap packages are easily created with the snapcraft tool. The home of the project is snapcraft.io which includes a tour and step-by-step guides to snap creation, along with documentation for users and contributors to the project. Snaps can be built from existing distribution packages, but are more commonly built from source for optimization and size efficiency.

What About App Image, Flatpak, Orbital Apps, Etc?

App Image has been around for a while. 'It delivers a single binary but it doesn't make any attempt to do it in a secure way; it doesn't have the upgrade semantics that Snaps were designed to introduce,' Shuttleworth explains.

Flatpak is the new name for GNOME's XDG-App initiative, though '95% of the commits come from one Red Hat employee,' Shuttleworth cheekily noted. 'We would be delighted if they'd work with us."

Orbital Apps are primarily focused on portability and do not offer a transactional update model.

You May Also Like To Read :

Fragmentation is Good and Bad for Linux


Monday, June 6, 2016

How To Install Upstream Linux Kernel(s) On Ubuntu

How To Install
Upstream Linux Kernel(s) On Ubuntu


By default, Ubuntu systems run with the Ubuntu kernels provided by the Ubuntu repositories. However it is handy/convenient to be able to get unmodified upstream kernels ,for people who are eager to try out new upstream kernels features, or to confirm that upstream has fixed a specific issue. So Ubuntu offers upstream kernel builds. These kernels are made from unmodified kernel source but using the Ubuntu kernel configuration files. These are then packaged as Ubuntu .deb files for simple installation.
Here , i'm going to show you, How to install upstream kernels or kernel which you want to use in your Ubuntu system..


Warning : The Linux kernel is a critical element of the system. To do the upgrade costs when one of your hardware devices is not working properly, and the new kernel may fix this problem. But at the same time installing a new kernel unnecessarily can lead to undesirable regressions, such as: no network connection, no sound or even the inability to boot the system, so install a new kernel on your own risk.

Installation Steps :

Step 1 :

First, you have to Download the 3 packages of Linux kernel (version which you want ) from http://kernel.ubuntu.com/~kernel-ppa/mainline/?C=N;O=D.

You need to download..

  1. first download (header)file named/looks like
    linux-headers-version-....._all.deb
  2. then download (header)file named/looks like
    linux-headers-version..-generic_..._(your arcitecture).deb
  3. After this download (main)file named/looks like
    linux-image-version-...-generic_.._(your architecture).deb

Make sure that you have downloaded packages which suits for your system architecture(64 bit / 32 bit)

Step 2 :

Now navigate to the folder where you have download and saved the above packages.. and run following command

sudo dpkg -i linux-*.deb

That is it ! .. You have done..

For my example, I'm going with Linux 4.6 :

so, first downloaded packages from http://kernel.ubuntu.com/~kernel-ppa/mainline/?C=N;O=D.

For 64 bit..

  1. linux-headers-4.6.0-040600_4.6.0-040600.201606030904_all.deb
  2. linux-headers-4.6.0-040600-generic_4.6.0-040600.201606030904_amd64.deb
  3. linux-image-4.6.0-040600-generic_4.6.0-040600.201606030904_amd64.deb

For 32 bit..

  1. linux-headers-4.6.0-040600_4.6.0-040600.201606030904_all.deb
  2. linux-headers-4.6.0-040600-generic_4.6.0-040600.201606030904_i386.deb
  3. linux-image-4.6.0-040600-generic_4.6.0-040600.201606030904_i386.deb

Then , run the following command to install downloaded .deb files. Assume that i have all downloaded files in Downloads folder..

So first navigate to the directory where you have stored above downloaded files..

cd ~/Downloads

Then , run the following command

sudo dpkg -i linux-*.deb

And then , reboot to use latest kernel.. enjoy..

sudo reboot

When you come back up, run

uname -r

to make sure you're running the kernel version you specified.

You can find more information about using Ubuntu's mainline builds.

if you want to build your own kernel from source see this post .


PulseAudio Sound Server For Linux

PulseAudio
Sound Server For Linux


PulseAudio is a network-capable sound server program distributed by freedesktop.org. It runs on Linux, the BSDs including Mac OS X, Solaris and Microsoft Windows operating systems, licensed under GNU Lesser General Public License.


Features :

The main PulseAudio features include:

  • Per-application volume controls.
  • An extensible plugin architecture with support for loadable modules.
  • Compatibility with many popular audio applications.
  • Support for multiple audio sources and sinks.
  • Low latency operation and latency measurement.
  • A zero-copy memory architecture for processor resource efficiency.
  • Ability to discover other computers using PulseAudio on the local network and play sound through their speakers directly.
  • Ability to change which output device an application plays sound through while the application is playing sound (without the application needing to support this, and indeed without even being aware that this happened).
  • A command-line interface with scripting capabilities.
  • A sound daemon with command line reconfiguration capabilities.
  • Built-in sample conversion and resampling capabilities.
  • The ability to combine multiple sound cards into one.
  • The ability to synchronize multiple playback streams.
  • Bluetooth audio devices with dynamic detection.
  • The ability to enable system wide equalization.

Installation :

Most of the Linux distributions include pulseaudio in their official repositories.. so we can easily install it from official repos..

Install PulseAudio In Ubuntu :

sudo apt-get install pulseaudio

Install PulseAudio In Fedora :

See, How to enable RPM fusion repositories...

For Fedora 22 and later...

sudo dnf install pulseaudio

For Fedora 21 and older...

sudo yum install pulseaudio

JACK (JACK Audio Connection Kit) Sound Server For Linux

JACK (JACK Audio Connection Kit)
Sound Server For Linux


JACK Audio Connection Kit (or JACK) is a professional sound server daemon that provides real-time, low-latency connections for both audio and MIDI data between applications that implement its API. JACK has been developed by a community of open-source developers led by Paul Davis (who won an Open Source Award in 2004 for this work) and has been a key piece of infrastructure and the de facto standard for professional audio software on Linux since its inception in 2002. The server is free software, licensed under the GNU GPL, while the library is licensed under the more permissive GNU LGPL.

Installation :

For Ubuntu :

sudo apt-get install jack

For Fedora :

See, How to enable RPM fusion repositories...

For Fedora 22 and later...

sudo dnf install jack

For Fedora 21 and older...

sudo yum install jack

Sunday, June 5, 2016

How to install Ardour (digital audio workstation) on Linux

How to install Ardour (digital audio workstation) on Linux

Ardour stands out as the most popular go-to digital audio workstation on GNU/Linux. It offers professional-quality recording, mixing, and all-around production. The MIDI capabilities are functional, but less robust. For multitrack recording, this is the way to go. Ardour is fully JACK capable, but the newest versions can simply use ALSA directly if you just use Ardour alone as an all-in-one tool. Though its detailed feature list is shorter, Ardour has all the core capabilities to match that of the expensive proprietary competition. For recording a band in a studio or overlaying dubs of live performances, this is all you really need.

Installation :

For Ubuntu :

There is a community maintained PPA is available for Ubuntu..

DO NOT use this PPA if you are using the KXStudio PPAs. The KXStudio PPAs intentionally break the Ubuntu upgrade path, and will result in crashes or worse, if combined with this PPA.

sudo add-apt-repository ppa:dobey/audiotools && sudo apt-get update && sudo apt-get install ardour

Compiling from source..(For fedora)

If you want binaries you have to pay.. however you can get source code for free of cost and then, you can compile it on your system.. Here , I am going to show how to compile it from source code..

Before You start..

Before you start compiling, You should have to enable RPM fusion repos.. see here , How to enable RPM fusion repos..

Now that we have rpmfusion added let's add PlanetCCRMA repository.

Enable ccrma repos..

sudo rpm -Uvh http://ccrma.stanford.edu/planetccrma/mirror/fedora/linux/planetccrma/18/i386/planetccrma-repo-1.1-3.fc18.ccrma.noarch.rpm

Install planetccrma and reboot

Next we need to install the realtime kernel and alsa libraries that is available from PlanetCCRMA. While still in the terminal session.

For fedora 22 and later..

sudo dnf check-update && sudo dnf install planetccrma-core && sudo reboot

for fedora 21 and older..

sudo yum update && sudo yum install planetccrma-core && sudo reboot

Install dependencies :

For fedora 22 and later..

sudo dnf install git jack-audio-connection-kit-devel libsndfile-devel liblo-devel aubio-devel cppunit-devel cwiid-devel liblrdf-devel libsamplerate-devel lv2-devel serd-devel sord-devel sratom-devel lilv-devel flac-devel gtkmm24-devel libgnomecanvas-devel libgnomecanvasmm26-devel suil-devel libcurl libcurl-devel uuid uuid-devel libuuid libuuid-devel lib fftw3 fftw3-devel liboggz liboggz-devel qjackctl jack-audio-connection-kit boost boost-devel libxml2 libxml2-devel

for fedora 21 and older..

sudo yum install git jack-audio-connection-kit-devel libsndfile-devel liblo-devel aubio-devel cppunit-devel cwiid-devel liblrdf-devel libsamplerate-devel lv2-devel serd-devel sord-devel sratom-devel lilv-devel flac-devel gtkmm24-devel libgnomecanvas-devel libgnomecanvasmm26-devel suil-devel libcurl libcurl-devel uuid uuid-devel libuuid libuuid-devel lib fftw3 fftw3-devel liboggz liboggz-devel qjackctl jack-audio-connection-kit boost boost-devel libxml2 libxml2-devel

1 . Get Source Code, compile and Run :

cd && git clone git://git.ardour.org/ardour/ardour.git

Once the download has completed we need to compile it.

cd ~/ardour && ./waf configure && ./waf

You do not need to install in order to use your new build of Ardour. You can run it from within the build tree:

cd ~/ardour/gtk2_ardour && ./ardev

To install (optional):

cd ~/ardour && ./waf install

To uninstall

cd ~/ardour && ./waf uninstall

How To Install Hydrogen (Music Maker) On Linux

How To Install Hydrogen On Linux


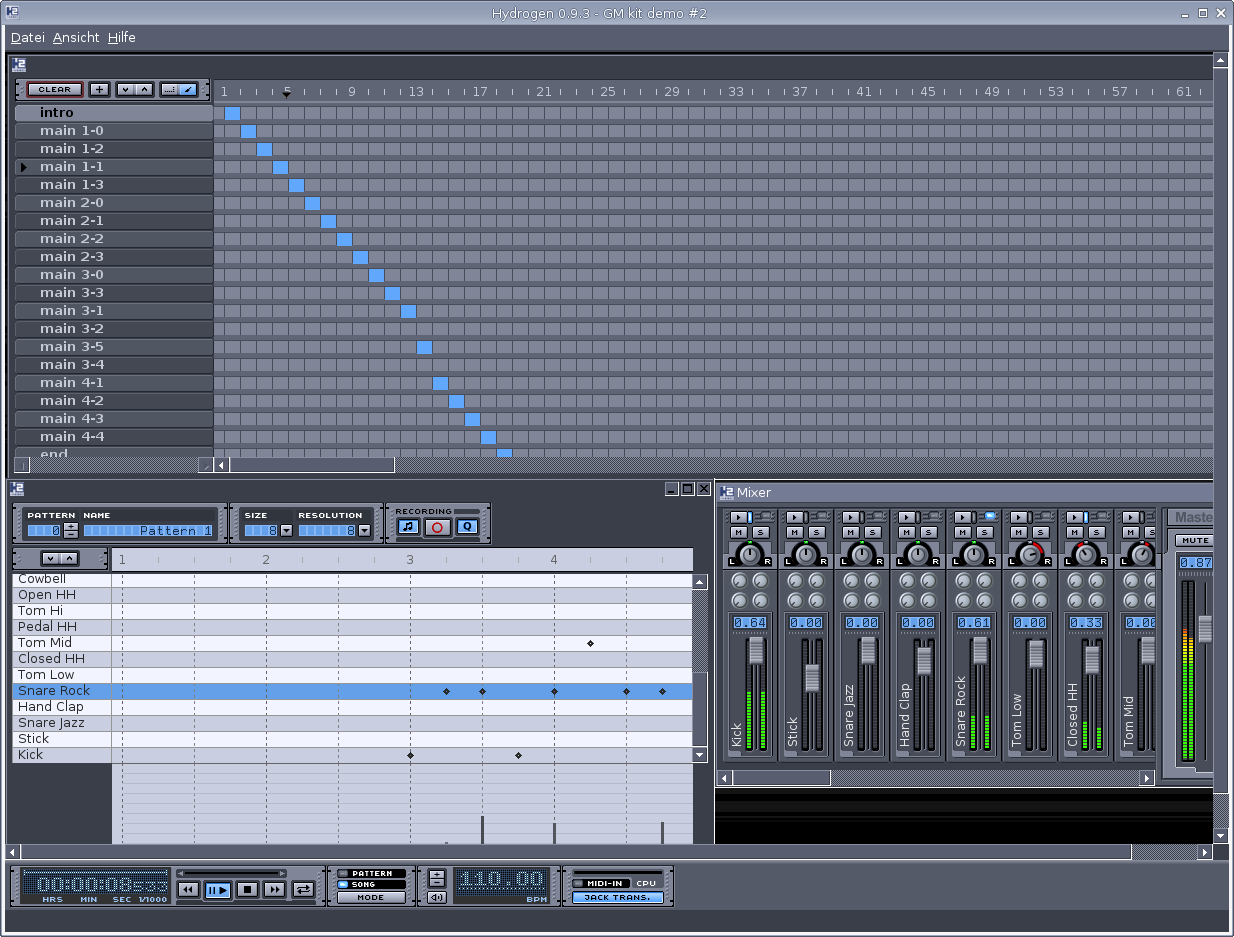
Hydrogen is an open source drum machine created by Alessandro Cominu, an Italian programmer who goes by the pseudonym Comix. Its main goal is to provide professional yet simple and intuitive pattern-based drum programming.

Hydrogen was originally developed for Linux, but later ported to Mac OS X. The graphical user interface for the application uses Qt library, and all code is released under the GNU General Public License.

Features :

These are the features of Hydrogen:

  • Pattern-based sequencer, with unlimited number of patterns and ability to chain patterns into a song.
  • Up to 192 ticks per pattern with individual level per event and variable pattern length.
  • Unlimited instrument tracks with volume, mute, solo, pan capabilities.
  • Multi-layer support for instruments (up to 16 samples for each instrument).
  • Sample Editor, with basic cut and loop functions.
  • Time-stretch and pitch functions.
  • Time-line with variable tempo.
  • Single and stacked pattern mode.
  • Ability to import/export song files.
  • Support for LADSPA effects.
  • Real-time slide control for swing.
  • Option to slightly randomize velocity, time, pitch and swing functions to give a more "human" playback.
  • Multiple patterns playing at once.
  • GMkit, the drum kit features: Kick, Stick, Snare Jazz, Hand Clap, Snare Rock, Tom Low, Closed HH (high hat), Tom Mid, Pedal HH (high hat), Tom Hi (high), Open HH (high hat), Cowbell, Ride Jazz, Crash, Ride Rock, and Crash Jazz.

Installation :

Since there is many Linux Distros, Hydrogen developers not providing distro specific binaries for installation.. so we have to compile from source..

These are the instructions for compiling the Hydrogen versions 0.9.6 (all based on QT4) on a debian-based distribution. Hydrogen runs on all kinds of linux distribution, but then the package names and installation tools will differ.

Required libraries

QT4     : libqt4-dev
ALSA    : libasound-dev
SndFile : libsndfile-dev
JACK    : libjack-dev
LRDF    : liblrdf-dev
TAR     : libtar-dev
LASH    : liblash-dev
ZLIB    : zlib1g-dev

Build steps :

1. Install the required libraries and tools:

apt-get install git-core libqt4-dev g++ libasound2-dev libjack-dev liblrdf0-dev libtar-dev libsndfile1-dev cmake

NOTE: get QT version 4.7 or higher


NOTE: depending on the jack server version you have installed you might have to install libjack-jackd2-dev iso libjack-dev

2. Get the sourcecode:

cd && git clone git://github.com/hydrogen-music/hydrogen.git

3. Compile and install hydrogen:

cd hydrogen && ./build.sh m

4. Build a debian package (optional)

As an alternative you can build a debian package. This makes it easier to remove hydrogen from your system.

sudo apt-get install fakeroot debhelper build-essential && cd ~/hydrogen/linux && sudo fakeroot dpkg-buildpackage

The package appears inside hydrogen directory and can be installed with dpkg (dpkg -i package_name)


How To Install Audacity In Linux

How To Install Audacity In Linux


Audacity is a free open source digital audio editor and recording computer software application, available for Windows, OS X, Linux and other operating systems.

For basic audio recording, Audacity works. It doesn't provide any advanced mixing or composition tools, but it has wonderful effects and detailed tools for audio editing. Audacity is probably the best program to explore the nature of sound in fundamental ways, playing with generating tones and combining waveforms.

Install Audacity On Ubuntu..

You can use Audacity PPA to install Audacity on ubuntu systems..

sudo add-apt-repository -y ppa:audacity-team/daily && sudo apt-get update && sudo apt-get install audacity

Install Audacity On Fedora..

Audacity 2.1.2 is not available via any repository, we have to download the audacity rpm package and to install it via rpm. Follow the instructions for your system and architecture exactly, in order to get a successful installation.

For 32 bit systems:

cd && wget https://kojipkgs.fedoraproject.org//packages/audacity/2.1.2/4.fc24/i686/audacity-2.1.2-4.fc24.i686.rpm && sudo rpm -Uhv audacity-2.1.2-4.fc24.i686.rpm

For 64 bit systems

cd && wget https://kojipkgs.fedoraproject.org//packages/audacity/2.1.2/4.fc24/x86_64/audacity-2.1.2-4.fc24.x86_64.rpm && sudo rpm -Uhv audacity-2.1.2-4.fc24.x86_64.rpm

How to install MuseScore In Linux

How to install MuseScore In Linux


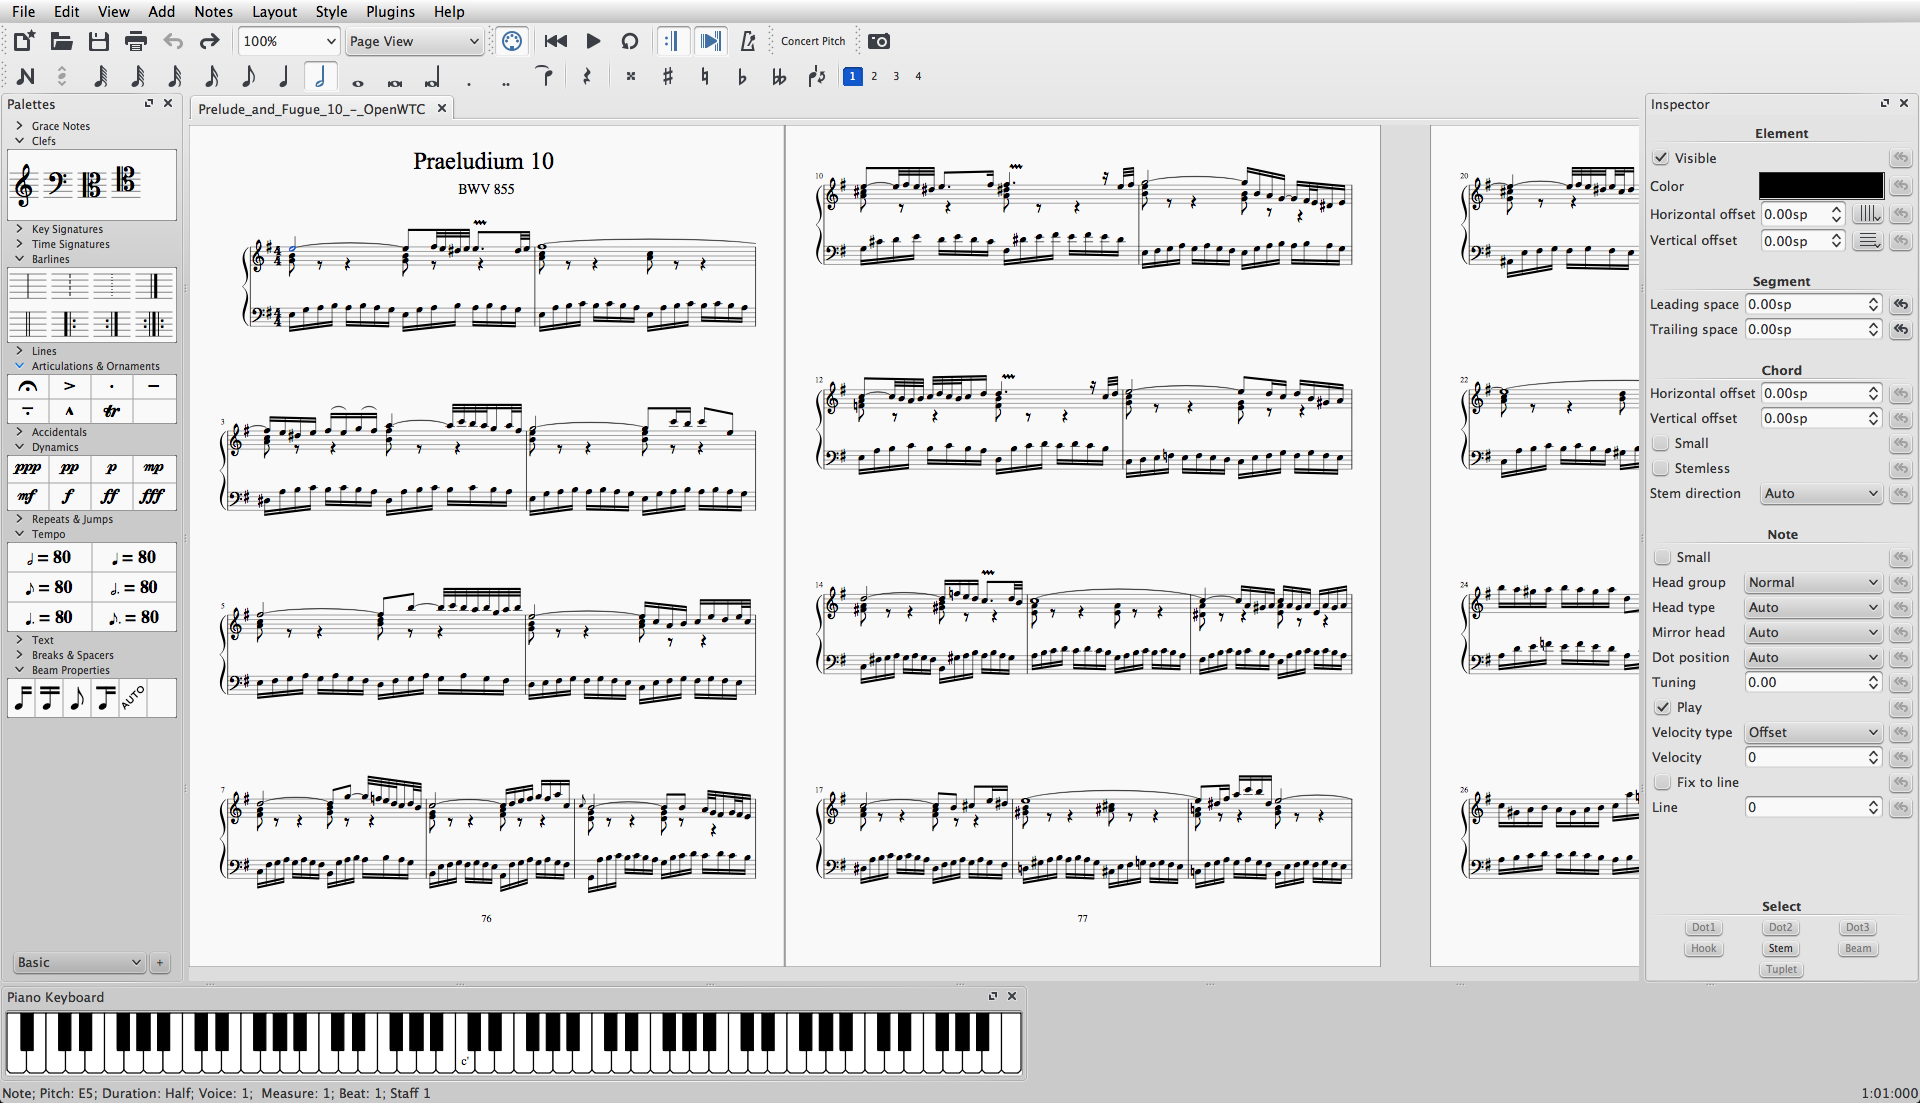
MuseScore is a scorewriter for Windows, OS X, and Linux, comparable to Finale and Sibelius, supporting a wide variety of file formats and input methods. It is released as free and open-source software under the GNU General Public License.

MuseScore was originally created as a fork of the MusE sequencer's codebase. At that time, MusE included notation capabilities and in 2002, Werner Schweer, one of the MusE developers, decided to remove notation support from MusE and fork the code into a stand-alone notation program. Since then, MuseScore has been under constant active development.

Installation through PPA (For Ubuntu based Linux systems only..) :

Run the following command to install MuseScore in Ubuntu and it's derivative linux systems..

sudo add-apt-repository -y ppa:mscore-ubuntu/mscore-stable && sudo apt-get update && sudo apt-get install musescore

Installation Through Appimage (Works for all Linux Systems..)

Appimage is a new application format for Linux applications.. It doesn't require installation. these apps are fully portable and we can run this apps probably on any Linux system.. Here I will show you how to download and run this apps on your Linux system.

Step 1 - Download :

Before you download an AppImage, you need to know your processor's architecture. These terminal commands will show it:

arch

or

uname -m

The output will be something like "i686", "x86_64" or "armv7":

  • i686 (or similar) - 32 bit Intel/AMD processor. (Found on older machines.)
  • x86_64 (or similar) - 64 bit Intel/AMD processor. (Modern laptop and desktop computers, most Chromebooks.)
  • armv7 (or later) - ARM processor. (Phones & tablets, Raspberry Pi 2/3 running Ubuntu Mate, some Chromebooks. Usually 32 bit at present.)

Now you can head over to the Download page and find the AppImage that best matches your architecture. Once downloaded, the file will be named "MuseScore-X.Y.Z-$(arch).AppImage".

Step 2 - Give execute permission :

Before you can use the AppImage you need to give permission for it to be run as a program.

From Terminal :

This command gives the user (u) permission to execute (x) the AppImage. It works on all Linux systems.

cd ~/Downloads && chmod u+x MuseScore*.AppImage

Note: Use the "cd" command to change directory to wherever you saved the AppImage. For example the above command assumes that our downloaded Appimage is present inside the user's Desktop folder..

From a File Manager:

If you prefer to avoid the command line, there is usually a way give execute permission from inside a File Manager.
In GNOME Files (Nautilus), simply:

  1. Right-click on the AppImage and select "Properties".
  2. Open the "Permissions" tab.
  3. Enable the option labelled "Allow executing file as a program".

Step 3 - Run it! :

Now you should be able to run the program simply by double-clicking on it!

When you downloaded the AppImage it was probably saved in your Downloads folder, but you can move somewhere else it at any time (e.g. you could put it on your desktop for easy access). If you ever want to remove it then simply delete it.