Showing posts with label tricks. Show all posts

Sunday, May 6, 2018

Finding Application / Process Running On Particular Port In Linux Systems

Finding Application / Process Running On Particular Port In Linux Systems


Today, I'm going to show you how to find application / process running on particular port in Linux Systems.

We can use lsof command to find the process running on particular port. The syntax of lsof command to find the application running on particular port looks like following..

lsof -i :port

Summary of above code...
lsof command is used to list open files.. and the argument -i is used to list files whose ip address / port matched to specified ip address / port.

Note: If you ignore ip address / port after -i then the above command will lists processes for all ip addresses...

For example to find the process / application listening on port 80, run the following code..

lsof -i :80

The output will looks like following..

shivaraj@shivaraj-A14RM0E:~$ lsof -i:80 COMMAND PID USER FD TYPE DEVICE SIZE/OFF NODE NAME plugin_ho 3981 shivaraj 20u IPv4 420822 0t0 TCP 192.168.0.117:33104->45.55.41.223:http (CLOSE_WAIT) shivaraj@shivaraj-A14RM0E:~$

If you omit port value... lsof -i the output will looks like following one..

shivaraj@shivaraj-A14RM0E:~$ lsof -i COMMAND PID USER FD TYPE DEVICE SIZE/OFF NODE NAME plugin_ho 3981 shivaraj 20u IPv4 420822 0t0 TCP 192.168.0.117:33104->45.55.41.223:http (CLOSE_WAIT) node 4165 shivaraj 12u IPv4 509873 0t0 TCP *:http-alt (LISTEN) firefox 4178 shivaraj 114u IPv4 7216095 0t0 TCP 192.168.0.117:42436->server-54-230-190-100.maa3.r.cloudfront.net:https (ESTABLISHED) shivaraj@shivaraj-A14RM0E:~$

By specifying -t for lsof command we can get pid of process listening on particular port... Look at the below command signature..

lsof -t -i :port

If you want to find out pid of process listening on port 80, run the following code..

lsof -t -i :80

The above commands output will looks like..

shivaraj@shivaraj-A14RM0E:~$ lsof -t -i :80 3981 shivaraj@shivaraj-A14RM0E:~$
How to find and kill the process running on particular port..

That's it for now.. If you like don't forget to share it guys.. You can follow us on fb.com/opensourceinside and also subscribe our channel on Youtube..


Sunday, May 22, 2016

Record Your DESKTOP SCREEN With VLC Media Player

Record Your DESKTOP SCREEN
With VLC Media Player


VLC media player

VLC media player (commonly known as VLC) is a portable, free and open-source, cross-platform media player and streaming media server written by the VideoLAN project. VLC is available for desktop operating systems and mobile platforms, such as Windows 10 Mobile, Windows Phone, Android, iPad, iPhone, and iPod Touch. VLC is also available on App stores such as Apple's App Store and Microsoft Windows Windows Store.

VLC media player supports many audio and video compression methods and file formats, including DVD-Video, video CD and streaming protocols. It is able to stream media over computer networks and to transcode multimedia files.

The default distribution of VLC includes a large number of free decoding and encoding libraries, avoiding the need for finding/calibrating proprietary plugins. The libavcodec library from the FFmpeg project provides many of VLC's codecs, but the player mainly uses its own muxers, and demuxers. It also has its own protocol implementations. It also gained distinction as the first player to support playback of encrypted DVDs on Linux and OS X by using the libdvdcss DVD decryption library.

And , Today , I am going show you how to capture/record your Desktop sreen with vlc media player.. Here , is the step by step guide..

Step 1 :

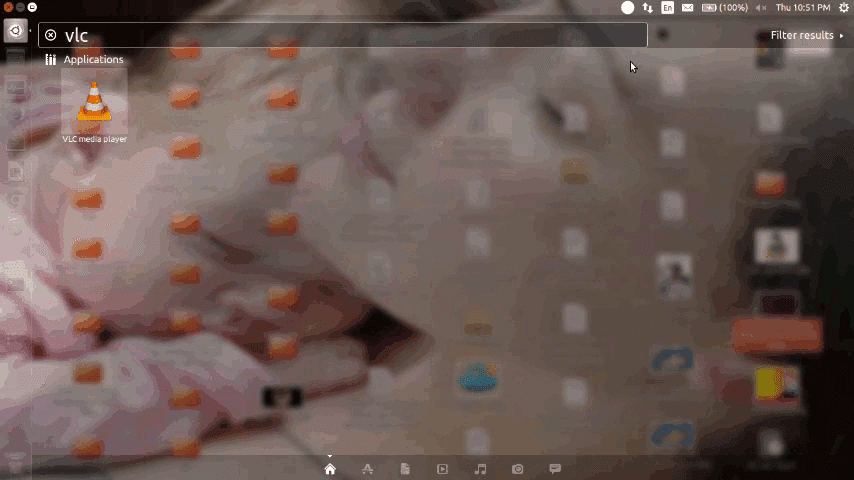
Open VLC media player

Step 2 :

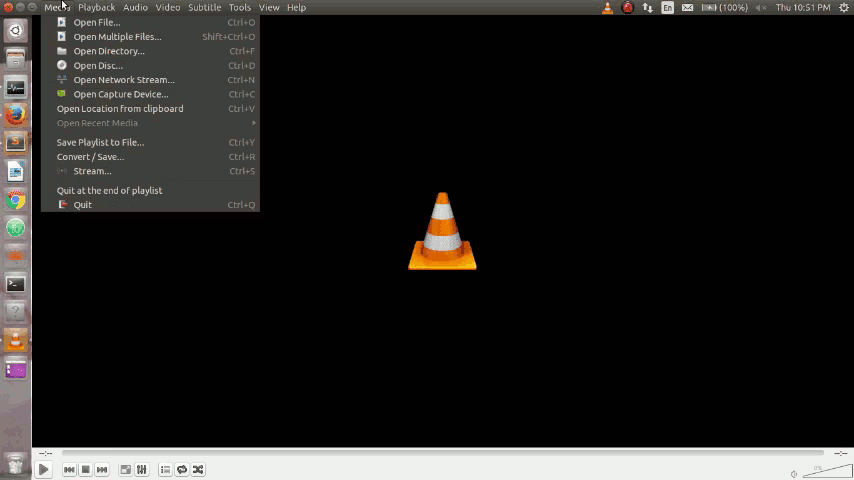
Then , go to "MEDIA"
Open VLC Media player --> "MEDIA"

Step 3 :

select "CAPTURE DEVICE" tab..
Open VLC Media player --> "MEDIA" --> "CAPTURE DEVICE"

Step 4 :

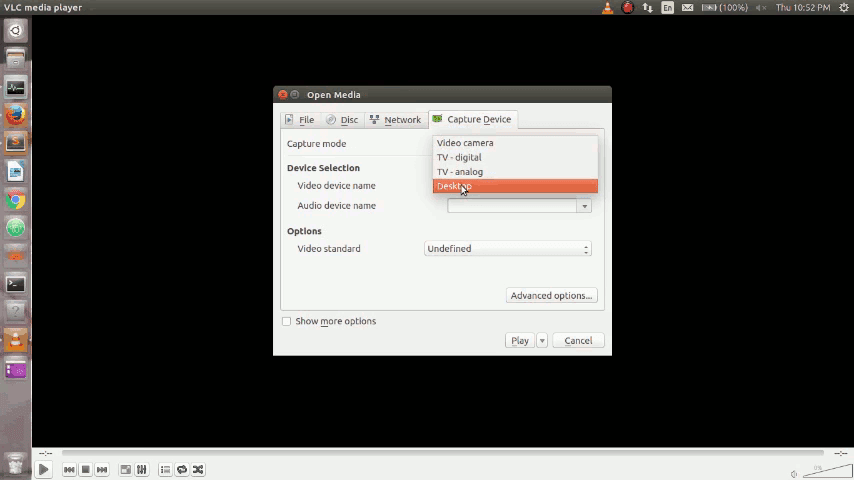
Change capture mode to DESKTOP
Cpture Mode ==> DESKTOP

Step 5 :

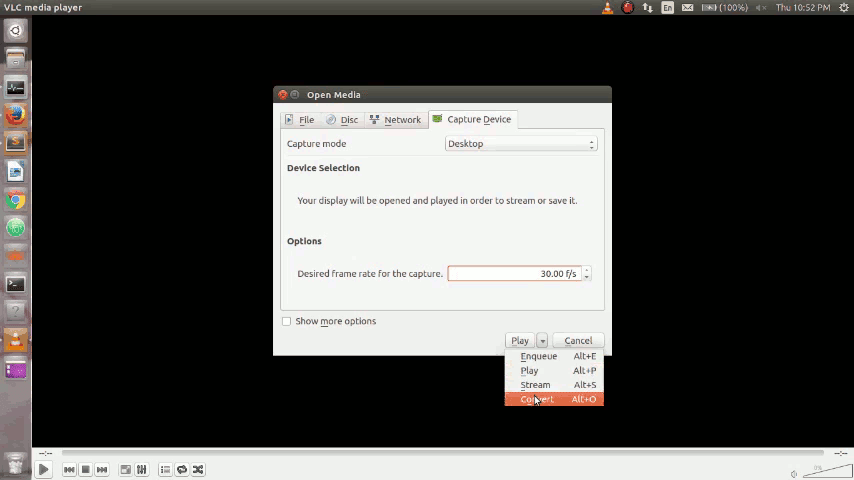
Change Options to 30 f/s

Step 6 :

Choose CONVERT option instead of play option

Step 7 :

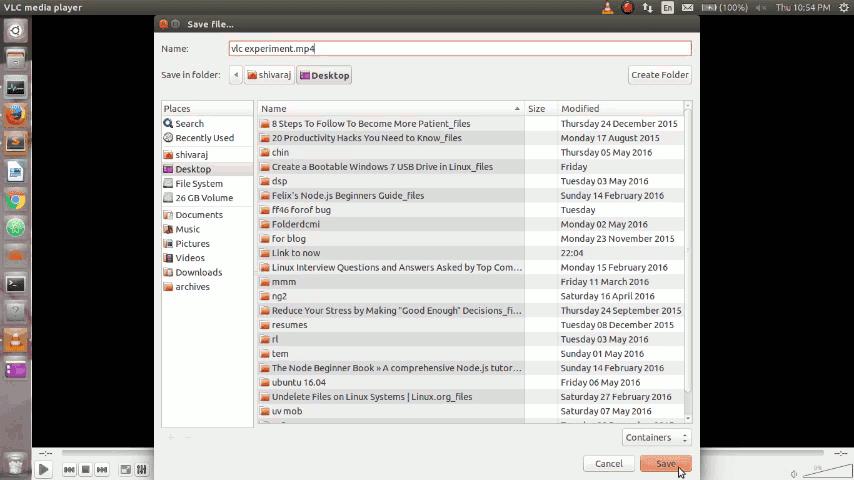
In the Convert window add the destination file via the BROWSE button then name the file TEST.MPG (VLC does require the extension so the file becomes TEST.MPG rather than just TEST) and click save button
If you want to change video format , you can do that throuh profile option. for example if you want to change video to mp4 format .. you can change that in profile options.. and you have to append .mp4 while naming your video file.


Step 8 :

Click START (Optional :Choose the DEINTERLACE option)

Step 9 :

If you have completed recording .. then.. press "STOP Playback" button. that's it..


Friends.. Dont Forget To Share It With Friends.. Have A Nice Day

How to video for you...


Saturday, November 28, 2015

NetSurf : An Extremely Fast and Light weight Web Browser

NetSurf

An Extremely Fast and Light weight Web Browser

NetSurf is a free, open source web browser. It is written in C and released under the GNU Public Licence version 2.
NetSurf has its own layout and rendering engine entirely written from scratch. It is small and capable of handling many of the web standards in use today.

Whether you want to check your webmail, read the news or post to discussion forums, NetSurf is your lightweight gateway to the world wide web. Actively developed, NetSurf is continually evolving and improving.

Also Read: How to get started with Linux: A beginner's guide

Why choose NetSurf?

  • Speed
  • Simple interface
  • Light weight
  • Portable
  • Standards compliant
See More At : www.netsurf-browser.org

Project Goals

  • Adhere to the standards
  • Superior user experience
  • Keep NetSurf small
  • Portability
  • Modularity
  • Have fun with Learning By contributing
See Brief Design Goals at : Net Surf ProjectGoals

Ports & Availability

NetSurf 3.3 features

  • Web standards: HTML 4.01 and CSS 2.1
  • Image formats including: PNG, GIF, JPEG, SVG, and BMP
  • HTTPS for secure online transactions
  • Unicode text
  • Web page thumb-nailing
  • Local history trees
  • Global history
  • Hot-list manager (bookmarks)
  • Cookie manager
  • URL completion
  • Text selection
  • Scale view
  • Search-as-you-type text search highlighting
  • Save pages complete with images
  • Fast, lightweight layout and rendering engine

Also Read: 47 cool browser hacks

Installation Instructions:

For Debian Based Linux :

Also Read: The only remaining barrier to entry for Linux

step 1 : Download *.deb binary file of Net Surf Browser to Downloads ( ~/Downloads) Folder .
step 2 : Now open command line & navigate into downloads folder

cd ~/Downloads
step 3 : then install using dpkg command
sudo dpkg -i package_name.deb

Note : In above command (sudo dpkg -i package_name.deb) replace package_name by downloaded package name .


If you encounter any problems during installation Run below commands:
sudo apt-get update && sudo apt-get -f install

if you have further doubt in installation see this link.

Installation procedure for other os :see official documentation .


Also Read: have a fun with Linux vs Windows vs Mac

Related Links :