Finding Application / Process Running On Particular Port In Linux Systems
Today, I'm going to show you how to find application / process running on particular port in Linux Systems.
We can use lsof command to find the process running on particular port. The syntax of lsof command to find the application running on particular port looks like following..
lsof -i :port
Summary of above code... lsof command is used to list open files.. and the argument -i is used to list files whose ip address / port matched to specified ip address / port.
Note:
If you ignore ip address / port after -i then the above command will lists processes for all ip addresses...
For example to find the process / application listening on port 80, run the following code..
lsof -i :80
The output will looks like following..
shivaraj@shivaraj-A14RM0E:~$ lsof -i:80
COMMAND PID USER FD TYPE DEVICE SIZE/OFF NODE NAME
plugin_ho 3981 shivaraj 20u IPv4 420822 0t0 TCP 192.168.0.117:33104->45.55.41.223:http (CLOSE_WAIT)
shivaraj@shivaraj-A14RM0E:~$
If you omit port value... lsof -i the output will looks like following one..
That's it for now.. If you like don't forget to share it guys..
You can follow us on fb.com/opensourceinside and also subscribe our channel on Youtube..
How To Install Linux Kernel 4.15 (Includes Patches for Meltdown and Spectre) In Ubuntu Linux And Its Derivatives
As usual, Sunday (28, JAN 2018), Linux creator Linus Torvalds officially announced the final release of Linux Kernel 4.15, Which includes patches for two critical bugs Meltdown and Spectre. Apart from patches for Meltdown and Spectre bugs there also some other inresting things comes with Linux 4.15, such as support for the RISC-V architecture, support for AMD Secure Encrypted Virtualization, as well as support for the User-Mode Instruction Prevention feature on Intel CPUs..
As Soon as it was released, immediately it will be available for rolling release distros such as Arch Linux, Solus, or even openSUSE. Soon it will be available for Fedora users also.. But for Ubuntu, you have to manually install Linux 4.15, if you want to upgrade your current Linux kernel installed in your system. Here I am going to show you how to install Linux 4.15 in Ubuntu Linux and It's derivatives.
Warning : The Linux kernel is a critical element of the system. To do the upgrade costs when one of your hardware devices is not working properly, and the new kernel may fix this problem. But at the same time installing a new kernel unnecessarily can lead to undesirable regressions, such as: no network connection, no sound or even the inability to boot the system, so install a new kernel on your own risk.
Installation Steps :
Before starting... Update your system package source list and upgrade all installed packages to latest version by running following commands..
sudo apt-get update; sudo apt-get upgrade
Now make a new folder/directory to download and store required binaries files...
mkdir linux4.15 && cd linux4.15
Now download required files with following command..
Or if you want to download manually.. you can download from here.. and put them in one directory.
if you are downloading manually.. download correct binaries for your architecture...
If you are not sure about your OS architecture.. Run getconf LONG_BIT command.. This will tell you whether the kernel is 64 bit or 32 bit.. See More On Finding System Architecture..
How To Install Linux Kernel 4.9 In Ubuntu Linux And Its Derivatives
As usual, Last Sunday (11, DEC 2016), Linux creator Linus Torvalds officially announced the final release of Linux Kernel 4.9, codenamed 'Roaring Lionus'. Which is also the final and biggest ever release of 2016. As of writing this, Linux 4.9 is mainline kernel and the most advanced Linux kernel available in market for GNU Linux Distros...
As Soon as it was released, immediately it will be available for rolling release distros such as Arch Linux, Solus, or even openSUSE.
Soon it will be available for Fedora users also.. But for Ubuntu, you have to manually install Linux 4.9, if you want to upgrade your current Linux kernel installed in your system. Here we are going to see how to install Linux 4.9 in Ubuntu Linux and It's derivatives.
So new kernel release means, new features, support for more hardware and many more bug fixes and improvements.. Here is some new features and improvements Linux kernel 4.9 brings..
Some Of The New Features Of Linux 4.9
Experimental support for older AMD Radeon graphics cards
Memory Protection Keys (MPK) are now mainlined.
AMDGPU virtual display support.
Support for 29 more ARM machines by the mainline Linux kernel.
If you want to automate the installation processor.. follow the instructions given Method 1, otherwise if you want to know and install step by step follow Method 2.
Method 1 :
Just open and copy-paste the following in your terminal..
To Install Linux Kernel 4.9 in your system run the following command..
wget -O - https://gist.githubusercontent.com/shivarajnaidu/cfd4ddc12de1798a82d1dbe0b8fad0b2/raw/df86e39b818c9a6e007b0b8bd9736ea1ba0f7800/install_linux4.9_in_ubuntu.sh | sh -s
If script execution completes successfully then you are ready to go.. Just restart your system to use latest kernel... Enjoy ! ☻
If you want to remove Linux kernel for any reason.. Just pass 'd' (with out single quotes) as argument to above command
To Remove Linux Kernel 4.9 from your system run the following command..
wget -O - https://gist.githubusercontent.com/shivarajnaidu/cfd4ddc12de1798a82d1dbe0b8fad0b2/raw/df86e39b818c9a6e007b0b8bd9736ea1ba0f7800/install_linux4.9_in_ubuntu.sh | sh -s d
Method 2 :
In this method i will show you step by step process of installing Linux kernel 4.9 .....
First update your system package source list and upgrade all installed packages to latest version by running following commands..
sudo apt-get update; sudo apt-get upgrade
Warning : The Linux kernel is a critical element of the system. To do the upgrade costs when one of your hardware devices is not working properly, and the new kernel may fix this problem. But at the same time installing a new kernel unnecessarily can lead to undesirable regressions, such as: no network connection, no sound or even the inability to boot the system, so install a new kernel on your own risk.
Now make a new folder/directory to download and store required binaries files...
mkdir linux4.9 && cd linux4.9
Now download required files with following command..
Or if you want to download manually.. you can download from here.. and put them in one directory.
if you are downloading manually.. download correct binaries for your architecture...
If you are not sure about your OS architecture.. Run getconf LONG_BIT command.. This will tell you whether the kernel is 64 bit or 32 bit.. See More On Finding System Architecture..
Create Bootable USB Disk For Linux With "dd" Command
Bootable USB Disk creation is one of the common thing that Linux users will do often in their Linux Life.. ☻
There's a several ways are available to create bootable USB Disk for Linux (such as UNetbootin, Linux live usb.. etc..).
"dd" command is one of the simple way to create bootable USB disk for Linux through Linux Command Line..and also, The most Linux distros comes with "dd" tool pre-installed. Today i am going to show how to create bootable USB with "dd" command..
Note : dd is very powerful tool. dd stands for "Data Duplicator" which is make copy using block by block from one device into another device. So we can also use dd tool for data backup and restore from one device into another device. at the same time be careful wile using dd tool. because improper use may make your target device/memory stick unusable..
Now see how to create one with dd command....
The first thing you have to do is , identifying your USB device label.. it's very important, Because if we identify it wrongly.. we will end up with data loss.. So be careful with while identifying which one is your intended USB disk for this operation.. Just see following example..
Sector size (logical/physical): 512 bytes / 4096 bytes
I/O size (minimum/optimal): 4096 bytes / 4096 bytes
Disk identifier: 0x000d5d58
Device Boot Start End Blocks Id System
/dev/sda1 * 2048 52002815 26000384 83 Linux
/dev/sda2 52004862 312580095 130287617 5 Extended
Partition 2 does not start on physical sector boundary.
/dev/sda5 262002688 312580095 25288704 7 HPFS/NTFS/exFAT
/dev/sda6 52004864 60002303 3998720 82 Linux swap / Solaris
/dev/sda7 60004352 261988351 100992000 83 Linux
Partition table entries are not in disk order
Disk /dev/sdb: 15.6 GB, 15631122432 bytes
255 heads, 63 sectors/track, 1900 cylinders, total 30529536 sectors
Units = sectors of 1 * 512 = 512 bytes
Sector size (logical/physical): 512 bytes / 512 bytes
I/O size (minimum/optimal): 512 bytes / 512 bytes
Disk identifier: 0x00000000
Device Boot Start End Blocks Id System
/dev/sdb1 32 30529535 15264752 c W95 FAT32 (LBA)
shivaraj@shivaraj-A14RM0E:~$
Just note that... sdb is my pen drive/device (sdb1 is partition present in my pendrive /dev/sdb). That is assigned by Linux operating system automatically while inserting pen drive into our system. You can identify it by typing following command
sudo fdisk -l
After identifying our intended device to create bootable USB disk, we need to format our pen drive/device..
Before formatting the device/pen drive , we have to unmount all of its mounted partitions ..
So , unmount it first with following command..
sudo umount /dev/sdb1
Now format the pen drive to FAT32 disk format..
sudo mkfs.vfat -I /dev/sdb
The above command will format the pen drive and makes FAT filesystem. After that use dd command to create bootable USB disk..
sudo dd if=/path to iso/name_of_the_iso.iso of=/dev/sdb bs=1M; sync
For example, here i am going to create bootable USB disk from ubuntu-16.04-desktop-amd64.iso which is stored at ~/Downloads/os/.
Here, If stands for input file. It is used to specify the location of the ISO file.
Of stands for output file. It specifies where to write the ISO file. In our case, it's /dev/sdb
It takes some time to copy one disk to another disk. dd tool does not show progressing status.
That’s all. You can use the same procedure to make any OS to make bootable USB drive.
Note that..While creating bootable USB by using above method, dd tool will make several partition on that pen drive. So after using bootable USB, It is best to format and use the pen drive for making another bootable ISO.
Don't forget to unmount the USB ... after unmounting the usb drive, run the following command to format it..
sudo mkfs.vfat -I /dev/sdb
That's all for now... and guys, Don't forget to share it with fellow Linux friends..
How To Solve gvfsd-smb-browse 100% CPU usage Issue in Linux
Shortly, after installing Ubuntu 16.04 LTS and SAMBA file sharing in one of my friends laptop, I noticed that his laptop hangs on file open, save and on some other system operations... I have found this is caused by gvfsd-smb-browse. Yes, the theif is gvfsd-smb-browse. it's consuming 100% of your system's CPU, that makes Ubuntu 16.04 lagging badly..
Ubuntu isn't the only Linux distro which is affected by this bug, after googling about this issue, I found that Fedora Linux and some other Linux distros also affected by this gvfs issue. Someone already filed a bug about this issue on Launchpad and Red Hat Bugzilla. Hope soon we will get bug-fix update for this issue..
However, we can also get rid of this issue by small workaround.. I found this workaround on Ask Ubuntu forms..
Solution
We can fix this issue just by changing the permission of gvfsd-smb-browse file located in /usr/lib/gvfs/ to 744. So that we can prevent gvfsd-smb-browse from starting on system startup and now it can only be executed by sudo or root user.
open Terminal app in your Linux system and run the following command to change the the permission..
sudo chmod 744 /usr/lib/gvfs/gvfsd-smb-browse
Solution 2 :
One of our facebook page follower commented another solution for this issue..
That solution is posted in Red Hat Bugzilla.. According to that post mentioned in Red hat bugzilla, we can solve this issue just by adding single line in /etc/samba/smb.conf file
Note : This change only addresses the 100% CPU usage when opening the Nautilus file browser after a initial boot or reboot. I am not sure what other issues with gvfsd-smb-browse and 100% CPU usage this may impact so your experience may vary.
Step 1 :
Make a back up of your /etc/samba/smb.conf file.
Step 2 :
Using your preferred editor edit the smb.conf file and add the following line below the "[global]" statement
name resolve order = wins lmhosts bcast
Step 3 :
Your file should look like this:
[global]
name resolve order = wins lmhosts bcast
Step 4 :
Save the file and reboot.
This should resolve the 100% CPU usage problem and you should notice
that the "Network" Icon and label should appear in your file browser
much quicker that before.
If you find any changes required to this post or find any typo error please let us know about it.. please drop your comment on our facebook page message box fb.com/opensourceinside
Enable/Disable Backspace as 'Go Back' Shortcut in Firefox
In Firefox on Windows operating system, if you press the `backspace` key, it will take you one page back from current web page, an action that similar to when the both Firefox and IE browser's "Back" button, while `Shift+Backspace` will go forward. The backspace key is mapped to "Back" function in Firefox for Windows is for consistency with Internet Explorer.
On the other hand, Firefox in Linux by default does not map the backspace key to "Go Back" function to improve consistency with other applications running on Linux. Instead, the page will scroll up or down (when pressing Shift+Backspace key together).
The backspace as Back button feature can be easily turned on or off depending on user preference. Thus, Firefox for Windows users can disable the back function mapping to backspace key, and Firefox for Linux can enable the backspace to map to Back function easily, by using the following Firefox preference.
Step 1 :
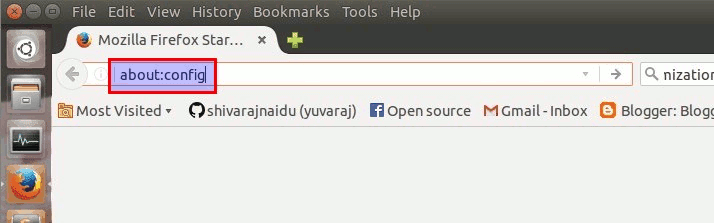
Type about:config and then press Enter key in Firefox Location Box..
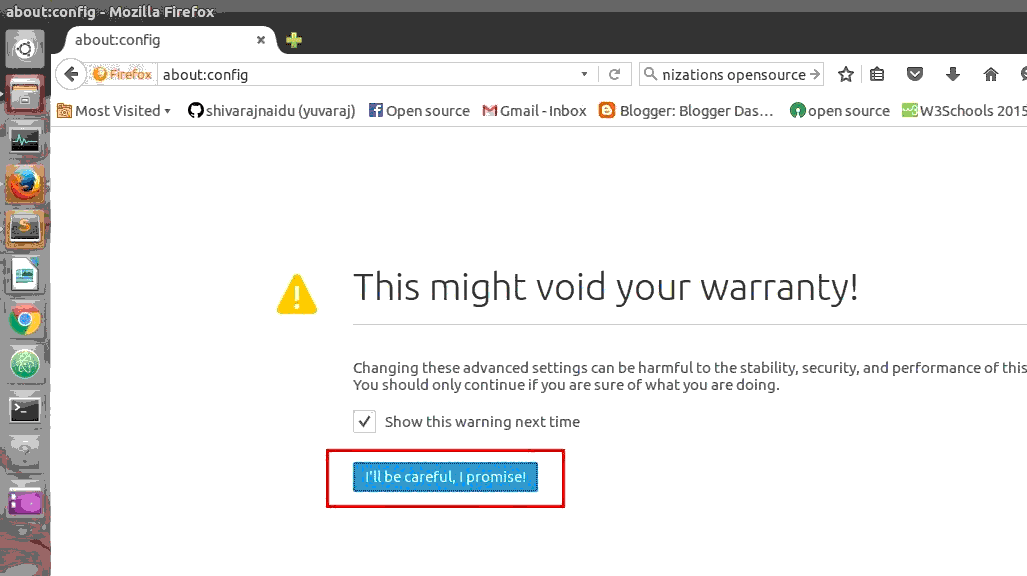
And then confirm the warning message.
Step 2 :
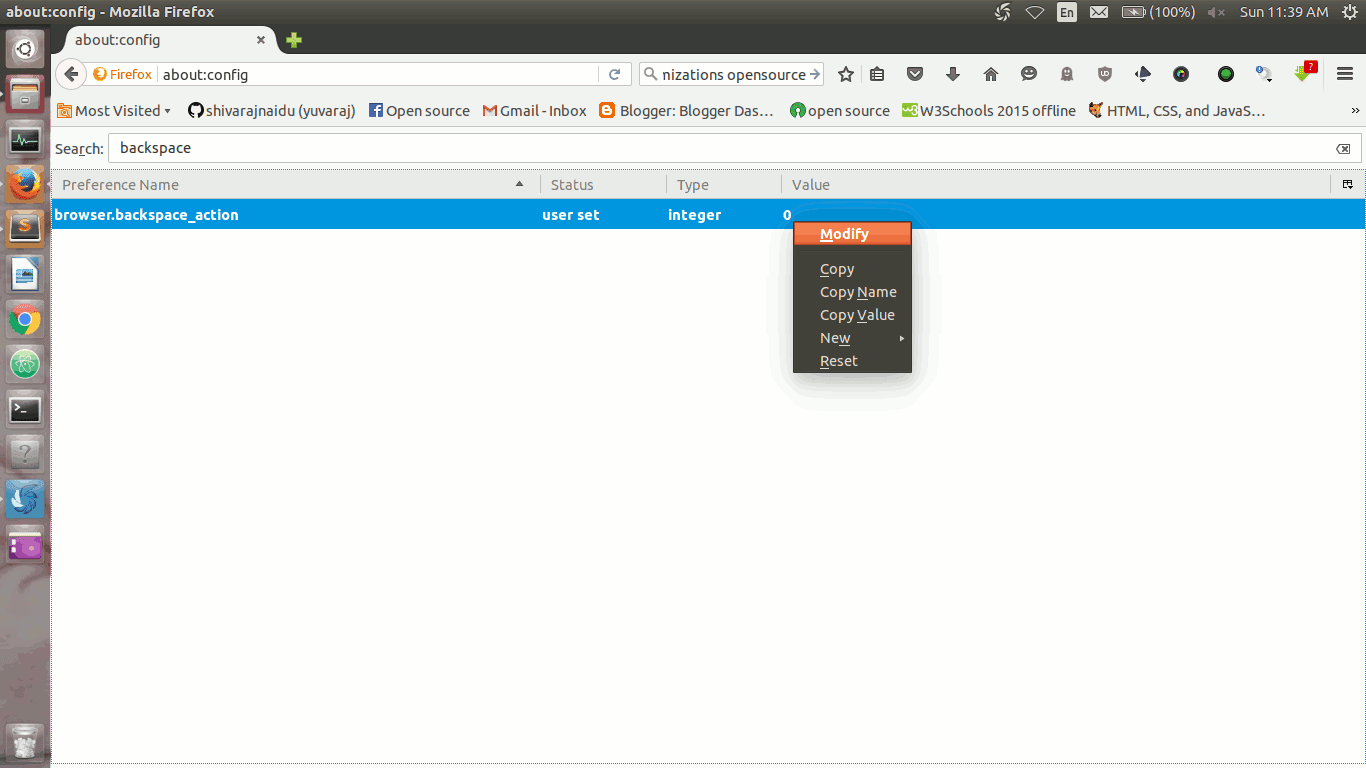
Then type "backspace" in search bar and locate the following preference name: browser.backspace_action
Right click on it ,select "Modify" option
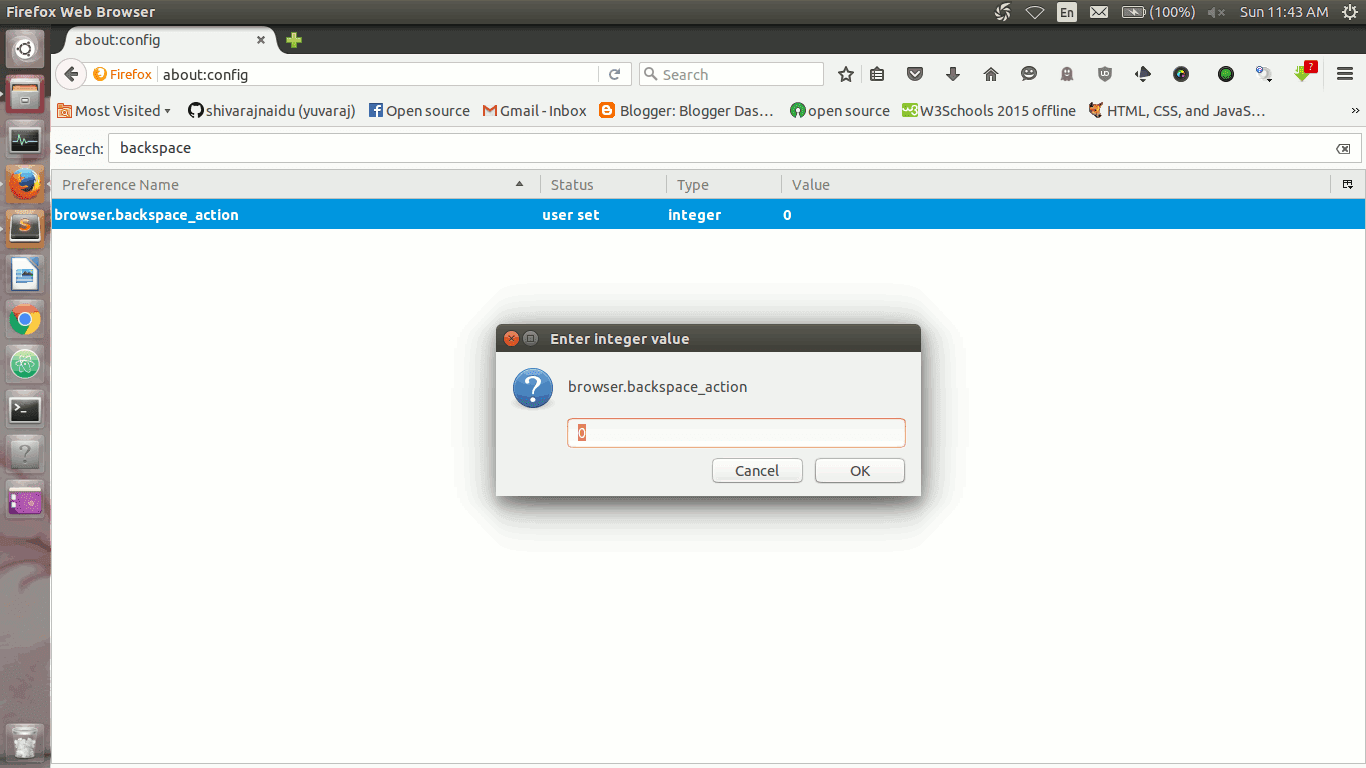
and change the browser.backspace_action value to one of the following values (as per your need):
Set value as 0: If you want to set backspace key as 'Go Back' short cut. (Default in Windows)
Set value as 2: If you want disable Backspace as shortcut for 'Go Back' . (Default in Linux)
Secure Your Linux Box With Proper Service Management (How To Manage Services In Linux)
Managing services are the one of the important job in Linux administration and it's a one of the first thing we need to do ,to harden the security of our Linux system. After installing Linux the first thing you should do is turn off all services and deny all incoming traffic till you configured the box securely.
In general,default installation might run many nonessential services. These services may turn into security risks and also waste hardware resources. So,The best defense is to turn off all unwanted service.
This guide shows you how to enable and disable services in Linux. This is the command line method of enabling and disabling services. Some Linux distributions like Fedora, Ubuntu and so on do provide a GUI front-end as well.
So how do you disable these services so that they are not started at boot time?
The answer to that depends on the type of Linux distribution you are using.
True, many Linux distributions including Ubuntu bundle with them a GUI front end to accomplish the task which makes it easier to enable and disable the system services.
But there is no standard GUI utility common across all Linux distributions. And this makes it worth while to learn how to enable and disable the services via the command line.
Most Linux distributions have one thing in common. That being, all the start-up scripts are stored in the /etc/init.d/ directory.
some Linux distributions such as Slackware use the BSD style of init scripts which are in /etc/rc.d
How to enable and disable services in Red Hat
This method is for RedHat and similar systems Like Fedora and CnetOS. Red Hat, Fedora, and Red Hat based Linux distributions such as CentOS make use of the script called chkconfig to enable and disable the system services running in Linux.
Note : The following methods may or may not be work for newer Linux systems such as Fedora 21 and later , Debian , and Ubuntu 15.x and later. Because Now , Many Linux Systems uses systemd init system to manage services..
See , How to manage services on Linux With systemd
How to enable a service
As an example, lets enable the Apache web server to start in run levels 2, 3, and 5. This is how it is done.
We first add the service using chkconfig script. Then turn on the service at the desired run levels.
chkconfig httpd --add

chkconfig  httpd  on --level 2,3,5
This will enable the Apache web server to automatically start in the run levels 2, 3 and 5. You can check this by running the command
chkconfig --list httpd
How to disable a service
chkconfig httpd off

chkconfig httpd --del
Red Hat/Fedora also have a useful script called service which can be used to start or stop any service. For example, to start Apache web server using the service script, the command is as follows
service httpd start
and to stop the service...
service httpd stop
The options being start, stop and restart which are self explanatory.
How to enable or disable services in Debian / Ubuntu
To Enable and disable services across runlevels in Debian, Ubuntu, and other Debian based Linux distributions we use a script called update-rc.d.
How to enable a service
As an example, to enable Apache web server in Debian, do the following
update-rc.d apache2 defaults
... this will enable the Apache web server to start in the default run levels of 2,3,4 and 5. Of course, you can do it explicitly by giving the run levels instead of the defaults keyword as follows:
The above command modifies the sym-links in the respective /etc/rcX.d directories to start or stop the service in the destined runlevels. Here X stands for a value of 0 to 6 depending on the runlevel. One thing to note here is the dot (.) which is used to terminate the set which is important. Also 20 and 80 are the sequence codes which decides in what order of precedence the scripts in the /etc/init.d/ directory should be started or stopped.
To enable the service only in runlevel 5, you do this instead
To disable the service in all the run levels, you execute the command:
update-rc.d -f apache2 remove
Here -f option which stands for force is mandatory.
How to enable or disable services in Gentoo
Gentoo Linux also uses a script to enable or disable services during boot-up. The name of the script is rc-update. Gentoo has three default run levels. They are -
boot
default
nonetwork
How to enable a service
Lets set Apache web server to start in the default runlevel.
rc-update add apache2 default
How to disable a service
To remove the web server, use the del option as follows.
rc-update del apache2
List all running services
To list all the running services at your run level and check their status, you use the rc-status command.
rc-status --all
How to enable and disable services manually
I remember the first time I started using Linux, there were no such scripts to aid the user in enabling or disabling the services during start-up.
You did it the old fashioned way which was creating or deleting symbolic links in the respective /etc/rcX.d/ directories. Here X in rcX.d is a number which stands for the runlevel.
As an example, here is a listing of all the services started in runlevel 5 in my PC running Ubuntu.
As you can see, all the content in the /etc/rc5.d directory are symbolic links pointing to the corresponding script in the /etc/init.d directory.
There can be two kinds of symbolic links in the /etc/rcX.d/ directories.
One starts with the character 'S' followed by a number between 0 and 99 to denote the priority, followed by the name of the service you want to enable.
The second kind of symlink has a name which starts with a 'K' followed by a number and then the name of the service you want to disable.
So in any /etc/rcX.d directory, at any given time, for each service, there should be only one symlink of the 'S' OR 'K' variety but not both.
So coming back to our Apache example, suppose I want to enable Apache web server in the run level 5 but want to disable it in all other run levels, I do the following:
First to enable the service for run level 5, I move into /etc/rc5.d/ directory and create a symlink to the apache service script residing in the /etc/init.d/ directory as follows:
cd /etc/rc5.d/

ln -s /etc/init.d/apache2 S20apache2
This creates a symbolic link in the /etc/rc5.d/ directory which the system interprets as - start (S) the apache service before all the services which have a priority number greater than 20.
If you do a long listing of the directory /etc/rc5.d in your system, you can find a lot of symlinks similar to the one below.
Now if I start a service, I will want to stop the service while rebooting or while moving to single user mode and so on. So in those run levels I have to create the symlinks starting with character 'K'.
So going back to the apache2 service example, if I want to automatically stop the service when the system goes into run level 0, 1 or 6, I will have to create the symlinks in the /etc/rc0.d, /etc/rc1.d/, /etc/rc6.d/ directories as follows
cd /etc/rc0.d

ln -s /etc/init.d/apache2 K80apache2
One interesting aspect here is the priority. Lower the number, the higher is the priority.
So since the starting priority of apache2 is 20 - that is apache starts way ahead of other services during startup, we give it a stopping priority of 80.
There is no hard and fast rule for this but usually, you follow the formula as follows:
If you have 'N' as the priority number for starting a service, you use the number (100-N) for the stopping priority number and vice versa.
Managing services with systemd
Systemd is one of the most controversial projects in Linux-land , and As of 2015, many Linux distributions have adopted systemd as their default init system.
It has been—or is being—adopted by Linux distributions from Fedora and OpenSuSE to Ubuntu, Debian, and even Arch Linux.
So , It's important to learn systemd way of managing services on Linux . I have wrote one seperate post on "How to manage services on Linux With systemd"
How To Upgrade Linux Kernel on Supported Ubuntu Releases and Its Derivatives To Ububntu 16.04 's Kernel (linux 4.4.X)
You may know that we can get latest stable kernel on Ubuntu from point release( or
LTSEnablementStack) which is released by Ubuntu for every 6 moths.
The Ubuntu LTS enablement stacks provide newer kernel and X support for existing LTS releases. These can be installed manually, or are automatically shipped if installing from point releases like.. 12.04.2/14.04.2 and newer release media.
Brand new hardware devices are released to the public always more frequently. And we want such hardware to be always working on Ubuntu, even if it has been released after an Ubuntu release. Six months (the time it takes for a new Ubuntu release to be made) is a very long period in the IT field. Hardware Enablement (HWE) is about that: catching up with the newest hardware technologies.
The 12.04.x , 14.04.x and newer point release will ship with an updated kernel and X stack by default. If you have installed with older media you can use the following to install the newer HWE kernel derived from Ubuntu 16.04 (XenialXerus):
Now run the following command to install linux kernel 4.4 which is provided by Ubuntu as HWE stack
sudo apt-get install linux-generic-lts-xenial
Now package manager will ask for your confirmation ..that whether you want to continue or you want to abort installation process..
So, give Y (yes) and press Enter
That's it ,,, Now you have system installed with 16.04 's kernel (Linux kernel 4.4)
If you encounter any issues after installing this kernel .. you can easily un-install this kernel.
Run the following command to un install the kernel that you have installed just before.
Systemd is now used by default in most Linux distributions, from Fedora and Red Hat to Ubuntu, Debian, openSUSE, and Arch. The systemctl command allows you to get information about systemd's status and control running services.
Despite the controversy, this at least introduces some standardization across Linux distributions. The same commands will allow you to manage services in the same way on any Linux distribution using systemd.
Note: To modify your system configuration on Linux distribution like Ubuntu that uses sudo, you'll need to prefix the commands here with sudo. On other Linux distributions, you'll need to become the root user with the su command first.
What's Systemd ?
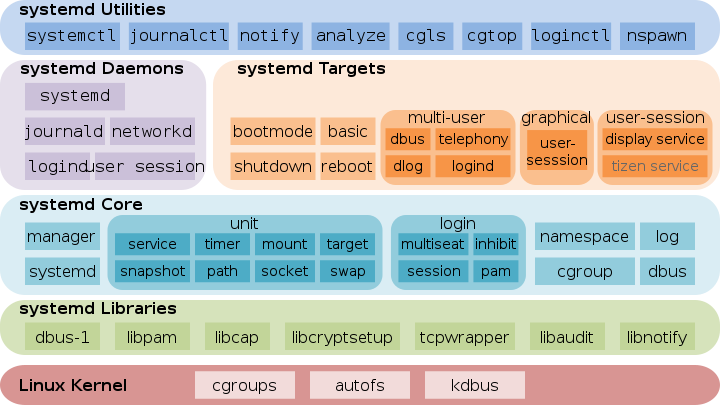
systemd is a system and service manager for Linux, compatible with SysV and LSB init scripts.
systemd
Provides aggressive parallelization capabilities
Uses socket and D-Bus activation for starting services
Offers on-demand starting of daemons
Implements transactional dependency-based service control logic
Tracks processes using Linux cgroups
Supports snapshotting and restoring
Maintains mount and automount points
Check If Your Linux System Is Using Systemd
If you're not sure whether your Linux distribution is using systemd, open a Terminal window and run the following command. This shows you the version number of systemd on your Linux system, if it does have systemd installed:
systemctl is the main tool used to introspect and control the state of the "systemd" system and service manager. You can use systemctl for instance to enable/disable services permanently or only for the current session.See man systemctl for more details.
Tip:
You can use all of the following systemctl commands with the -H user@host switch to control a systemd instance on a remote machine. This will use SSH to connect to the remote systemd instance.
systemadm is the official graphical frontend for systemctl. It is provided by systemd-ui from the official repositories or by systemd-ui-gitAUR from the AUR for the development version.
Plasma users can install systemd-kcm as a graphical fronted for systemctl. After installing the module will be added under System administration.
Analyze the Boot Process
The systemd-analyze command allows you to view information about your boot process, such as how long it took and which services (and other processes) added the most time to the boot process.
To view information about the startup process in general, run this command:
systemd-analyze
To view how long each process took to start, run this command:
systemd-analyze blame
Analyzing the system state
Show system status using:
systemctl status
Using units
Systemd uses "units", which can be services (.service), mount points (.mount), devices (.device), or sockets (.socket). The same systemctl command manages all these types of units.
List running units:
systemctl or:systemctl list-units
List failed units:
systemctl --failed
To view all available unit files on your system:
The available unit files can be seen in /usr/lib/systemd/system/ and
/etc/systemd/system/ (the latter takes precedence).
List installed unit files with:
systemctl list-unit-files
Managing services with systemd
To view a list of enabled and disabled services, you use the same systemctl command as above, but tell it to only list services:
systemctl list-unit-files --type=service
List all running services:
systemctl
Note:
When using systemctl, you generally have to specify the complete name of the unit file, including its suffix, for example sshd.socket. There are however a few short forms when specifying the unit in the following systemctl commands:
If you do not specify the suffix, systemctl will assume .service. For example, netctl and netctl.service are equivalent.
Mount points will automatically be translated into the appropriate .mount unit. For example, specifying /home is equivalent to home.mount.
Similar to mount points, devices are automatically translated into the appropriate .device unit, therefore specifying /dev/sda2 is equivalent to dev-sda2.device.
Activates the service named "example1" immediately:
systemctl start example1
Deactivates the service "example1" immediately:
systemctl stop example1
Restarts the service "example1" immediately:
systemctl restart example1
Shows status of the service "example1":
systemctl status example1
Enables "example1" to be started on bootup:
systemctl enable example1
Disables "example1" to not start during bootup:
systemctl disable example1
Power management using Systemd
polkit is necessary for power management as an unprivileged user. If you are in a local systemd-logind user session and no other session is active, the following commands will work without root privileges. If not (for example, because another user is logged into a tty), systemd will automatically ask you for the root password.
Shut down and reboot the system:
systemctl reboot
Shut down and power-off the system:
systemctl poweroff
Suspend the system:
systemctl suspend
Put the system into hibernation:
systemctl hibernate
Put the system into hybrid-sleep state (or suspend-to-both):
How To Move Unity Launcher To The Bottom Of The Screen ( In Ubuntu 16.04 )
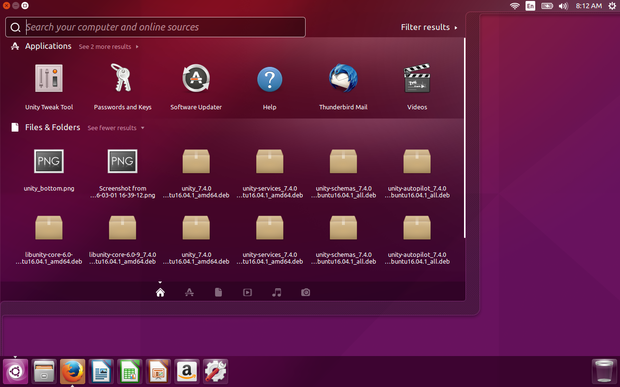
Screen Shot : Ubuntu 16.04 launcher moved to bottom of the screen
Finally the default Unity Desktop’s left launcher panel can be moved to the bottom of screen in Ubuntu 16.04 LTS Xenial Xerus. Ubuntu 16.04 has reached its final beta. One of the great new features is that the left launcher panel now is movable: to Left or to Bottom.
However, the 'option' to change position is buried deep in the geeky depths of dconf-editor it is the one change that everyone is talking about.
At present, you can change Unity Launcher position in following two ways:
Method 1: Command line way
For those prefer Linux commands, this can be done via a single command in terminal:
Open a terminal (Ctrl+Alt+T) and use the following commands accordingly:
Move the Unity Launcher to bottom:
gsettings set com.canonical.Unity.Launcher launcher-position Bottom
Move the Unity Launcher back to left:
gsettings set com.canonical.Unity.Launcher launcher-position Left
For graphical way, do:
1.You need dconf-editor to do this in GUI way.. so install dconf-editor with following command .
sudo apt-get install dconf-editor
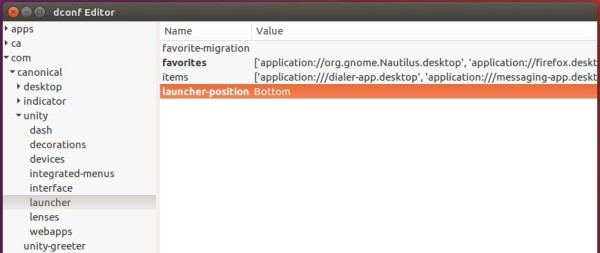
2. Launch dconf editor after installation, and navigate to "com -> canonical -> unity -> launcher". Finally change the value of “launcher-position” to select Unity Launcher position.
To make the bottom panel fit your screen, go to System Settings -> Appearance and change the value of Launcher icon size.
The change takes into effect immediately. No need for a restart or even closing the dconf editor.
UbuntuBSD (Ubuntu Linux + BSD)
The Brand New Open Source OS To Bring The Two Super Powers Together Into Single OS.
BSD -- the open source, Unix-like operating system kernel that lives in Linux's shadow -- is now coming to the Ubuntu world, thanks to a new open source project called UbuntuBSD.
For the uninitiated, here's the BSD back story: Created starting in the late 1970s (originally as an enhanced version of AT&T's Unix operating system, then as a complete replacement for it) at the University of California, Berkeley, BSD was one of the first freely redistributable operating systems. Then, in the 1990s, for various complicated reasons -- largely but not solely related to legal challenges -- BSD took a back seat to other free operating systems that were based on GNU software and the then-new Linux kernel.
A handful of BSD-based systems have survived into the present: FreeBSD, NetBSD and OpenBSD and so on... But they haven't been nearly as influential, within either the server or desktop markets, as GNU/Linux systems.
Now, a group of programmers wants to combine one of the most popular GNU/Linux distributions, Canonical's Ubuntu, with BSD by developing a new operating system called (plainly enough) UbuntuBSD (also dubbed as "UNIX for Human Beings" on social ntworks). The idea is to deliver "the ease and familiarity of Ubuntu with the rock-solid stability and performance of the FreeBSD kernel," according to the project.
The idea is to deliver ,
The ease and familiarity of Ubuntu with the rock-solid stability and performance of the FreeBSD kernel
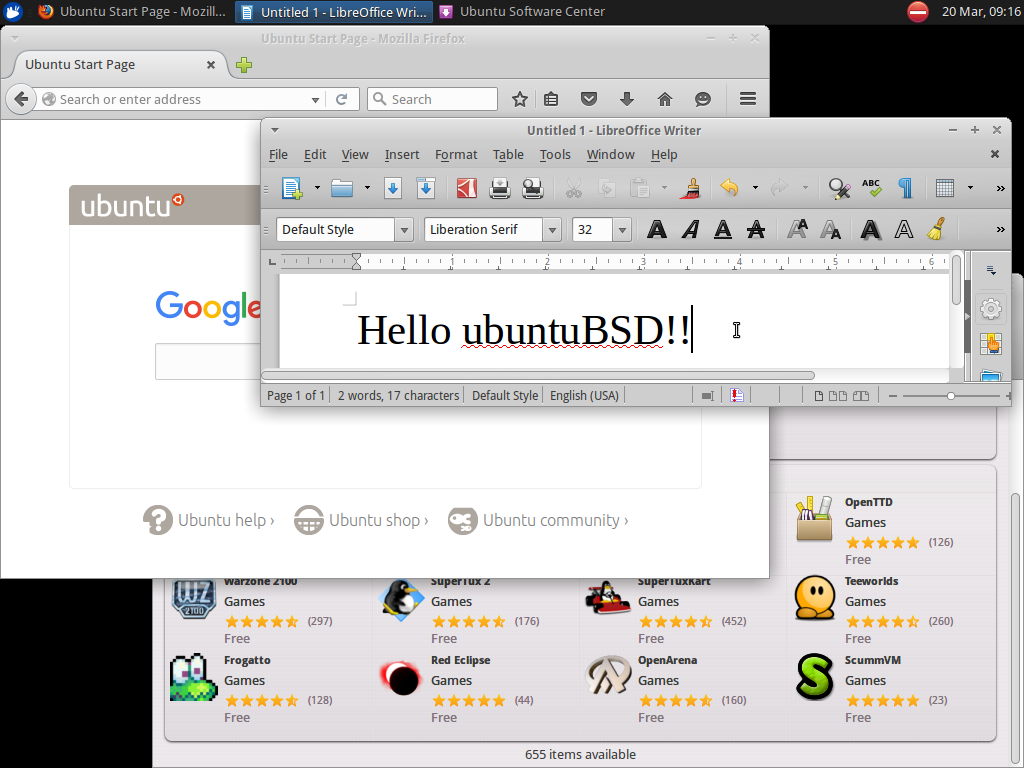
Actually, UbuntuBSD probably won't look too much like Ubuntu to most users. That's because it runs Xfce as its default interface, rather than Unity, the one that ships with Ubuntu. So UbuntuBSD is more like the Ubuntu backend combined with a BSD kernel (specifically, the project is using the FreeBSD kernel) and an alternative interface.
But we're guessing most users won't mind much, especially since Xfce is popular with users who want a desktop interface that is less resource intensive than options like Unity and GNOME, but still looks pretty and delivers extensive functionality.
UbuntuBSD has seen nearly 5,000 downloads already, even though developers warn that it remains in beta form and is not yet ready for production use in all cases.
Look @ UbuntuBSD
In the short term, it's unlikely that UbuntuBSD will see much of a following beyond a certain community of power users who want to experiment with a new open source OS. But the project does provide novel opportunities for integrating the extensive software ecosystem that surrounds Ubuntu with a kernel that offers some features not present in Linux -- not to mention more liberal licensing terms, since the FreeBSD kernel does not use the GNU GPL license. That could lead not just to a new type of desktop OS, but also new server or cloud solutions, down the road.